1983 Ford Bronco
| Owner: |
michael collins |
| From: |
North Highlands, CA, U.S.A. (Other registries in CA) |
| Year, Make, & Model: |
1983 Ford Bronco (Other Ford Broncos) |
| Avatar: |
 |
| Clubs: |
FullSizeBronco.com (Other vehicles in this club)
|
| Nickname: |
Jezebel |
| Mileage: |
81000 |
| Engine: |
I6-1992 EFI motor swap (currently under way) 3G swap |
| Drivetrain: |
It is mostly stock with a 8" lift. I replace the front axle pivet mount bracket and all the rubber bushings to poly. I regeared the 8.8 with 4:56 and an Auburn differential. I complete a rear shackle flip (sky products) and a belltech drop bracket to add more lift. I replaced the stock rubber body mounts for poly and added a 3" body lift. Added 40X17 supper mudder gumbo tires on 15"X12" wagon wheels |
| Notes: |
The cam shaft went flat and started to chatter real bad. i got a 1992 F150 and swapping the motor and goodies over to Jezebel. Updates listed below |
| Last Updated: |
8/26/2008 |
| Hits: |
455611 |
| Folder |
 |
 |
 |
Hits |
 |
Created |
Updated |
 example example | 8 | 0 | 0 | 15,394 | 0 | 4/23/05 | 12/19/06 | | Top slider window latches | 5 | 0 | 0 | 2,408 | 0 | 8/13/06 | 8/13/06 | | The Drunk | 12 | 0 | 0 | 6,028 | 0 | 11/14/06 | 11/14/06 | | Other Vehicles | 0 | 0 | 0 | 0 | 0 | 5/17/05 | 5/16/08 | | 1993 Chevy Sunurban 4X4 | 18 | 0 | 0 | 9,068 | 0 | 12/31/06 | 12/31/06 | | Back-up Swtich | 4 | 0 | 0 | 1,853 | 0 | 2/22/07 | 2/22/07 | | Belt Pulleys | 12 | 0 | 0 | 16,984 | 0 | 1/3/08 | 1/3/08 | | Coil | 2 | 0 | 0 | 1,029 | 0 | 5/17/08 | 5/17/08 | | Door Hinge | 1 | 0 | 0 | 448 | 0 | 5/29/08 | 5/29/08 | | Front Brakes | 5 | 0 | 0 | 2,881 | 0 | 5/16/08 | 5/16/08 | | Fuel Filter | 4 | 0 | 0 | 1,949 | 0 | 4/2/07 | 4/2/07 | | Fuel pump | 15 | 0 | 0 | 7,240 | 0 | 5/16/07 | 5/29/08 | | heat and ac | 15 | 0 | 0 | 20,361 | 0 | 3/1/07 | 5/16/07 | | head light switch | 6 | 0 | 0 | 3,071 | 0 | 3/13/07 | 5/17/08 | | Jack Issue | 4 | 0 | 0 | 1,897 | 0 | 7/3/07 | 7/3/07 | | Looks and safety | 2 | 0 | 0 | 881 | 0 | 5/17/08 | 5/17/08 | | MAP sensor | 2 | 0 | 0 | 1,027 | 0 | 5/19/08 | 5/19/08 | | O2 | 3 | 0 | 0 | 1,861 | 0 | 5/17/08 | 5/17/08 | | Plugs And wires | 18 | 0 | 0 | 7,975 | 0 | 4/10/07 | 12/27/07 | | Power Mirror Replacement | 10 | 0 | 0 | 4,373 | 0 | 10/8/07 | 10/8/07 | | P/S Pump replacement | 12 | 0 | 0 | 6,493 | 0 | 1/4/08 | 1/4/08 | | Radio | 128 | 0 | 0 | 68,415 | 0 | 2/16/07 | 2/4/08 | | Raditor | 35 | 0 | 0 | 18,982 | 0 | 6/9/07 | 6/9/07 | | Seats | 7 | 0 | 0 | 3,176 | 0 | 2/16/07 | 2/16/07 | | IAC | 5 | 0 | 0 | 2,990 | 0 | 7/7/08 | 7/7/08 | | Coolent temp sensor | 6 | 0 | 0 | 2,727 | 0 | 7/7/08 | 7/7/08 | | 1992 GMS Safari | 23 | 0 | 0 | 19,425 | 0 | 5/17/05 | 8/23/06 | | 1986 Mustang Convertable | 0 | 0 | 0 | 0 | 0 | 7/13/08 | 7/13/08 | | Electric fan | 6 | 0 | 0 | 2,703 | 0 | 7/13/08 | 7/13/08 | | Seats | 1 | 0 | 0 | 479 | 0 | 7/13/08 | 7/13/08 | | 1982 Motorhome | 30 | 0 | 0 | 24,077 | 0 | 7/23/07 | 7/25/07 | | 502 motor pictures | 7 | 0 | 0 | 3,506 | 0 | 11/13/07 | 11/13/07 | | Aqua Magic Swap | 25 | 0 | 0 | 10,632 | 0 | 12/26/07 | 12/26/07 | | Battery Clean up | 6 | 0 | 0 | 2,735 | 0 | 6/10/08 | 6/10/08 | | Belts | 1 | 0 | 0 | 458 | 0 | 5/17/08 | 5/17/08 | | Cabinet Repair | 15 | 0 | 0 | 6,505 | 0 | 11/13/07 | 11/14/07 | | Dinette Upgrade | 4 | 0 | 0 | 1,853 | 0 | 11/13/07 | 11/13/07 | | Electric Fan swap Ford Tarus | 1 | 0 | 0 | 484 | 0 | 11/13/07 | 2/4/08 | | Exhaust | 52 | 0 | 0 | 33,145 | 0 | 7/9/08 | 8/26/08 | | Front Airbag replacement | 15 | 0 | 0 | 7,863 | 0 | 11/13/07 | 11/14/07 | | Front Bunk Fix | 14 | 0 | 0 | 5,903 | 0 | 11/13/07 | 11/13/07 | | Ignition cleanup | 5 | 0 | 0 | 2,208 | 0 | 6/10/08 | 6/10/08 | | Inside shots | 2 | 0 | 0 | 891 | 0 | 11/13/07 | 11/13/07 | | License Plate repair | 5 | 0 | 0 | 2,268 | 0 | 11/14/07 | 7/9/08 | | Mirror Cleanup | 4 | 0 | 0 | 1,751 | 0 | 6/10/08 | 7/9/08 | | Roof Repair | 14 | 0 | 0 | 5,809 | 0 | 12/27/07 | 12/27/07 | | Safe | 3 | 0 | 0 | 1,634 | 0 | 6/18/08 | 6/18/08 | | Windshield pump swap | 6 | 0 | 0 | 3,037 | 0 | 5/30/08 | 5/30/08 | | 1982 Yamaha G1 Golf Cart | 12 | 0 | 0 | 13,801 | 0 | 7/7/08 | 7/7/08 | | Wiring Clean up | 23 | 0 | 0 | 9,510 | 0 | 7/9/08 | 7/10/08 | | Rear Seat | 5 | 0 | 0 | 2,241 | 0 | 7/13/08 | 8/26/08 | | Motor | 4 | 0 | 0 | 1,959 | 0 | 7/13/08 | 7/13/08 | | Horn Install | 8 | 0 | 0 | 4,117 | 0 | 8/9/08 | 8/9/08 | | Lights | 19 | 0 | 0 | 8,296 | 0 | 8/22/08 | 8/26/08 | | 1981 Mustang | 3 | 0 | 0 | 1,851 | 0 | 5/17/05 | 5/17/05 | | 1967 Galaxie500 | 19 | 0 | 0 | 9,842 | 0 | 8/26/05 | 8/26/05 | | 1960 Chevy Pickup | 10 | 0 | 0 | 5,734 | 0 | 5/17/05 | 8/23/06 | | Yamaha 50 | 5 | 0 | 0 | 2,401 | 0 | 9/14/05 | 9/14/05 | | Trailer | 40 | 0 | 0 | 19,331 | 0 | 5/17/05 | 7/3/07 | | welding projects | 8 | 0 | 0 | 5,291 | 0 | 1/6/06 | 8/6/06 | | Welding Cart | 5 | 0 | 0 | 6,569 | 0 | 8/13/06 | 8/13/06 | | Garage Shelf | 1 | 0 | 0 | 396 | 0 | 7/3/07 | 7/3/07 | | Shop Press Dolly | 11 | 0 | 0 | 5,285 | 0 | 8/23/06 | 8/23/06 | | Bruce 89 bronco 3" body lift | 18 | 0 | 0 | 10,811 | 0 | 12/28/06 | 12/28/06 | | engine puller handle | 2 | 0 | 0 | 837 | 0 | 5/15/07 | 5/15/07 | | Shed Move | 25 | 0 | 0 | 10,383 | 0 | 5/23/07 | 5/23/07 | | New house | 24 | 0 | 0 | 10,423 | 0 | 5/23/07 | 6/6/07 | | Name That Tool | 2 | 0 | 0 | 943 | 0 | 7/3/07 | 7/3/07 | | Cooking Gadgets | 0 | 0 | 0 | 0 | 0 | 12/27/07 | 12/27/07 | | KitchenAid Mixer 620 | 8 | 0 | 0 | 3,321 | 0 | 12/27/07 | 12/27/07 | | F550 Tow Truck | 8 | 0 | 0 | 7,443 | 0 | 1/28/08 | 1/28/08 | | Body | 0 | 0 | 0 | 0 | 0 | 8/23/05 | 8/23/05 | | Exterior | 0 | 0 | 0 | 0 | 0 | 10/15/06 | 10/15/06 | | 3" Body Lift | 40 | 0 | 0 | 25,312 | 0 | 10/11/06 | 12/3/06 | | Bumpers | 0 | 0 | 0 | 0 | 0 | 10/11/06 | 10/15/06 | | Front | 64 | 0 | 0 | 27,060 | 0 | 10/11/06 | 12/28/06 | | Rear | 22 | 0 | 0 | 8,942 | 0 | 10/11/06 | 12/5/06 | | Cowl | 16 | 0 | 0 | 8,164 | 0 | 10/15/06 | 10/15/06 | | Floorboard Repair | 1 | 0 | 0 | 492 | 0 | 11/1/06 | 11/1/06 | | Electrical | 0 | 0 | 0 | 0 | 0 | 10/31/06 | 10/31/06 | | Running light Issue | 12 | 0 | 0 | 5,046 | 0 | 10/15/06 | 10/31/06 | | Power Take off tap | 3 | 0 | 0 | 2,263 | 0 | 10/31/06 | 1/16/07 | | License Plate light | 16 | 0 | 0 | 6,988 | 0 | 10/31/06 | 11/3/06 | | Tailgate Electrical | 6 | 0 | 0 | 2,843 | 0 | 11/3/06 | 11/3/06 | | 92 tail light swap | 5 | 0 | 0 | 2,996 | 0 | 11/5/06 | 11/5/06 | | Gas Tank | 5 | 0 | 0 | 2,256 | 0 | 10/15/06 | 11/6/06 | | Gas tank swap | 46 | 0 | 0 | 24,363 | 0 | 2/16/07 | 7/4/07 | | Lightbar | 11 | 0 | 0 | 6,899 | 0 | 10/17/06 | 12/28/06 | | Mud Flaps | 12 | 0 | 0 | 7,725 | 0 | 1/18/06 | 11/6/06 | | Paint | 26 | 0 | 0 | 11,095 | 0 | 10/15/06 | 11/6/06 | | Removable Top | 17 | 0 | 0 | 13,053 | 0 | 10/15/06 | 2/13/07 | | Roof | 1 | 0 | 0 | 470 | 0 | 10/15/06 | 10/15/06 | | Roof Rack | 10 | 0 | 0 | 7,942 | 0 | 10/17/06 | 12/29/06 | | Steps | 2 | 0 | 0 | 884 | 0 | 11/3/06 | 11/3/06 | | Tailgate | 0 | 0 | 0 | 0 | 0 | 10/17/06 | 10/17/06 | | Inspection Panel | 11 | 0 | 0 | 5,172 | 0 | 10/17/06 | 12/15/06 | | Rear Window Motor Repair | 13 | 0 | 0 | 14,631 | 0 | 10/17/06 | 10/17/06 | | Tailgate Latch | 2 | 0 | 0 | 1,156 | 0 | 11/8/06 | 11/8/06 | | Interior | 0 | 0 | 0 | 0 | 0 | 9/7/05 | 12/15/06 | | After market guages | 31 | 0 | 0 | 14,420 | 0 | 10/18/06 | 11/3/06 | | Dome Light | 5 | 0 | 0 | 2,315 | 0 | 11/3/06 | 11/3/06 | | Factory Tac Install | 8 | 0 | 0 | 6,603 | 0 | 10/18/06 | 11/3/06 | | Heating & Cooling | 0 | 0 | 0 | 0 | 0 | 10/26/06 | 10/26/06 | | Heater Box Swap | 53 | 0 | 0 | 25,796 | 0 | 10/26/06 | 11/3/06 | | Climate Control Panel swap | 29 | 0 | 0 | 16,067 | 0 | 10/26/06 | 11/8/06 | | Pedal Covers | 9 | 0 | 0 | 5,230 | 0 | 10/26/05 | 10/18/06 | | Roll Cage | 19 | 0 | 0 | 12,513 | 0 | 10/17/06 | 11/7/06 | | Seats and Seat Belts | 23 | 0 | 0 | 10,099 | 0 | 10/26/06 | 12/28/06 | | Low fuel Light | 14 | 0 | 0 | 6,270 | 0 | 1/16/07 | 3/16/07 | | Trips and Travels | 28 | 0 | 0 | 13,579 | 0 | 1/1/06 | 1/1/06 | | Current Picture of the bronco | 5 | 0 | 0 | 3,331 | 0 | 1/6/06 | 6/9/07 | | Custom Tools | 0 | 0 | 0 | 0 | 0 | 8/13/06 | 8/13/06 | | Radius Arm wrench | 2 | 0 | 0 | 923 | 0 | 8/13/06 | 8/13/06 | | Window motor Tester | 5 | 0 | 0 | 3,194 | 0 | 8/20/06 | 8/20/06 | | C-Press | 1 | 0 | 0 | 499 | 0 | 11/9/06 | 11/9/06 | | Work Bench Dolly | 3 | 0 | 0 | 1,468 | 0 | 12/28/06 | 12/28/06 | | Air Compressor | 11 | 0 | 0 | 4,921 | 0 | 2/8/07 | 2/8/07 | | Pressure Washer | 3 | 0 | 0 | 1,347 | 0 | 3/1/07 | 3/1/07 | | Scaffold | 1 | 0 | 0 | 527 | 0 | 10/12/07 | 10/12/07 | | Band Saw | 4 | 0 | 0 | 2,100 | 0 | 2/26/08 | 2/26/08 | | Drivetrain | 0 | 0 | 0 | 0 | 0 | 10/11/06 | 10/11/06 | | Axles | 0 | 0 | 0 | 0 | 0 | 10/27/06 | 10/27/06 | | Front Axle | 0 | 0 | 0 | 0 | 0 | 10/27/06 | 10/27/06 | | TTB Dana 44HP | 0 | 0 | 0 | 0 | 0 | 10/27/06 | 10/27/06 | | Ball Joints | 18 | 0 | 0 | 8,434 | 0 | 10/27/06 | 11/9/06 | | Brakes | 17 | 0 | 0 | 8,245 | 0 | 10/27/06 | 11/9/06 | | Camber Bushings | 16 | 0 | 0 | 12,739 | 0 | 10/27/06 | 12/28/06 | | Extended Radius arms | 28 | 0 | 0 | 18,142 | 0 | 5/3/06 | 12/29/06 | | Center Carrier | 14 | 0 | 0 | 6,161 | 0 | 10/27/06 | 11/3/06 | | Hub Swap | 11 | 0 | 0 | 4,517 | 0 | 10/27/06 | 12/28/06 | | Pivot Bushings | 8 | 0 | 0 | 10,593 | 0 | 10/27/06 | 11/9/06 | | Radius Arm spacer | 3 | 0 | 0 | 1,896 | 0 | 11/9/06 | 12/28/06 | | Springs | 22 | 0 | 0 | 12,193 | 0 | 11/1/06 | 11/9/06 | | Steering Stablizer | 18 | 0 | 0 | 9,574 | 0 | 10/27/06 | 11/9/06 | | SwayBar | 13 | 0 | 0 | 7,927 | 0 | 10/27/06 | 11/7/06 | | TTB Mounts | 0 | 0 | 0 | 0 | 0 | 10/27/06 | 10/27/06 | | Super Lift 4" lift | 7 | 0 | 0 | 3,392 | 0 | 10/27/06 | 11/9/06 | | Sky Jacker Class II TTB drop mounts | 26 | 0 | 0 | 19,562 | 0 | 8/23/05 | 10/27/06 | | Rear Axle | 0 | 0 | 0 | 0 | 0 | 10/27/06 | 12/19/06 | | Ford 8.8 | 0 | 0 | 0 | 0 | 0 | 10/27/06 | 10/27/06 | | 3.55 gears | 12 | 0 | 0 | 4,585 | 0 | 10/27/06 | 10/30/06 | | 4.56 gears | 12 | 0 | 0 | 5,754 | 0 | 10/27/06 | 11/7/06 | | Axle Vent | 3 | 0 | 0 | 2,096 | 0 | 10/27/06 | 10/27/06 | | Brakes | 29 | 0 | 0 | 13,642 | 0 | 10/27/06 | 10/30/06 | | Shackle Flip | 55 | 0 | 0 | 41,094 | 0 | 11/1/06 | 11/7/06 | | Shocks | 2 | 0 | 0 | 864 | 0 | 11/1/06 | 11/1/06 | | Springs | 17 | 0 | 0 | 9,307 | 0 | 11/1/06 | 12/28/06 | | Dana 60 | 5 | 0 | 0 | 2,321 | 0 | 11/7/06 | 11/7/06 | | Factory shim blocks | 2 | 0 | 0 | 1,074 | 0 | 12/28/06 | 12/28/06 | | Drive Shaft | 0 | 0 | 0 | 0 | 0 | 10/27/06 | 10/27/06 | | Front Drive shaft | 0 | 0 | 0 | 0 | 0 | 10/27/06 | 10/27/06 | | Rear Drive shaft | 31 | 0 | 0 | 15,888 | 0 | 10/27/06 | 11/7/06 | | Electrical | 0 | 0 | 0 | 0 | 0 | 10/30/06 | 10/30/06 | | 2G Alternator | 3 | 0 | 0 | 1,672 | 0 | 10/30/06 | 12/28/06 | | 3G Alternator Swap | 34 | 0 | 0 | 31,532 | 0 | 10/30/06 | 11/3/06 | | Battery and Dual Battery | 22 | 0 | 0 | 9,975 | 0 | 10/30/06 | 11/9/06 | | Dura Spark II swap | 7 | 0 | 0 | 5,298 | 0 | 10/30/06 | 10/31/06 | | Exhaust | 16 | 0 | 0 | 7,446 | 0 | 10/31/06 | 11/7/06 | | Motor | 0 | 0 | 0 | 0 | 0 | 10/31/06 | 10/31/06 | | 4.9 Carburetor Motor | 0 | 0 | 0 | 0 | 0 | 10/31/06 | 10/31/06 | | Emissions | 31 | 0 | 0 | 25,331 | 0 | 10/31/06 | 12/28/06 | | Lifter replacement | 8 | 0 | 0 | 3,844 | 0 | 10/31/06 | 10/31/06 | | Sagnaw Power Steering Pump Swap | 9 | 0 | 0 | 4,153 | 0 | 10/31/06 | 11/7/06 | | Motor | 19 | 0 | 0 | 10,029 | 0 | 10/31/06 | 11/6/06 | | Carburetor | 13 | 0 | 0 | 9,432 | 0 | 10/31/06 | 10/31/06 | | 1992 EFI 4.9 Swap | 0 | 0 | 0 | 0 | 0 | 10/31/06 | 10/31/06 | | The donor truck | 63 | 0 | 0 | 32,943 | 0 | 11/4/06 | 2/27/07 | | Motor Prep | 63 | 0 | 0 | 37,216 | 0 | 12/23/06 | 7/4/07 | | Wiring Harness conversion | 41 | 0 | 0 | 21,882 | 0 | 1/16/07 | 6/10/08 | | EEC Install | 17 | 0 | 0 | 8,761 | 0 | 3/9/07 | 3/12/07 | | Sagnaw Power steering swap | 23 | 0 | 0 | 13,692 | 0 | 3/9/07 | 7/3/07 | | 3G Sawp | 6 | 0 | 0 | 3,355 | 0 | 3/12/07 | 7/3/07 | | actual motor swap | 26 | 0 | 0 | 11,278 | 0 | 3/20/07 | 7/23/07 | | Tires | 0 | 0 | 0 | 0 | 0 | 10/31/06 | 10/31/06 | | 33X10 with 6" lift | 4 | 0 | 0 | 2,225 | 0 | 10/31/06 | 10/31/06 | | 35X1250 Thornbirds | 7 | 0 | 0 | 4,603 | 0 | 10/31/06 | 10/31/06 | | 40X17 Super Mudder Gumbos | 18 | 0 | 0 | 11,018 | 0 | 10/31/06 | 11/8/06 | | Spare Tires and or rims | 6 | 0 | 0 | 2,651 | 0 | 10/31/06 | 12/28/06 | | 31X8 stock rims and tires | 6 | 0 | 0 | 3,100 | 0 | 12/28/06 | 12/29/06 | | Transfercase | 0 | 0 | 0 | 0 | 0 | 10/11/06 | 10/11/06 | | NP 208 | 19 | 0 | 0 | 10,590 | 0 | 10/11/06 | 11/6/06 | | Transmission | 0 | 0 | 0 | 0 | 0 | 10/11/06 | 10/11/06 | | NP435 | 0 | 0 | 0 | 0 | 0 | 10/11/06 | 10/11/06 | | Clutch | 17 | 0 | 0 | 8,570 | 0 | 10/11/06 | 11/3/06 | | Shifter | 7 | 0 | 0 | 3,768 | 0 | 10/11/06 | 11/3/06 | | Transmission Pictures | 3 | 0 | 0 | 1,511 | 0 | 11/1/06 | 11/6/06 | | Miscellaneous Bronco pictures | 34 | 0 | 0 | 14,800 | 0 | 10/15/06 | 12/28/06 | | The Day Jezebel was towed home | 8 | 0 | 0 | 4,034 | 0 | 10/27/06 | 11/3/06 | | Special Products | 1 | 0 | 0 | 437 | 0 | 2/26/08 | 2/26/08 | | Shop Projects | 0 | 0 | 0 | 0 | 0 | 5/16/08 | 5/16/08 | | Shop Projects | 0 | 0 | 0 | 0 | 0 | 5/16/08 | 5/16/08 |
 exhaust fix 43.JPG
1388 hits | 32.83 KB | Posted: 8/26/08
here is the new pass side doughnut. after the install i heated the motor for 20 min and re-tourqued the bolts. this motor sounds real good now. after 500 miles i retourqued the bolts and no more leaks.
 exhaust fix 42.JPG
1305 hits | 38.64 KB | Posted: 8/26/08
This is the pass side doughnut. see it is real bad shape.
 exhaust fix 41.JPG
1375 hits | 35.58 KB | Posted: 8/26/08
this is the drivers side doughnut. it was in poor shape. the new one is next to it.
 exhaust fix 40.JPG
1397 hits | 43.68 KB | Posted: 8/26/08
here are the bolts after i wire wheeled them clean. now they are reay for prime and paint.
 exhaust fix 39.JPG
1312 hits | 64.14 KB | Posted: 8/26/08
here was the pass side gasket. it too was in real bad shape.
 exhaust fix 38.JPG
1334 hits | 44.49 KB | Posted: 8/26/08
here is the bottom side of the manifold
 exhaust fix 37.JPG
1311 hits | 89.47 KB | Posted: 8/26/08
I was able to get the part number on this side.
 exhaust fix 36.JPG
1345 hits | 46.16 KB | Posted: 8/26/08
after wire wheeling and primer and paint it looks as good as the other side.
 exhaust fix 35.JPG
1330 hits | 33.71 KB | Posted: 8/26/08
another look at the plugs and bolts.
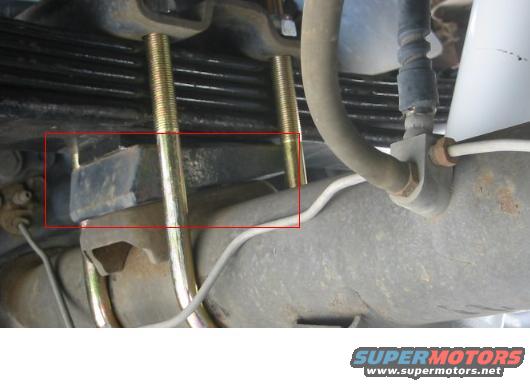
 shim.JPG
10501 hits | 24.63 KB | Posted: 4/23/05
the red is the factory shim /block
 3-51v-r00-83-bronco.jpg
3614 hits | 75.22 KB | Posted: 10/31/06
I got lucky and found the last of the part number on the vaccum diagram sheet. the rest of the sheet was torn off. i made copies of this and took them to the smog shop with me. this is for a FED 48 1983 4.9 motor.
 top off3.jpg
3365 hits | 100.02 KB | Posted: 10/16/06
topless another shot
 thumper.JPG
3154 hits | 48.59 KB | Posted: 3/13/07
hereis what goes wrong. you can see the 3rd gear down fromthe top. it lots 3 teeth and will not power the next gear. the motor keeps running and will turn off after 30 seconds.
 cart2.jpg
2835 hits | 93.45 KB | Posted: 8/13/06
Here is the working side of the cart.
 newfan.jpg
2567 hits | 84.18 KB | Posted: 7/5/06
Here is a 3.8 tarus 2 speed fan. $19 at the local junk yard. these have a high and low speed and really put out the air.
 blendmotor.JPG
2439 hits | 59.79 KB | Posted: 3/1/07
this is the "Clicking" component. it is the "Max" or recycle door motor. this is real hard to get to, it is the center of the heaterbox and the firewall.
 Golf Cart Christian.JPG
2406 hits | 80.14 KB | Posted: 7/7/08
here is the new golf cart with Christian on the back. we used the golf bag tie down to belt him in. he loved this.
 frontbelt12.JPG
2395 hits | 32.04 KB | Posted: 1/3/08
here is the front of the idler pulley this was normal thread and came out without issue
Maintenance & Modification Logs
This user hasn't added any log entries, yet.
|
|