Owner Notification Program B93 Floor Pan Reinforcement
Check
the Ford website &/or
the NHTSA to see if your VIN is affected.
Affected Vehicles:
1989/90 Bronco and F-Series SuperCab with Captain Chair Option
Ford Motor Company is providing a no-charge Service Program, Number (B93), to owners of certain 1989-1990 Bronco and F-Series Super Cab trucks equipped with captain chair option.
Reason For This Program
The seat tracks on your truck are attached to non-reinforced sections of the floorpan. This may cause the floor pan to crack at the seat track attachment. At no cost to you, your dealer will install floor pan reinforcements on your truck.
How Long Will It Take?
The time needed for this service is about 3 hours. However, due to service scheduling times, your dealer may need your truck for one full working day.
Call Your Dealer
Ask for a service date and if parts are in stock. If your dealer does not have the parts in stock, they can be ordered before scheduling your service date. Parts would be expected to arrive within a week. When you bring your truck in, give the dealer this letter. If you misplace this letter, your dealer will still do the work, free of charge.
Refunds
If you paid to have this service done before the date of this letter, Ford is offering a full refund. For the refund, please show your paid work-order to your Ford dealer.
Technical Instructions
This floor pan reinforcement program will strengthen the area and prevent future cracking.
A. Inspect floor pan for cracks near seat track attachments.
1. Remove both front seats. (See Shop Manual Section 41-01).
2. Inspect seat tracks for cracks. Replace all damaged tracks.
3. Remove or peel back carpet/mats. (See Shop Manual Section 45-26).
4. Inspect all seat track-to-floor pan attachment nuts. Weld any loose nuts to floor pan.
5. Inspect top side of floor pan for cracks:
If floor pan is not cracked, go to Step B-1 and reinforce both sides with small reinforcements.
If floor pan is cracked, go to Step B-10.
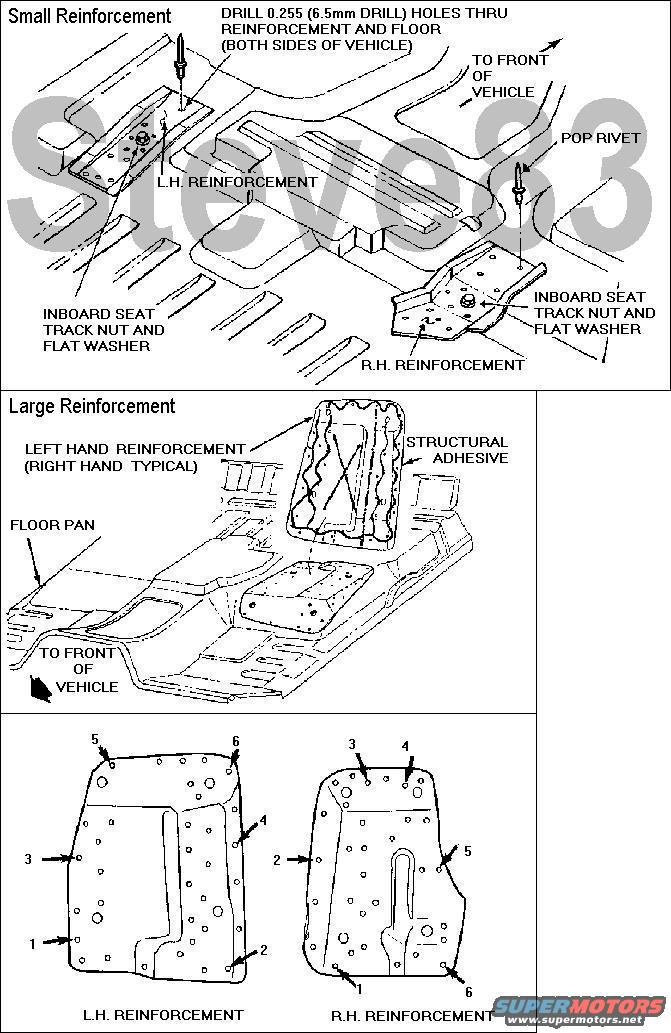
B. Small Reinforcement Installation Procedure
1. Place small reinforcement on top of the floor pan sheet metal. (See Figure). Remove any floor pan deadener from under the reinforcement.
2. Attach the small reinforcement to the floor pan with 1 seat track nut and flat washer.
3. Use the holes in the reinforcement as a guide. Drill a 0.255 diameter (6.5mm drill) hole through the reinforcement and the floor pan.
4. Install and set a pop rivet immediately after drilling hole. Repeat drilling/riveting for each hole.
5. Remove the seat track bolt and washer when all holes are completed.
6. Repeat procedure for other side of floor pan.
7. Reinstall carpets/mats.
8. Reinstall both seats.
9. Raise truck and spray Super Seal on bottom side of floor pan to cover all pop rivets.
10. If driver's side is cracked, use large reinforcement (FOTZ-1811299-A). See Section C. If driver's side is NOT cracked, use small left side reinforcement (See Step B-1) to strengthen driver's side floor pan.
If passenger's side is cracked, use large reinforcement (FOTZ-1811298-B). See Section C. If passenger's side is NOT cracked, use small right side reinforcement (See Step B-1) to strengthen passenger's side floor pan.
C. Large Reinforcement Installation Procedure - Floor Pan Cracked (Either Side)
1. Remove heat bonded deadener from floor pan and clean the floor pan surface with 3M General Purpose Adhesive Cleaner.
2. Apply 3M Joint and Seam Sealer on top of crack.
3. Clean bottom surface of reinforcement plate with 3M General Purpose Adhesive Cleaner.
4. Apply 1/4"-3/8" (6.3-9.5mm) bead of 3M Structural Adhesive to the bottom surface of reinforcement. (See Figure).
NOTE: A 3M Automix Applicator gun can be purchased from your local 3M supplier. The applicator gun is required to apply the structural adhesive. Adhesive hardens within 30 minutes. Complete installation steps as soon as possible before adhesive cures.
5. Place large reinforcement on top of floor pan.
6. Attach the reinforcement to the floor pan with the four (4) seat track mounting bolts and flat washers.
7. Using the holes in the reinforcement as guides, drill the six (6) 0.255 diameter (6.5mm drill) holes in the numbered locations shown in Figure 3. Drill through the reinforcement and floor pan. Install and set a pop rivet after drilling each hole. Drill the remaining 27 holes in the reinforcement and floor pan. Install and set 27 pop rivets.
8. Remove the four (4) seat track bolts and washers.
9. Reinstall carpets/mats.
10. Reinstall both seats.
11. Raise truck and spray Super Seal on bottom side of floor pan to cover all pop rivets and all visible cracks.
Labor Allowances
Inspect and Install Both Small Reinforcements: 2.5 Hrs. (B93A)
Inspect and Install One Large and One Small Reinforcement: 2.8 Hrs. (B93B)
Inspect and Install Two Large Reinforcements: 3.3 Hrs. (B93C)
F0TZ-1811272-A Floor Pan Reinforcement Kit (contains SMALL RH. and LH. reinforcements plus 25 pop rivets) Dealer Price $7.67 Current retail price $31.08
FOTZ-1811299-A Large Driver's Reinforcment - current retail price ~$60
FOTZ-1811298-B Large Passenger's Reinforcment - current retail price ~$60
See also: TSB 90-06-12
For other TSBs, check
here.