TSB 89-09-10 Normal Oil Consumption
Publication Date: MAY 3, 1989
FORD: 1986-89 ALL FORD LINES
LINCOLN-MERCURY: 1986-89 ALL LINCOLN-MERCURY LINES
MERKUR: 1986-89 ALL MERKUR LINES
LIGHT TRUCK: 1986-89 ALL LIGHT TRUCK LINES
ISSUE: The following information can be used to inform vehicle owners about "normal" oil consumption in today's engines.
ACTION: Use the following information to assist in explaining "normal" oil consumption to vehicle owners.
The amount of oil an engine uses will vary with the way the vehicle is driven in addition to normal engine-to-engine variation. This is especially true during the first 7500 miles (12000 kilometers), when a new engine is being "broken-in" or until certain internal engine components become conditioned. Vehicles used in heavy duty operation (severe service) may use more oil. The following are examples of heavy duty operation:
* Trailer towing applications
* Taxi cab applications
* Police service applications
* Severe loading applications
* Sustained high speed operation
Engines need oil to lubricate the following internal components:
* Engine block cylinder walls
* Pistons and piston rings
* Intake and exhaust valve stems
* Intake and exhaust valve guides
* All internal engine components
When the pistons move downward, a thin film of oil is left on the cylinder walls. The thin film of oil is burned away on the firing stroke during combustion. If an engine burned a drop of oil during each firing stroke, oil consumption would be about one (1) quart for every mile traveled. Fortunately modern engines use much less oil than this example. However, even efficient engines will use some oil or they would quickly wear out. Additionally as the vehicle is operated, some oil is drawn into the combustion chambers past the intake and exhaust valve stem seals and burned.
A lot of different things can affect oil consumption rates. The following is a partial list of these items:
* Engine size
* Operator driving habits
* Ambient temperature
* Quality and viscosity of the oil
Operation under varying conditions can be frequently misleading. A vehicle that has been run for several thousand miles (kilometers) of short trip operation or below freezing ambient temperatures, may have consumed a "normal" amount of oil. However, when checking the engine oil level, it may measure up to the full mark on the dipstick due to dilution (condensation and fuel) in the engine crankcase. The vehicle then might be driven at high speeds on the highway where the condensation and fuel boil off. The next time the engine oil is checked, it may appear that a quart of oil was used in a hundred or so miles. This perceived 100-mile per quart (160-kilometer per quart) oil consumption rate causes customer concern even though the actual overall all oil consumption rate was about 1500-miles per quart (2400-kilometers per quart).
Make sure the selected engine oil meets the recommended API performance category "SG" and SAE viscosity grade as shown in the vehicle Owner Guide. It is also important that the engine oil is changed at the intervals specified for the typical operating conditions of the customer. This information is available in the Owner Guide, Maintenance Schedule and Record log.
OTHER APPLICABLE ARTICLES: NONE
SUPERSEDES: 86-11-16
WARRANTY STATUS: INFORMATION ONLY
For other TSBs, check
here.
____________________________________________________
SSM# 19462 OASIS MESSAGE :
SOME 1997-2007 E150/F150, 1997-2007 CROWN VIC./GRAND MARQUIS/TOWN CAR, 1997-2004 MUSTANG GT, 1997-1998 T-BIRD/COUGAR AND 2002-2005 EXPLORER/MOUNTAINEER WITH 4.6L 2V ENGINE MAY EXPERIENCE AN ENGINE TICKING OR RATTLE NOISE THAT SOUNDS LIKE A STUCK TAPPET (HLA). THIS MAY BE DUE TO THE DETERIORATION OF AN AFTERMARKET OIL FILTER. VEHICLES WITH THIS CONDITION HAVE LOW OIL PRESSURE AT ONE CYLINDER HEAD ONLY, WHILE MAIN PRESSURES ARE NORMAL. DISLODGED MATERIAL FROM THE AFTERMARKET OIL FILTER BLOCKS THE CAM CAP OIL PASSAGE, EITHER AT CYLINDER #4 (RIGHT BANK REAR) OR CYLINDER #5 (LEFT BANK FRONT). FORD RECOMMENDS THE USE OF FORD APPROVED FILTERS ONLY. DAMAGE TO ENGINES CAUSED BY AFTERMARKET OIL FILTERS ARE NOT COVERED UNDER WARRANTY.
---------------------------------------------------------------------------
TSB 90-01-09 Oil Consumption Test
Publication Date: JANUARY 4, 1990
FORD: 1987-88 THUNDERBIRD
1987-90 CROWN VICTORIA, MUSTANG
LINCOLN-MERCURY: 1987 CONTINENTAL
1987-88 COUGAR
1987-90 GRAND MARQUIS, MARK VII, TOWN CAR
LIGHT TRUCK: 1987-90 BRONCO, E-150, E-250, F-150, F-250
ISSUE: Excessive oil consumption on 5.0L EFI engines may be caused by one or more of the following:
* Oil leaks from gaskets
* Poor sealing of the lower intake manifold
* Intake and exhaust valve stem seals
* Piston rings
ACTION: Perform an inspection and oil consumption test as described in the following service procedure to determine if an excessive oil consumption condition exists. If an excessive oil consumption condition is present, install new guide mounted valve stem seals for a more positive fit and new piston rings with improved oil control. Refer to the following procedure for service installation details.
EXTERNAL OIL LEAK INSPECTION PROCEDURE
NOTE: CHECK ALL GASKETS AND SEALS FOR OIL LEAKAGE.
1. Place the vehicle in a stall that has a hoist. Make sure the floor under the vehicle is clean and free of oil.
2. Inspect the engine for signs of oil leakage.
3. Clean any areas where oil looks like it may be leaking.
4. Run the engine for five (5) minutes at varying engine RPM.
NOTE: DO NOT EXCEED 2500 RPM.
5. Turn the engine off and re-inspect the engine for signs of oil leaks.
6. If an external oil leak is found, repair as required and repeat Steps 4 and 5. If no external oil leak is found, proceed to Step 7.
7. Torque the lower intake manifold using the following two (2) step procedure before proceeding to the "CUSTOMER OIL CONSUMPTION TEST."
a. Torque the lower intake manifold bolts in sequence to 15-20 lb-ft (20-27 N-m).
b. Once again, torque the lower intake manifold bolts in sequence to 23-25 lb-ft (32-34 N-m).
CUSTOMER OIL CONSUMPTION TEST
NOTE: SEE THE WARRANTY AND POLICY MANUAL FOR APPLICABLE CHARGES.
1. Drain the engine oil and remove the oil filter.
2. Install a new FL1-A oil filter.
3. Install five (5) quarts of Ford XO-10W30-QP engine oil in passenger cars and six (6) quarts in light truck applications. An equivalent oil can be used as long as it meets Ford specification ESE-M2C153-E and API SG.
4. Make sure the vehicle has the correct dipstick. Check the engineering part number stamped on the dip stick against the information provided in the dip stick application chart that follows.
DIP STICK APPLICATION CHART
APPLICATION MODEL YEAR - ENGINEERING PART NUMBER - SERVICE PART NUMBER
Mustang 1987-90 - E7SE-6750-BA - E8SZ-6750-A
Thunderbird, Cougar 1987-88 - E7SE-6750-BA - E8SZ-6750-A
Continental 1987 - E7SE-6750-BA - E8SZ-6750-A
Mark VII 1987-90 - E7SE-6750-BA - E8SZ-6750-A
Crown Victoria, Grand Marquis, Town Car 1987-90 - E8AE-6750-BA - E8AZ-6750-C
F-150, F-250, Bronco 1987-5/15/89 - E7TE-6750-HA - E8TZ-6750-F
F-150, F-250, Bronco 5/16/89-90 - E9TE-6750-CA - E9TZ-6750-E
Econoline 1987-5/15/89 - E7UE-6750-CA - E7UZ-6750-D
Econoline 5/16/89-90 - E9UE-6750-BA - FOUZ-6750-D
5. Run the engine for two (2) minutes then turn the engine off.
6. Let the oil drain back into the oil pan for at least three (3) minutes before going to Step 7.
7. With the engine off and the vehicle parked on level ground, remove the engine oil dip stick and wipe it clean. Fully re-install the dip stick, then remove it again.
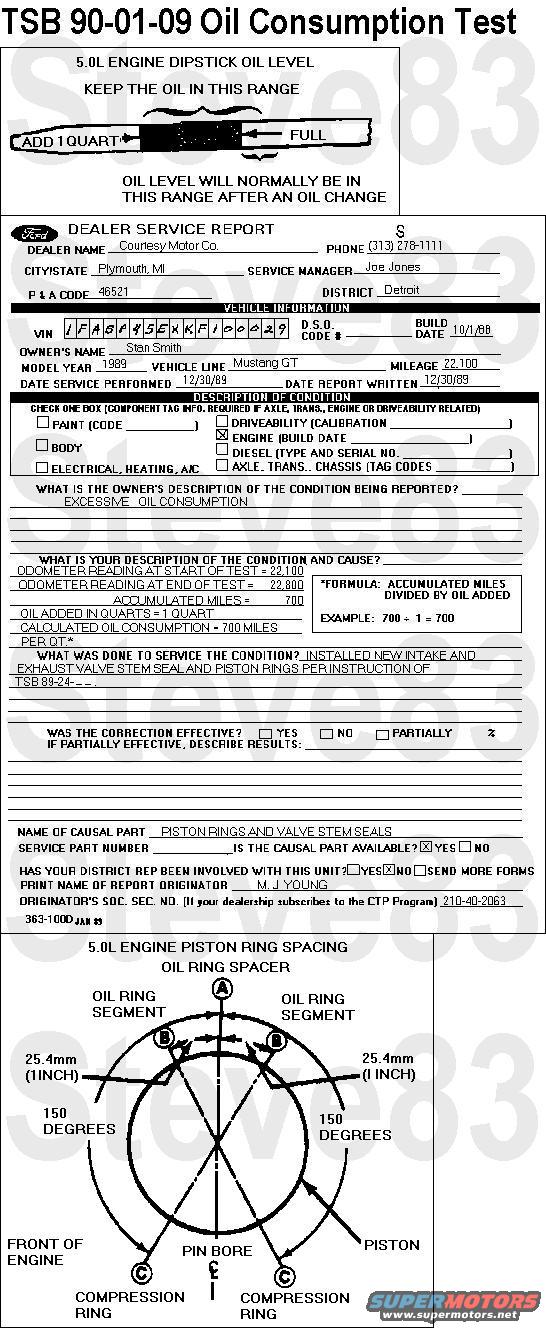
8. See where the oil level is on the graphic, stamped on the dip stick. The oil level should be between the top of the cross hatch area and the "F" in "FULL".
9. Using a file, scribe a notch on the edge of the dip stick where the actual oil level is at.
NOTE: THE SCRIBE MARK ON THE DIP STICK IS THE ACTUAL OIL LEVEL FULL MARK. USE THE SCRIBE MARK AS THE INDICATOR FOR ALL FUTURE OIL READINGS THAT ARE TAKEN.
10. Record the mileage on the vehicle.
11. When the vehicle is returned to the customer, show them where the dip stick is located and how to read it. Make sure you point out that the scribed notch on the dip stick is the "True Full Mark". Also point out the following to the customer:
* Your vehicle is now part of an engine oil consumption test.
* The vehicle has new engine oil and a new oil filter.
* Your vehicle's mileage has been recorded.
* You are to check the engine oil level every time you stop for fuel.
* If the engine oil level indicated on the dip stick is in the "ADD ONE QUART" range, contact the dealership to return for a re-inspection.
* NOTE: DO NOT ADD ENGINE OIL. THIS NEEDS TO BE DONE BY THE DEALERSHIP TO ESTABLISH THE CORRECT CONSUMPTION RATE.
12. When the customer returns for the re-inspection, make sure the engine oil level is in the "ADD ONE QUART" area on the dip stick.
13. Check and record the vehicle's mileage at this time. This will be needed to calculate the oil consumption rate later.
14. Add and record the amount of oil it takes to restore the engine oil level on the dip stick to the "True Full Mark" scribed during Step 9.
15. Calculate the oil consumption rate as shown in the following example:
* Starting Odometer Reading recorded in Step 10 at start of test = 22,100
* Ending Odometer Reading recorded in Step 13 at end of test = 22,800
* Accumulated mileage = 700 miles
* Oil added = 1 quart
Once you have the accumulated mileage and the oil added, use the following formula to calculate the actual oil consumption:
* Calculated oil consumption = Accumulated miles(divide by) oil added (in quarts)
* 700 miles per quart = 1 quart
NOTE: RECORD THE OIL CONSUMPTION TEST INFORMATION ON A DEALER SERVICE REPORT . OBTAIN A COPY OF THE DEALER SERVICE REPORT (NO. 363-100D REVISED 1-90) FROM THE ORIGINAL TECHNICAL SERVICE BULLETIN. (IT IS LOCATED IN THE BACK OF BULLETIN 90-01, BEHIND THE SERVICE INFORMATION PAGE.) AFTER YOU HAVE COMPLETED THIS FORM, MAIL IT TO FORD MOTOR COMPANY. A SAMPLE DEALER SERVICE REPORT INDICATING THE REQUIRED INFORMATION IS SHOWN IN FIGURE 3.
16. If the vehicle did not use one (1) quart or less of engine oil within 900 miles, an oil consumption concern is not present. Remind the customer at the time of vehicle return to use the recommended 10W30 API SG engine oil. No further action is required at this point.
17. If the engine oil consumption test indicates that the vehicle used one (1) quart or more of engine oil in less than 900 miles, proceed to the "PISTON RING & VALVE SEAL REPLACEMENT PROCEDURE".
PISTON RING & VALVE SEAL REPLACEMENT PROCEDURE.
WARNING: THE ENGINE MUST BE REMOVED FROM THE VEHICLE TO PERFORM THE FOLLOWING PROCEDURE. IT IS IMPORATANT THAT THE ENGINE IS FREE OF EXTERNAL OIL LEAKS WHEN RE-ASSEMBLED.
1. Remove the engine from the vehicle.
2. Place the engine on an engine stand.
3. Remove the upper and lower intake manifolds. Refer to the appropriate model year Shop Manual, Section 21-21 for service details.
4. Remove the right hand and left hand cylinder head. Refer to the appropriate model year Shop Manual, Section 21-21 for service details.
5. Remove the oil pan and oil pump. Refer to the appropriate model year Shop Manual, Section 21-21 for service details.
6. Remove any ridge and/or deposits from the upper end of the cylinder bore with Cylinder Ridge Reamer T64L-6011-EA or equivalent. Follow the instructions furnished by tool manufacture. Never cut into the ridge travel area in excess of 0.74mm (1/32") when removing ridges.
WARNING: DO NOT BREAK THE GLAZE OR HONE THE CYLINDER BORES. THIS WILL DISTURB THE PRODUCTION BORE FINISH AND COULD CAUSE A MORE SEVERE OIL CONSUMPTION CONCERN.
7. Make sure all the connecting rods are marked so they can be re-installed in their original positions.
8. Remove the piston and rod assemblies from the engine.
9. Remove the existing piston rings and throw them away.
10. Install new piston ring sets on each piston. Make sure the ring gaps are properly spaced.
11. Remove the intake and exhaust valve stem seals.
12. Inspect the valve stems to make sure that they are free of nicks and burrs. Repair as required.
13. Install new guide mounted intake and exhaust valve stem seals.
NOTE: ON PASSENGER CAR ENGINES, THROW AWAY THE NYLON DISC ON THE VALVE STEMS. THE NYLON DISC WAS USED AS AN AID DURING INITIAL ASSEMBLY AND HAS NO OTHER USEFUL FUNCTION.
1987-90 GASKET/SEAL APPLICATION CHART
GASKET SEAL - CAR 5.0L BASE - CAR 5.0L H.O. - LIGHT TRUCK 5.0L
Oil Pan - E9AZ-6710-A - E9AZ-6710-A - E9AZ-6710-A
Cylinder Head - E6ZZ-6051-A - E6ZZ-6051-A - E5AZ-6051-A
Intake Manifold - E6SZ-9H486-C - E6SZ-9H486-C - E5TZ-9H486-C
Seals, Intake Manifold - D9AZ-9433-B - D9AZ-9433-B - D9AZ-9433-B
Rocker Arm Cover - E7ZZ-6584-C - E7ZZ-6584-C - E7ZZ-6584-C
14. Re-install the piston and rod assemblies in the engine in their original locations.
15. Re-install the oil pan and oil pump. Refer to the appropriate model year Shop Manual, Section 21-21 for service details.
16. Re-install the right hand and left hand cylinder head. Refer to the appropriate model year Shop Manual, Section 21-21 for service details.
17. Re-install the upper and lower intake manifolds. Refer to the appropriate model year Shop Manual, Section 21-21 for service details.
18. Re-install the engine in the vehicle.
PART NUMBER PART NAME
E8SZ-6750-A Dip Stick
E8AZ-6750-C Dip Stick
E8TZ-6750-F Dip Stick
E7UZ-6750-D Dip Stick
E9TZ-6750-E Dip Stick
FOUZ-6750-D Dip Stick
FOTZ-6148-A Piston Ring Set - 8 Required
E8AZ-6571-A Intake Valve Seal - Pkg. of 4
E5ZZ-6571-A Exhaust Valve Seal - Pkg. of 4
E9AZ-6710-A Oil Pan Gasket
E6ZZ-6051-A Cylinder Head Gasket
E5AZ-6051-A Cylinder Head Gasket
E6SZ-9H486-C Intake Manifold Gasket
E5TZ-9H486-A Intake Manifold Gasket
D9AZ-9433-B Seals - Intake Manifold
E7ZZ-6584-C Rocker Arm Gasket
OTHER APPLICABLE ARTICLES: NONE
WARRANTY STATUS: Eligible Under Basic Warranty Coverage, Powertrain Warranty Coverage
OPERATION DESCRIPTION TIME
900109A Perform External Inspection 0.7 Hr.
900109B Perform Oil Consumption Test 0.4 Hr.
900109C Install Valve Seals & Piston Rings - All Cars Except Thunderbird, Cougar 18.6 Hrs.
900109C Install Valve Seals & Piston Rings - Bronco, F Series 18.9 Hrs.
900109C Install Valve Seals & Piston Rings - Econoline 21.3 Hrs.
900109C Install Valve Seals & Piston Rings - Thunderbird, Cougar 17.5 Hrs.
____________________________________________________
TSB 01-24-6 ENGINE - ENGINE OIL SYSTEM PRIMING PROCEDURES - SERVICE TIPS
12/10/01
FORD:1995-1997 PROBE, THUNDERBIRD
1995-2000 CONTOUR
1995-2002 CROWN VICTORIA, ESCORT, MUSTANG, TAURUS
2000-2002 FOCUS
2002 THUNDERBIRD
1995-1996 BRONCO
1995-1997 AEROSTAR, F-250, F-350
1995-2002 E SERIES, EXPLORER, F-150, RANGER, WINDSTAR
1997-2002 EXPEDITION
1999-2002 SUPER DUTY F SERIES
2000-2002 EXCURSION
2001-2002 ESCAPE, EXPLORER SPORT TRAC, EXPLORER SPORT
LINCOLN:1995-1998 MARK VIII
1995-2002 CONTINENTAL, TOWN CAR
2000-2002 LS
1998-2002 NAVIGATOR
2002 BLACKWOOD
MERCURY:1995-1997 COUGAR
1995-1999 TRACER
1995-2000 MYSTIQUE
1995-2002 GRAND MARQUIS, SABLE
1999-2002 COUGAR1995-2002 VILLAGER
1997-2002 MOUNTAINEER
ISSUE: Reports of premature engine failure suggest some overhauled, new and/or remanufactured engine oil Systems are not correctly primed prior to initial engine start-up, after being installed in the vehicle. This may cause oil starvation during initial engine start-up.ACTIONPrior to starting a new, overhauled or remanufactured engine, the oil pump and oil system should be primed to eliminate the possibility of oil starvation at start-up. Refer to the following Service Information for details.
SERVICE INFORMATION: Regardless of engine design, it is extremely important that the engine oil pump is correctly primed, prior to initial engine start-up.
Overhead Cam Engines (OHC): Overhead cam engines use a G-rotor pump design and is driven by the crankshaft. If the engine is overhauled, the oil pump (prior to assembly) should be fed oil through the oil pick-up passage, prior to installing the pick-up tube and screen assembly. This can usually be accomplished by rotating the oil pump while oil is being fed into the oil pump inlet. Once the oil pump is primed, the oil pump can then be installed onto the engine.Remanufactured engines are usually cold tested before leaving the plant. As a result, the oil pump should not have to be removed from the engine and primed. Overhead cam engines, whether overhauled or remanufactured, prior to starting the engine, ensure the engine crankcase is filled to specification with engine oil. Disable the fuel supply to the fuel injectors (disable inertia fuel shut-off switch) and crank the engine in fifteen (15) second increments, until the oil pump is primed. An oil pressure gauge can be used to assist in determining when oil pressure is obtained. NOTE: ENSURE THE INERTIA FUEL SHUT-OFF SWITCH IS RE-ENABLED PRIOR TO ATTEMPTING TO START ENGINE.
Overhead Valve Engines (OHV): Overhead valve engines (push-rod type) use an oil pump driven by the camshaft via an intermediate shaft connected to the distributor or camshaft synchronizer assembly.Whether the engine is overhauled or remanufactured, the oil pump should be primed prior to starting the engine. If the engine is overhauled, ensure the crankcase is filled to specification with engine oil and using an engine oil pump priming tool kit, (commercially available) rotate oil pump until it is primed. An oil pressure gauge can be used to assist in determining when oil pressure is obtained.If a remanufactured engine is being installed, after the installation has been completed, ensure the crankcase is filled to specification with engine oil. Disable the fuel supply to the fuel injectors (disable inertia fuel shut-off switch) and crank the engine in (15) second increments, until the oil pump is primed. An oil pressure gauge can be used to assist in determining when oil pressure is obtained. NOTE ENSURE THE INERTIA FUEL SHUT-OFF SWITCH IS RE-ENABLED PRIOR TO ATTEMPTING TO START ENGINE.
OTHER APPLICABLE ARTICLES: NONE
WARRANTY STATUS: INFORMATION ONLY
OASIS CODES: 401000, 497000, 499000

.