|
|
This is the plan: a C8x11.5 (just like the previous one) with some 1/4" plate attached by square tubes to the frame, and a fold-down tube grille guard (again). The black trim will be taken from a stock '94-96 bumper. The outboard sectons will be storage boxes (as before). But instead of recessing the shackles this time (which takes up some storage space), I'm putting them out front to help protect the fairlead, and for the styling. They may also be useful as cable guides for side pulls, or as steps. And their receivers will allow me to easily add temporary features, like a snow plow, or a tow bar. I may even add lights inside the shackles or trim.  . 
|
|
|
There's barely room for the trim & the fairlead, which will be partially hidden.
|
|
|
This is how I start a bumper!
|
|
|
A couple of cutting wheels later, and I have the core of the bumper.
|
|
|
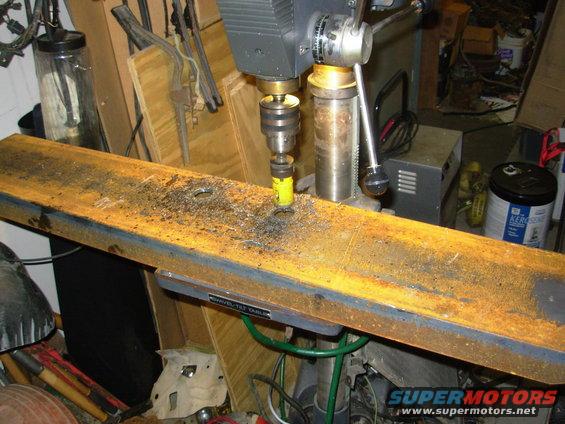 93-5BeamDrill.JPG | Hits: 1386 | Size: 102.54 KB | Posted on: 10/5/12 | Link to this image 93-5BeamDrill.JPG | Hits: 1386 | Size: 102.54 KB | Posted on: 10/5/12 | Link to this image
I'm really enjoying my new (used) drill press.
|
|
|
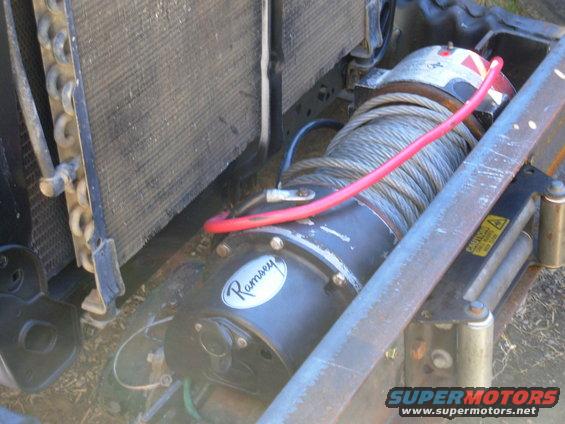 93-8Clearance.JPG | Hits: 1415 | Size: 92.77 KB | Posted on: 11/24/12 | Link to this image 93-8Clearance.JPG | Hits: 1415 | Size: 92.77 KB | Posted on: 11/24/12 | Link to this image
Good thing I added an inch to the bumper mounts, or the gearbox would hit the core support.  . 
|
|
|
One of the motor drive cover bolts is VERY close to the condenser bracket bolt on the core support. But since I have poly body mounts, neither should ever move in relation to the other. And since the condenser leg is slotted, its bolt only needs to be loosened for removal.
IF THE IMAGE IS TOO SMALL, click it.
|
|
|
With the winch drum centered between the frame rails, there's barely a half inch between the motor & the R frame tab (where the green wires are).
IF THE IMAGE IS TOO SMALL, click it.
|
|
|
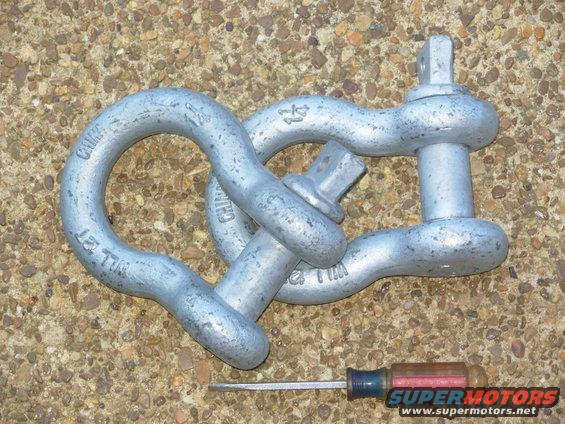 Shackles1.25.JPG | Hits: 1327 | Size: 119.84 KB | Posted on: 10/11/11 | Link to this image Shackles1.25.JPG | Hits: 1327 | Size: 119.84 KB | Posted on: 10/11/11 | Link to this image
I found these 1 1/4" (cross-section) shackles (galvanized cast iron) on sale at the Hot Springs AR off-road park, and they turned out to be perfect for my new bumper.
Rated for 12 tons WLL each. I'll try, but I don't think I'll get that high.
UPDATE: I've gone that high a few times now, stalling the 12,000-lb winch with a snatch block. But that force was never applied to these shackles.
|
|
|
The bull nose gives these drawbars a finished look, and probably strengthens them slightly. I had planned to make them from solid 2" square bar, but that turned out to be ridiculously expensive, in addition to being unnecessarily heavy.
IF THE IMAGE IS TOO SMALL, click it.
|
|
|
It's not welded in yet, but this bar will stow the cable hook and also be strong enough to use as a recovery point. It mimics the plastic divider that used to be there, and when powdered black, it should be almost indistinguishable.
|
|
|
The hook storage bar is now fully welded-in, and the top front panel is going on tomorrow.
|
|
|
Ouch - need T-shirts with SLIGHTLY longer sleeves.
|
|
|
Scattered showers & a tornado warning kept me indoors most of the day, so I cut the front plates, and then ducked out to weld them on between downpours.
|
|
|
The plating on the front face includes slots for this turbo-diesel (& high-trim) bumper pad. It will help this bumper look more like it belongs than the previous one did.
IF THE IMAGE IS TOO SMALL, click it.
|
|
|
With the front plating & the structure that holds it in place, the center section of the bumper is now honeycombed, making it even stronger than the previous one. The plating also retains & reinforces the factory plastic trim. The hook-storage rod in the center replaces the plastic bar I removed from the trim.
IF THE IMAGE IS TOO SMALL, click it.
|
|
|
This 3/8" chain link will not only prevent the shackle pin from coming out (while the draw bar is fully-inserted), but it can also work as a safety chain loop for a tow bar or snow plow.
|
|
|
I had this drop of 1/4" plate rolled into a 12" O.D. at a local fab shop.
|
|
|
After laying out the angle of the front panels onto the curve, I cut the bumper corners out.
|
|
|
It's coming together just the way I planned.
|
|
|
The alignment looks perfect.
|
|
|
After torching the curve into the upper angled strips, I tacked them all together & cut the angled curve onto the corners. I'm not quite ready to cut the bottoms.
|
|
|
It looks more complete than it actually is...
IF THE IMAGE IS TOO SMALL, click it.
|
|
|
The outboard top panel (below the headlight) is just resting in place while I check its fit, and several other parts.
The front receivers are already proving their worth.
|
|
|
I spent a lot of time taking measurements before drawing these panels, but I was still surprised by how well this fit. I hope the rest come close to this...
|
|
|
This will cover the winch, but it'll be easy to slide out, and it's strong enough to stand on.  . 
|
|
|
I was never happy with the previous door on this bumper, and I finally came up with a revised design that I think I'll like. So while I was getting parts plasma-cut for the new front bumper, I got these, too. It's surprisingly heavy, though.
Unlike the previous hinged door, this one slides out & becomes a platform. It does interfere with lowering the t/g when it's out, but I doubt that will ever be a problem. It can't fall off, but only 2 bolts hold it on, and only 1 needs to be completely removed to take the door off.
The oval is the handle, and it's slightly loose to allow a better grip. After it's powdercoated, I'll add nylon washers & maybe springs to keep the oval from rattling.
IF THE IMAGE IS TOO SMALL, click it.
|
|
|
I wish I hadn't cut so much off the curved ends - they don't reach back (up in the pic) far enough, so I'll be butt-welding some on later.
IF THE IMAGE IS TOO SMALL, click it.
|
|
|
This plate will cover the winch, but it can be pulled out for access, or to use as a step. I might add a hidden latch later, but it won't have a handle so it won't be obvious that it CAN be opened, or HOW to open it. IF THE IMAGE IS TOO SMALL, click it. 
|
|
|
Despite the complexity, and all the mistakes I made during fabrication, the first storage box & its door are coming together reasonably well.
IF THE IMAGE IS TOO SMALL, click it.
|
|
|
It's looking pretty close to what I wanted. I just hope the other side comes out the same...  .  .  The winch cover doesn't need any handle - it gives it a little more security, and it's easy for me to open. The doors on the ends are much heavier than I expected, but they're strong enough to withstand hard impacts.
|
|
|
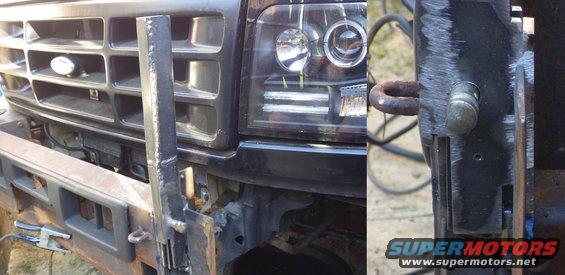 93-20GuardStart.JPG | Hits: 1041 | Size: 96.83 KB | Posted on: 9/5/13 | Link to this image 93-20GuardStart.JPG | Hits: 1041 | Size: 96.83 KB | Posted on: 9/5/13 | Link to this image
The uprights for the grille guard are fabricated from 1/4" plate, and include internal latches for the folding mechanism. The pins will be hidden inside the bumper, but easy to access if I want to remove the grille guard (without any tools).
IF THE IMAGE IS TOO SMALL, click it.
|
|
|
I cut off the tack welds holding the R box together and added that grille guard mechanism. The tubing for the actual guard should be here Monday.
IF THE IMAGE IS TOO SMALL, click it.
|
|
|
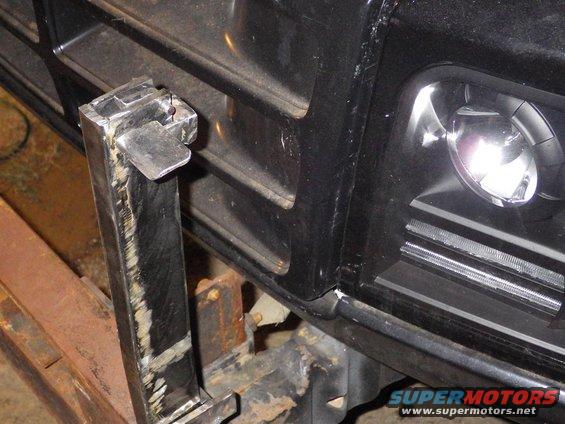 93-20GuareLeves.JPG | Hits: 1028 | Size: 113.68 KB | Posted on: 9/8/13 | Link to this image 93-20GuareLeves.JPG | Hits: 1028 | Size: 113.68 KB | Posted on: 9/8/13 | Link to this image
This lever operates the latch at the bottom of the upright, inside the bumper, but I'm not happy with it...
|
|
|
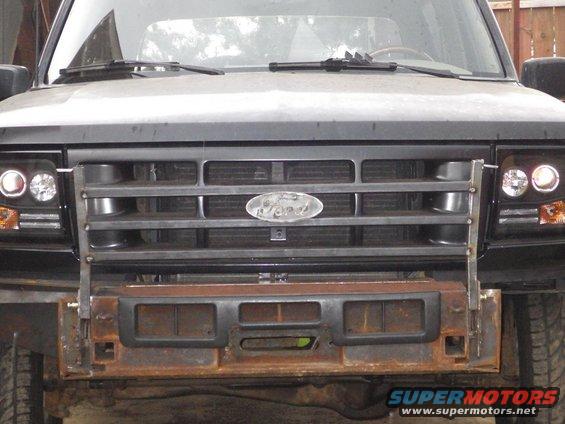 93-21GuardBart.JPG | Hits: 1168 | Size: 105.83 KB | Posted on: 9/10/13 | Link to this image 93-21GuardBart.JPG | Hits: 1168 | Size: 105.83 KB | Posted on: 9/10/13 | Link to this image
Crossbars going in. It looks like the body might be ~1/16" low on the driver's side because the bumper is dead-square to the frame. The oval is just there temporarily - I'll center & align it later when I weld it on permanently.
|
|
|
Can you tell which welds were done with the gas hose pinched off?
|
|
|
It's taking a long time, and several skim passes in some places followed by a LOT of grinding, but the joints are coming out about the way I imagined they would.
|
|
|
I got the nerve up to start building the L door today, and I almost finished it. It fits at least as well as the other, but there's a lot more welding & grinding to be done.
IF THE IMAGE IS TOO SMALL, click it.
|
|
|
These storage compartment doors are heavy & difficult-to-build, so I don't want them falling off or getting misplaced.
I've since revised the design so they can't fall off, and are stronger, and easier to build.
|
|
|
These doors are heavy & difficult-to-build, so I don't want them falling off or getting misplaced.
|
|
|
The front bumper doors fit so well & slide so easily that one fell off on this drive. I ran over it, but there was no damage. I'll get to work on the latches soon.
|
|
|
This went a lot faster than I expected - only about 4 hours including cleanup. I still may add a flat bar (1/4" plate) between the headlights & blinker, and a leg at each end going down to the bumper corner. IF THE IMAGE IS TOO SMALL, click it.  .  The top outer corners will be folded down when I have time to torch them into radiused bends. In addition to folding down, it's removable without tools (for either operation). UPDATE: It's at least as strong as I had hoped.  . 
|
|
|
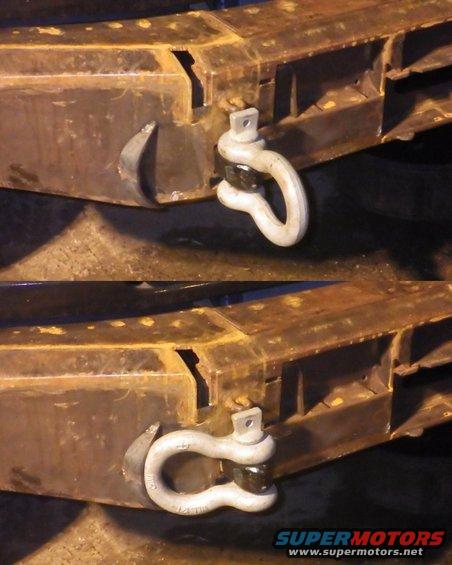 93-22Shackles.JPG | Hits: 1201 | Size: 103.95 KB | Posted on: 9/30/13 | Link to this image 93-22Shackles.JPG | Hits: 1201 | Size: 103.95 KB | Posted on: 9/30/13 | Link to this image
I'm not really happy with these curves, but they're as good as I could do for now. They'll keep the shackles from swinging forward as I drive, but they won't snag things or hold dirt.

|
|
|
I was sweating these latches, but they came out at least as good as I expected. The door can be installed without touching the latch, and the latch handle only needs to move ~1/2" to release the door. But swinging it fully forward (as shown) pushes the door free from its tracks. The latch pivots on brake pedal shaft bushings and is assembled with a single bolt. The handle is offset both to hide it under the body, and for a possible future mod to the grille guard. 
|
|
|
My thumb is still sore, but the winch is back in. I'll probably stress-test the whole thing later this week... IF THE IMAGE IS TOO SMALL, click it. 
|
|
|
I removed the torch-rolled shackle keepers and installed these bandsaw-cut pipe crescents, which look & fit much better. And I added the headlight dividers.  The outboard vertical tubes are coming off the grille guard, in favor of some that I'm fabricating with a radiused top corner. 
|
|
|
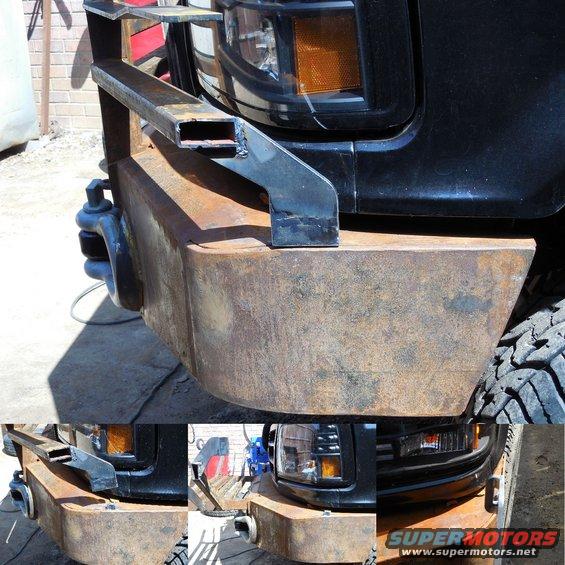 93-26GuardTabs.jpg | Hits: 1044 | Size: 149.77 KB | Posted on: 3/19/14 | Link to this image 93-26GuardTabs.jpg | Hits: 1044 | Size: 149.77 KB | Posted on: 3/19/14 | Link to this image
This leg will prevent the guard from being pushed back into the headlights. But the tab it fits onto still allows the guard to be tilted. Those door latch handles that I offset a few months back will still clear these. IF THE IMAGE IS TOO SMALL, click it. 
|
|
|
These became really complicated, but they turned out at least as well as I expected. Much better than my previous attempt:  IF THE IMAGE IS TOO SMALL, click it.
|
|
|
There are still a few internal things to do, but the outside is done. It came out pretty close to my original sketch. 
|
|
|
YEAH! That looks a LOT better!
I had a little mishap with an air compressor... It's a long story.
|
|
|
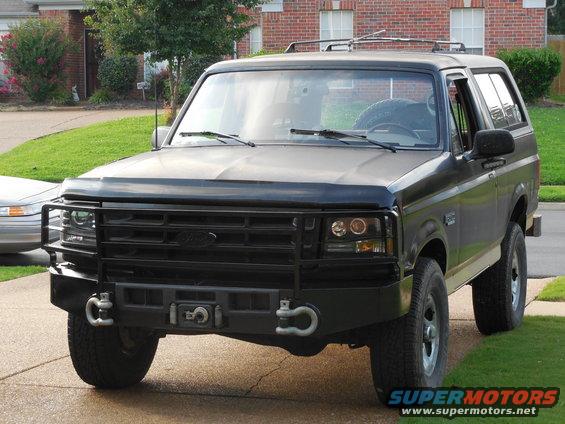
Looking good, but I still want to sandblast & powdercoat the whole front bumper eventually.  The aftermarket DOT-legal projector headlights work better than I expected, but the cheapo HID ballasts didn't last, so I'm using the included halogen bulbs. Chrome https://www.ebay.com/itm/274382325575 Black https://www.ebay.com/itm/273562204627The LEDs under the door mirrors also work better than I expected, and are very functional.  Unfortunately, the powdercoater I had been using went out of business. The bigger one can't do small jobs like this any more. And I've heard too much negative about the other to even risk it. One of these days, I might build my own oven. The big shackles are silent when I'm driving, secure when parked, and easy-to-use when wheeling. The grill guard has proven endlessly useful, and surprisingly sturdy; both hitting trees when up as shown, and hauling trees, deer, bulky parts, or passengers when folded down.
|
|
|
 93-28Paint10.JPG | Hits: 13922 | Size: 123.25 KB | Posted on: 7/20/14 | Link to this image 93-28Paint10.JPG | Hits: 13922 | Size: 123.25 KB | Posted on: 7/20/14 | Link to this image
Looking good, but I still want to sandblast & powdercoat the whole front bumper eventually.  Unfortunately, the powdercoater I had been using went out of business. The bigger one can't do small jobs like this any more. And I've heard too much negative about the other to even risk it. One of these days, I might build my own oven. These DOT-legal headlights can be found on eBay as low as $150/pr shipped with halogen bulbs. The cheap HID kits don't last, or perform substantially better than the included bulbs. Search for FO2503114, FO2502118, or "1992 bronco halo projector". Chrome https://www.ebay.com/itm/274382325575 Black https://www.ebay.com/itm/273562204627
|
|
|
Yeah, the fold-down grille guard works. And it's at least as strong as I had hoped. UPDATE: Turns out, it's a helluvalot stronger...  .  .  .  The lights under the door mirrors are great for when the headlights are blocked.
|
|
|
 BumperMkIICAD.jpg | Hits: 2034 | Size: 116.17 KB | Posted on: 1/11/15 | Link to this image BumperMkIICAD.jpg | Hits: 2034 | Size: 116.17 KB | Posted on: 1/11/15 | Link to this image
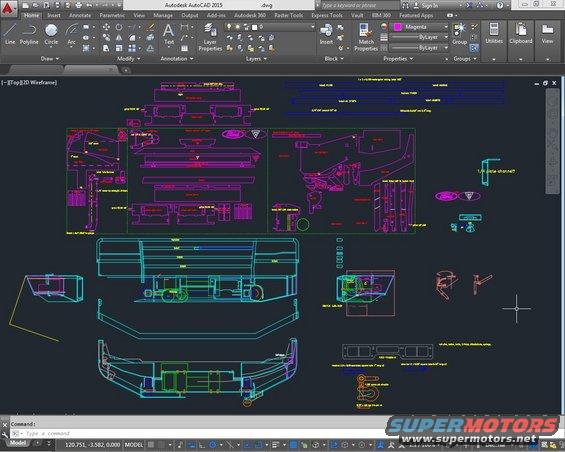
A screenshot of the CAD drawing for the revised front bumper. IF THE IMAGE IS TOO SMALL, click it. DraftSight is nearly identical, and produces top-quality DWGs (& acceptable PDFs) for $100/yr.
|
|
|
A solid bumper starts at the frame. A solid grill guard does, too.  .  .  An overbuilt bumper is no better than an underbuilt one.  .  .
|
|
|