Factory Tech 4R100 Valve Body Installation

June 28, 2005
Written by: E. Long
Discuss this article in this forum thread


Introduction

This "how to" article was performed on a 2000 Ford Excursion with the 7.3L Powerstroke Diesel and 4R100 transmission. I am getting the performance bug again and wanted to improve the shifting in my 4R100 transmission before installing a chip. These instructions are based off of the instructions supplied by Factory Tech with the purchase of the valve body. Always consult their installation instructions for any updates in prodedure.

Goal

The goal of this install is to improve factory shifting to firm, crisp shifts in all gears. The Factory Tech Valve Body is a complete accumulator re-calibrated for shorter shift duration, which decreases heat generated and reduces slippage and wear on the friction plates. This valve body is tuned for an aftermarket chip to leave all transmission settings at stock.

Required Tools:

(1) 13mm socket (3/8" ratchet)
(1) 10mm socket (1/4" & 3/8" ratchet for transmission pan bolts)
(1) 8mm socket (1/4" ratchet)
(1) inch-lb torque wrench
(1) ft-lb torque wrench
(2) 8-quart transmission drain pan
Lots of rags

Products needed:

(1) Factory Tech Valve Body
       
(1) Transmission filter (if you won't be reusing your existing filter)
(10) Quarts Mercon transmission fluid

Time Requirements

2-3 hours

Difficulty

3 out of 10 (1 being easiest, 10 being hardest)

Where to Buy

Step 1: Remove the transmission pan


1.) Using your 3/8" ratchet and 13mm socket, drain the transmission by removing the drain plug on the bottom of the transmission. This takes a while, keep an eye on the drain pan and be ready to swap to a second pan when the first one fills up!

2.) Reinstall the drain plug

3.) Using your 3/8" and 1/4" ratchets, remove all twenty (20) 10mm transmission pan bolts. The bolts on the rear of the transmission require a small set of hands/fingers to reach as the cross member obstructs access to these bolts. Begin by removing all of the bolts except those at the four corners of the pan.

4.) Drop the transmission pan and lay it underneath the transmission on the ground (this'll help catch additional fluid that drops and will also serve as a good spot to place the transmission filter in the next step.

5.) Remove the transmission pan gasket by hand (you may need a screw driver to gently pry it loose). Set this on top of the transmission pan as this is a reusable gaskets.

Step 2: Remove the transmission filter


1.) The filter is held in place by a peach-colored seal at the pump inlet (towards the front of the vehicle). Remove the filter with a twisting motion or you may use a screwdriver to pry it loose. It should drop out with very little effort. Note that it will still be full of transmission fluid. Keep the filter level as you remove it and dump it out into the nearby drainpan. Place the filter in the transmission pan (if you'll be reusing it), otherwise discard the filter.

2.) If you won't be reusing the filter, be sure to pry out the seal, but be careful not to scratch the sealing surface. Your new filter will come with a new seal, so you can throw the old one away. If you are keeping your existing transmission filter, then you may leave the seal in place.

Step 3: Locate and remove the accumulator


1.) With the filter removed, locate the accumulator. It is the rectangular valve body located at the front of the transmission. Use your new valve body to compare.

2.) It is held in place with eleven (11) 8mm bolts and two (2) 10mm nuts. Remove the bolts and loosen the nuts. About 1/2 quart of fluid is held by the "wormtrail" in the accumulator. Slowly lower the accumulator to avoid a spill. NOTE, when loosening the bolts, tranny fluid will begin to seep out so be sure to have a drain pan positioned below the transmission on the floor to catch the spillover.

3.) At this time, a small screen may fall from the separator plate. Simply pop the screen back in and rotate it 180 degrees to lock it. It will only fit in the correct hole.

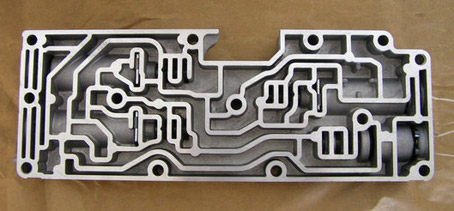
Step 4: Install the new valve body


1.) Install the new Factory Tech valve body over the studs and hold it in place loosely with the two (2) 10mm nuts.

2.) Replace and finger-tighten all eleven (11) 8mm bolts. Using your inch-lb torque wrench, tighten all bolts and nuts to 80-100 inch-lb, working from the center bolts on the valve body outward.

Step 5: (Re)install the filter and replace the transmission pan


1.) If you are installing a new transmission filter, spray WD-40 on the new filter seal and install the filter. The filter will press into the pump inlet and snap into palce. If you are reinstalling your original filter, press the filter into the pump inlet and it will snap into place.

2.) Clean the transmission pan and the magnet at the bottom of the transmission pan of any debris.

3.) Place the original transmission pan gasket on the transmission pan.

4.) Reinstall the transmission pan by finger tightening the pan bolts. Pan bolts should be tightened to 11-12 ft-lbs.

Step 6: Fill and finish
 

1.) Fill the transmission by pouring fluid into the dipstick tube. If your truck now has a deep pan, refill with 6 quarts of Mercon. With the factory pan, refill with 5 quarts.

2.) Start the engine and run the gear selector slowly through all the gears (including 2 and 1) and then return to park.

3.) Wait 30 seconds with the engine running and then check the fluid level and add fluid if necessary.

4.) Take your vehicle for a test drive, using all the gears (including 2 and 1).

5.) Check the transmission pan for leaks and check the transmission fluid level the next two times you stop for fuel.

Conclusion

Having just started towing a 7,000-lb load, I was looking into affordable bolt-on solutions for my transmission to help improve the towing experience and to prolong the life of my transmission. I've installed shift kits in the past and this was by far the easiest installation I've done. The longest part of the installation is waiting for the transmission fluid to drain out of the pan. I'm extremely happy with the improved and crisp shifting in my Excursion. Under wide open throttle, the gears really snap into place nicely. This'll really be nice when towing and will reduce any risk of heating up the trans inbetween shifts. I would recommend this modification for anybody who's the DIY type and likes crisp, firm shifting from their transmission. I can't wait to see how it performs with a chip installed.

Additional Questions or Comments?

Do you have additional questions or comments about this install article? Please discuss them in this forum thread.

HINT: Click the "printable page" button below to view this article in its entirety with higher-resolution photos.

Back to the installs page.