|
|
 ServiceDVDInstall30.jpg | Hits: 3148 | Size: 68.85 KB | Posted on: 10/15/08 | Link to this image ServiceDVDInstall30.jpg | Hits: 3148 | Size: 68.85 KB | Posted on: 10/15/08 | Link to this image
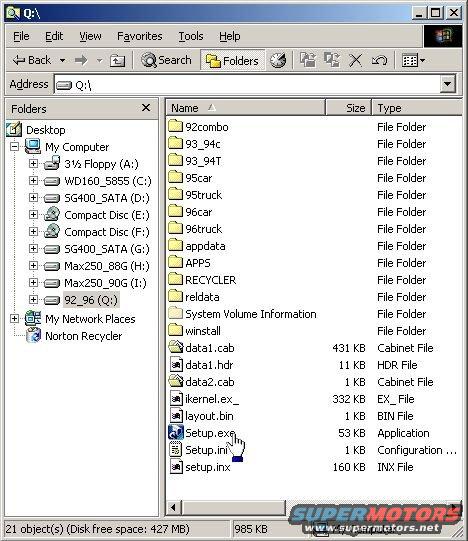
This album shows the '92-96 legacy Archive DVD, but this procedure applies to the '92-03 CDs as well. For instructions on using the '96-08 DVDs, see this album:  The data is stored in a proprietary format (*.ARC) which can't be opened except through the INCLUDED GUI, and from there, it's easy to print/copy/save. Place the disk in the drive that you plan to use every time - the GUI will only look for it in the same drive letter that it was installed from. Alternatively, the disk's entire contents (also available here) can be copied to the root directory of a drive letter on the computer, or mounted to a virtual drive using DaemonTools. Another option is to copy it to a USB flash drive. There can be other folders on that drive letter, but only one service disk, and it MUST be in the root. From the disk's root directory, run Setup.EXE . Here are the 20 Ford/L/M (North America) CDs I have: 2002 & '03 Cars 2002 Trucks & Vans 2001 Cars v08 2000 & '01 Trucks & Vans v12 2000 F-650 & 750 v01 (included on '00-01 T&V) 2000 Cars v12 1999 Trucks & Vans v13 1999 Cars v12 1998 Trucks & Vans v11 1998 Cars v14 1997 Trucks & Vans v15 1997 Cars v15 1996 Trucks & Vans v17 1996 Cars v18 1995 Trucks & Vans v11 1995 Cars v11 1993 & '94 Trucks & Vans v11 1993 & '94 Cars v10 1992 Cars, Trucks, & Vans v5.0 I also have the '89-00 TSB CD v02, but installing it on the same computer as the service discs causes problems. I don't know why. These DVDs contain ALL the same info as on the 19 CDs above, except '03 Cars: '92-96 Archive (June 01) no TSBs or FSAs '96-02 Archive v5.0 (April 06) no TSBs or FSAs Getting these disks to run under Win7 or later requires some extra steps, and someone else is working on compiling those instructions. I don't know about Linux or other OSs. It's still worth having a Haynes:  KEEP READING THE NEXT DOZEN PAGES...
|
|
|
 ServiceDVDInstall31.jpg | Hits: 2135 | Size: 36.03 KB | Posted on: 10/15/08 | Link to this image ServiceDVDInstall31.jpg | Hits: 2135 | Size: 36.03 KB | Posted on: 10/15/08 | Link to this image
After running Setup.EXE from the drive letter that you will want to use permanently, follow the on-screen instructions.
|
|
|
 ServiceDVDInstall32.jpg | Hits: 1875 | Size: 37.74 KB | Posted on: 10/15/08 | Link to this image ServiceDVDInstall32.jpg | Hits: 1875 | Size: 37.74 KB | Posted on: 10/15/08 | Link to this image
Follow the on-screen instructions.
|
|
|
 ServiceDVDInstall33.jpg | Hits: 1689 | Size: 34.67 KB | Posted on: 10/15/08 | Link to this image ServiceDVDInstall33.jpg | Hits: 1689 | Size: 34.67 KB | Posted on: 10/15/08 | Link to this image
The final folder name can be changed, but there will be fewer glitches if it stays in C:\\Ford\\
|
|
|
 ServiceDVDInstall34.jpg | Hits: 1645 | Size: 31.87 KB | Posted on: 10/15/08 | Link to this image ServiceDVDInstall34.jpg | Hits: 1645 | Size: 31.87 KB | Posted on: 10/15/08 | Link to this image
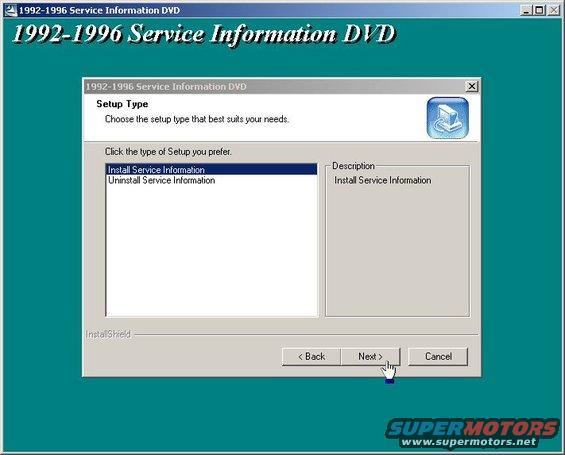
Follow the on-screen instructions.
|
|
|
 ServiceDVDInstall35.jpg | Hits: 1580 | Size: 39.14 KB | Posted on: 10/15/08 | Link to this image ServiceDVDInstall35.jpg | Hits: 1580 | Size: 39.14 KB | Posted on: 10/15/08 | Link to this image
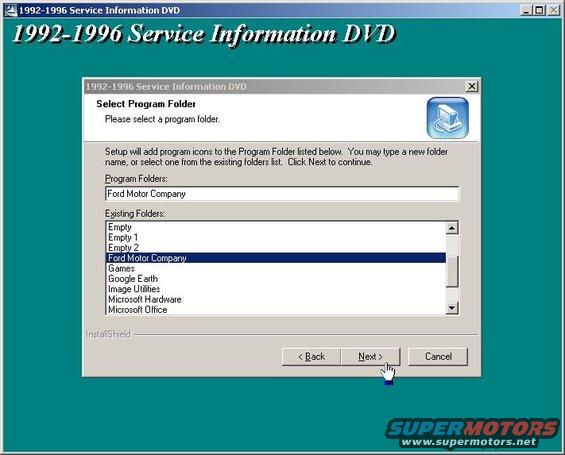
Select a START menu folder for the shortcut. A shortcut will also be added to the desktop.
|
|
|
 ServiceDVDInstall36.jpg | Hits: 1555 | Size: 20.52 KB | Posted on: 10/15/08 | Link to this image ServiceDVDInstall36.jpg | Hits: 1555 | Size: 20.52 KB | Posted on: 10/15/08 | Link to this image
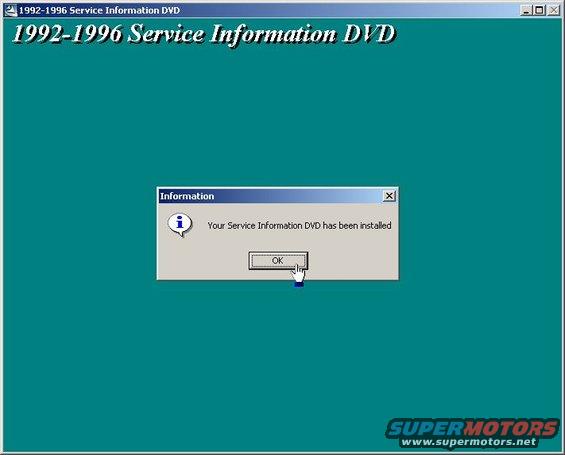
Follow the on-screen instructions. If the application doesn't start, run it from the desktop or START menu. The source disk MUST be in the same drive it was installed from for the application to find the data.
Getting these disks to run under Win7 or later requires some extra steps, and someone else is working on compiling those instructions. I don't know about Linux or other OSs.
|
|
|
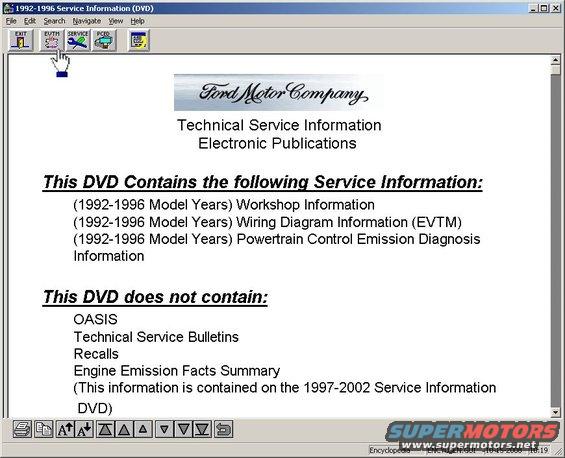 ServiceDVDInstallation37.jpg | Hits: 1733 | Size: 55.77 KB | Posted on: 10/15/08 | Link to this image ServiceDVDInstallation37.jpg | Hits: 1733 | Size: 55.77 KB | Posted on: 10/15/08 | Link to this image
For this example, the symptoms on a '96 Bronco are:
1) turn signal stalk doesn't move normally
2) turn signals don't work but hazards, wipers, & hi-beams do
3) rear defrost doesn't work, but the switch is illuminated when the parking lights are on
4) fuse #7 in the dash burns immediately when the key is in RUN
The defrost seems like the easiest to fix, so start with the EVTM.
|
|
|
 ServiceDVDInstallation38.jpg | Hits: 1518 | Size: 49.43 KB | Posted on: 10/15/08 | Link to this image ServiceDVDInstallation38.jpg | Hits: 1518 | Size: 49.43 KB | Posted on: 10/15/08 | Link to this image
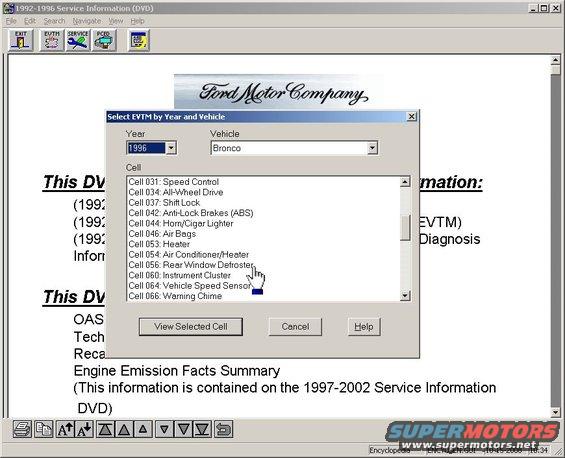
A dialogue opens allowing the vehicle & EVTM cell to be selected. Double-clicking the cell name is equivalent to clicking the cell to select, then clicking "View Selected Cell".
|
|
|
 ServiceDVDInstallation39.jpg | Hits: 1533 | Size: 48.08 KB | Posted on: 10/15/08 | Link to this image ServiceDVDInstallation39.jpg | Hits: 1533 | Size: 48.08 KB | Posted on: 10/15/08 | Link to this image
The entire cell is shown on one browser page. The slider on the R side will scroll down to subsequent cell pages, but in this case, there is only one.
Using this diagram, it's obvious why the defrost switch illumination still works: it's fed from the instrument panel circuit, and merely grounds through the defrost switch. Since the defrost doesn't come on, but the ground obviously works, the fuses are suspicious. To check power in the connector, the pinout is needed, so note the connector number of the wires in question (C278 for all 5 wires) & click "Connector".
|
|
|
 ServiceDVDInstallation40.jpg | Hits: 1566 | Size: 28.17 KB | Posted on: 10/15/08 | Link to this image ServiceDVDInstallation40.jpg | Hits: 1566 | Size: 28.17 KB | Posted on: 10/15/08 | Link to this image
A list of all connectors shown in the source cell appears. Scrolling up or down will show the lists of components, grounds, splices, & referenced pages.
To check the defrost switch connector, click its number.
|
|
|
 ServiceDVDInstallation41.jpg | Hits: 1638 | Size: 27.58 KB | Posted on: 10/15/08 | Link to this image ServiceDVDInstallation41.jpg | Hits: 1638 | Size: 27.58 KB | Posted on: 10/15/08 | Link to this image
The connector's location appears. This particular connector does not include a diagram - just a text description. It has 5 terminals and is molded from Natural-colored plastic. To see the pinout, click "Connector". Some connector pinouts (including most with 3 or fewer terminals) are not shown.
|
|
|
 ServiceDVDInstallation42.jpg | Hits: 1597 | Size: 42.27 KB | Posted on: 10/15/08 | Link to this image ServiceDVDInstallation42.jpg | Hits: 1597 | Size: 42.27 KB | Posted on: 10/15/08 | Link to this image
Pins 2 & 3 are the suspect terminals. After testing with a voltmeter or 12V test light with the key OFF and in RUN, it is found that pin 3 is never hot.
To trace that circuit, hit ESCAPE or click the back button 2x to return to the defroster cell.
|
|
|
 ServiceDVDInstallation43.jpg | Hits: 1625 | Size: 48.1 KB | Posted on: 10/15/08 | Link to this image ServiceDVDInstallation43.jpg | Hits: 1625 | Size: 48.1 KB | Posted on: 10/15/08 | Link to this image
Fuse 7 is the feed for pin 3, and its details are shown on page 13-3, so click PAGE, then click 13-3 from the list.
|
|
|
 ServiceDVDInstallation44.jpg | Hits: 1731 | Size: 70.32 KB | Posted on: 10/15/08 | Link to this image ServiceDVDInstallation44.jpg | Hits: 1731 | Size: 70.32 KB | Posted on: 10/15/08 | Link to this image
Since the fuse burns, it obviously has power coming from the battery, so this diagram doesn't help. But the circuit is continued on page 13-10, so click PAGE again and go there. Alternatively, since the target page is in this same cell, the RHS scroll bar can be used to find that page.
|
|
|
 ServiceDVDInstallation45.jpg | Hits: 1591 | Size: 56.74 KB | Posted on: 10/15/08 | Link to this image ServiceDVDInstallation45.jpg | Hits: 1591 | Size: 56.74 KB | Posted on: 10/15/08 | Link to this image
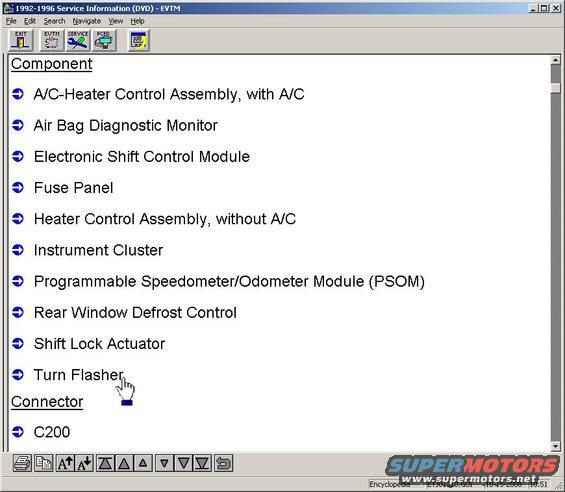
There are no splices or connectors in the circuit, but fuse 7 also feeds the turn signals, which are another symptom, so explore that circuit by clicking COMPONENT.
|
|
|
 ServiceDVDInstallation46.jpg | Hits: 1556 | Size: 44.95 KB | Posted on: 10/15/08 | Link to this image ServiceDVDInstallation46.jpg | Hits: 1556 | Size: 44.95 KB | Posted on: 10/15/08 | Link to this image
Click Turn Flasher to view the cell containing it.
|
|
|
 ServiceDVDInstallation47.jpg | Hits: 1553 | Size: 69.81 KB | Posted on: 10/15/08 | Link to this image ServiceDVDInstallation47.jpg | Hits: 1553 | Size: 69.81 KB | Posted on: 10/15/08 | Link to this image
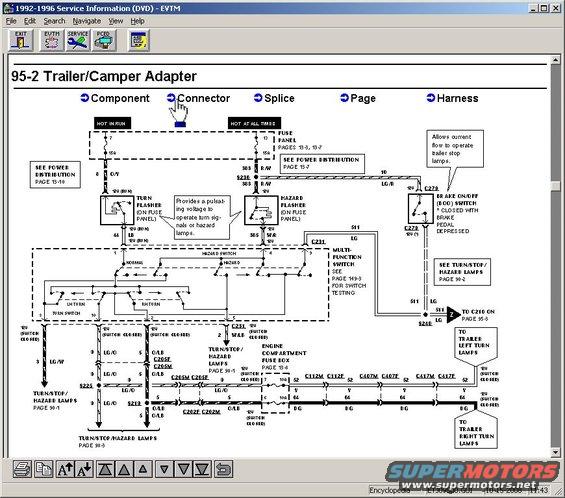
Following the circuit down (toward ground), it passes through the MFS, which is another symptom. It's also a known problem, so it's reasonable to think the bad MFS might be the source of ALL the symptoms.
|
|
|
 ServiceDVDInstallation48.jpg | Hits: 1597 | Size: 69.9 KB | Posted on: 10/15/08 | Link to this image ServiceDVDInstallation48.jpg | Hits: 1597 | Size: 69.9 KB | Posted on: 10/15/08 | Link to this image
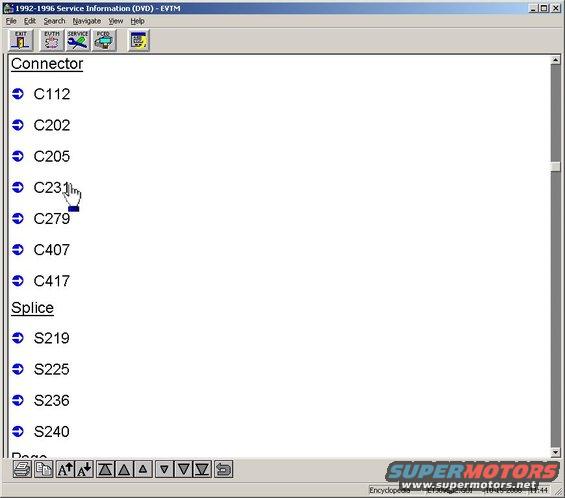
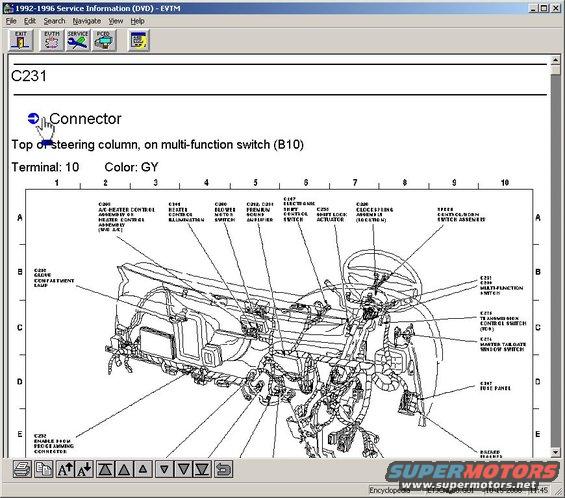
Since the wires in question pass through C231, find the pinout for that connector.
|
|
|
 ServiceDVDInstallation49.jpg | Hits: 1523 | Size: 28.39 KB | Posted on: 10/15/08 | Link to this image ServiceDVDInstallation49.jpg | Hits: 1523 | Size: 28.39 KB | Posted on: 10/15/08 | Link to this image
Click C231
|
|
|
 ServiceDVDInstallation50.jpg | Hits: 1658 | Size: 69.76 KB | Posted on: 10/15/08 | Link to this image ServiceDVDInstallation50.jpg | Hits: 1658 | Size: 69.76 KB | Posted on: 10/15/08 | Link to this image
Click Connector to see the pinout.
|
|
|
 ServiceDVDInstallation51.jpg | Hits: 1504 | Size: 46.28 KB | Posted on: 10/15/08 | Link to this image ServiceDVDInstallation51.jpg | Hits: 1504 | Size: 46.28 KB | Posted on: 10/15/08 | Link to this image
Remembering that this view is INTO the face of the connector, it will be a mirror-image of the view into the component.
To learn how to remove the MFS, open the service manual.
|
|
|
 ServiceDVDInstallation52.jpg | Hits: 1607 | Size: 50.16 KB | Posted on: 10/15/08 | Link to this image ServiceDVDInstallation52.jpg | Hits: 1607 | Size: 50.16 KB | Posted on: 10/15/08 | Link to this image
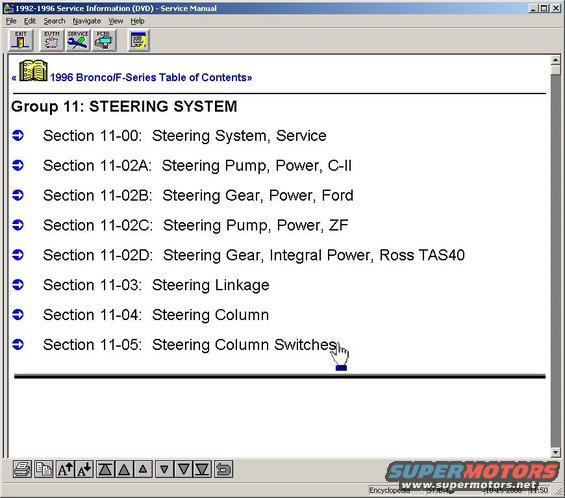
In the dialogue box, select the vehicle again. The MFS is inside the steering column, so go to the steering group.
|
|
|
 ServiceDVDInstallation53.jpg | Hits: 1465 | Size: 53.68 KB | Posted on: 10/15/08 | Link to this image ServiceDVDInstallation53.jpg | Hits: 1465 | Size: 53.68 KB | Posted on: 10/15/08 | Link to this image
Click Steering Column Switches.
|
|
|
 ServiceDVDInstallation54.jpg | Hits: 1475 | Size: 48.84 KB | Posted on: 10/15/08 | Link to this image ServiceDVDInstallation54.jpg | Hits: 1475 | Size: 48.84 KB | Posted on: 10/15/08 | Link to this image
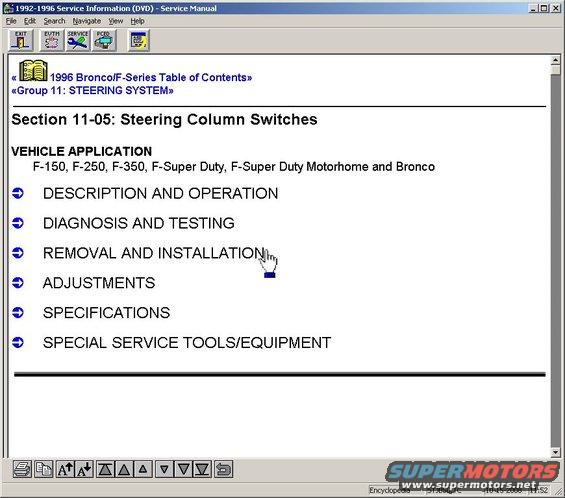
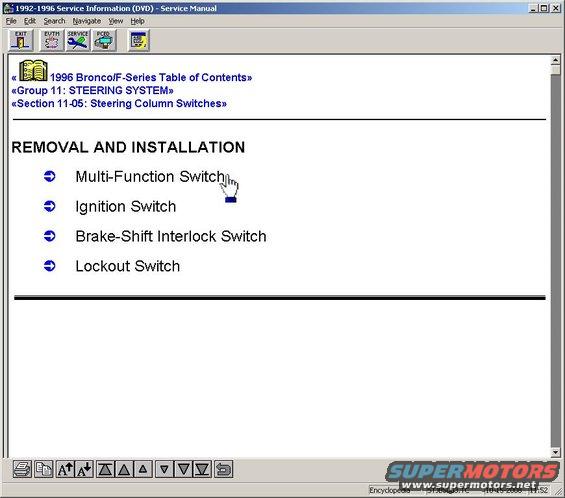
Click Removal and Installation.
|
|
|
 ServiceDVDInstallation55.jpg | Hits: 1531 | Size: 38.79 KB | Posted on: 10/15/08 | Link to this image ServiceDVDInstallation55.jpg | Hits: 1531 | Size: 38.79 KB | Posted on: 10/15/08 | Link to this image
Click MFS.
|
|
|
 ServiceDVDInstallation56.jpg | Hits: 1419 | Size: 58.49 KB | Posted on: 10/15/08 | Link to this image ServiceDVDInstallation56.jpg | Hits: 1419 | Size: 58.49 KB | Posted on: 10/15/08 | Link to this image
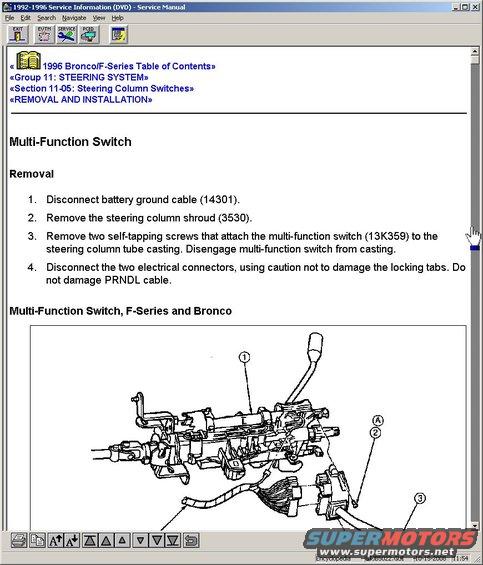
Follow the instructions to gain access to the MFS pins. After testing continuity, it is found that pin 1 on the MFS is always shorted to pins 2, 5, 8, & 10 indicating a bad MFS. With the MFS removed, fuse 7 does not burn & the rear defrost works, confirming the diagnosis. Installing a known-good MFS will complete the repair, so test the replacement part BEFORE installation, EVEN if it's new. Use the slider bar to scroll down the page to see installation instructions. For instructions on using the later DVDs, see this album:  Getting these disks to run under Win7 or later requires some extra steps, and someone else is working on compiling those instructions. I don't know about Linux or other OSs.
|
|
|
 Fuse8IP94Bronco.jpg | Hits: 3127 | Size: 47.99 KB | Posted on: 1/30/05 | Link to this image Fuse8IP94Bronco.jpg | Hits: 3127 | Size: 47.99 KB | Posted on: 1/30/05 | Link to this image
1994 IP Fuse 8
|
|
|
 HDMirrorConnectors03.jpg | Hits: 2144 | Size: 34.65 KB | Posted on: 11/3/05 | Link to this image HDMirrorConnectors03.jpg | Hits: 2144 | Size: 34.65 KB | Posted on: 11/3/05 | Link to this image
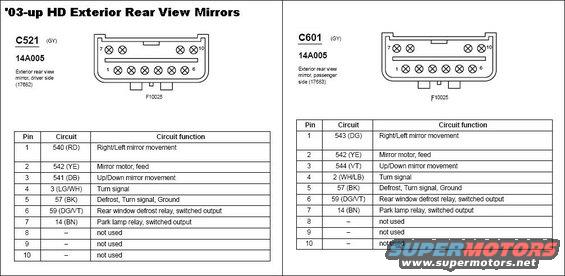
Connectors for '03-up HD side mirrors
|
|
|
 HeadlightC205ab-04F250.jpg | Hits: 2264 | Size: 59.22 KB | Posted on: 1/13/06 | Link to this image HeadlightC205ab-04F250.jpg | Hits: 2264 | Size: 59.22 KB | Posted on: 1/13/06 | Link to this image
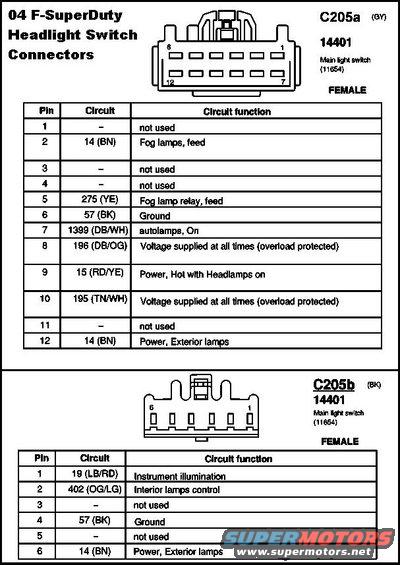
Headlight Connectors 04 SD
|
|
|
 HeadlightC273,4-99F250.jpg | Hits: 2132 | Size: 27.5 KB | Posted on: 1/14/06 | Link to this image HeadlightC273,4-99F250.jpg | Hits: 2132 | Size: 27.5 KB | Posted on: 1/14/06 | Link to this image
99 SuperDuty Headlight Connectors
|
|
|
2000 F150 Starter Circuit
|
|
|
 PowerMirror97C511.JPG | Hits: 2821 | Size: 34.91 KB | Posted on: 9/13/07 | Link to this image PowerMirror97C511.JPG | Hits: 2821 | Size: 34.91 KB | Posted on: 9/13/07 | Link to this image
Power Mirror Switch Connector '97 F150 C511
|
|
|
 PCED94-HighIdle.JPG | Hits: 3115 | Size: 73.97 KB | Posted on: 5/8/10 | Link to this image PCED94-HighIdle.JPG | Hits: 3115 | Size: 73.97 KB | Posted on: 5/8/10 | Link to this image
'94 PCED Chart 7 - High Idle / Dieseling
|
|
|