|
Step 1: Remove wheel
|
 |
Tools needed: Jack, jackstands, tire-iron
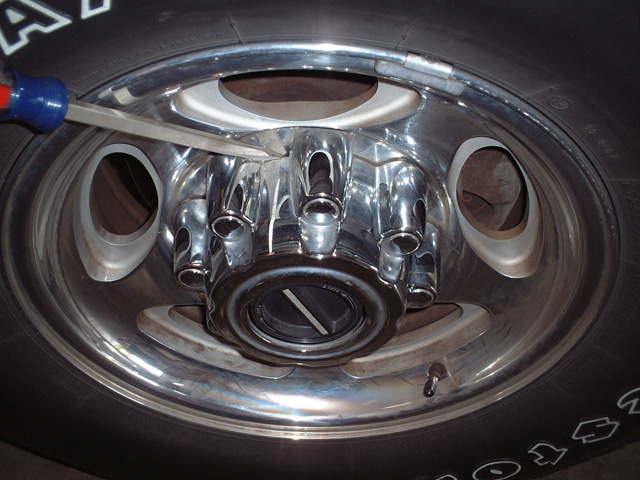
1.) Start with any wheel you'd like. This article begins with the driver's side front wheel/brake. Locate the tab on the beauty cap on each wheel as pointed out in the picture to your left.
2.) Remove the tire-iron from the engine compartment of your Excursion (it's mounted right on top of the raditor--careful, it will be hot if you've driven within the past hour).
3.) Use the end of the tire-iron (with the rubber casing) to pry off the beauty caps from your wheel
4.) Use the other end of your tire-iron to loosen all 8 lug nuts (make sure to loosen lug nuts before jacking the wheel up, otherwise you will have no leverage and the wheel will just rotate if you try to loosen the lug nuts with the wheel jacked up in the air)
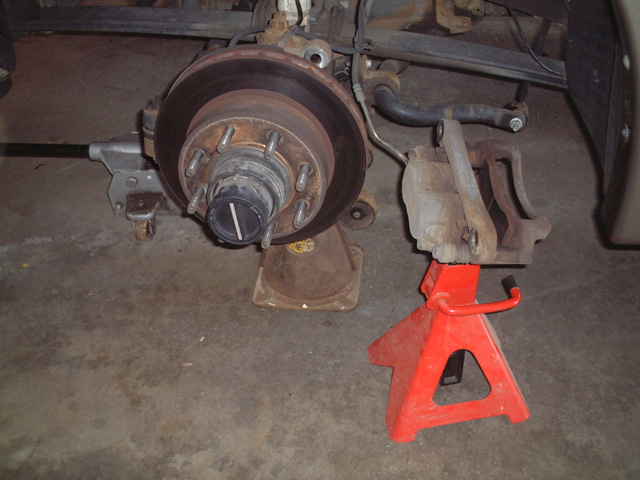
5.) Jack up vehicle high enough to remove wheel
6.) Place vehicle on jackstands
7.) Remove the wheel
|
|
|
Step 2: Locate caliper bolts
|

 |
Tools needed: n/a
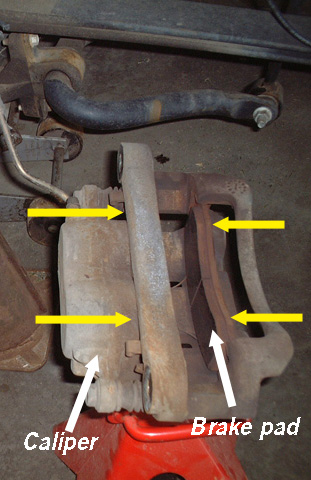
1.) Locate the upper and lower (21mm front rotors, 18mm rear rotors) caliper bolts as noted in the pictures to your left.
|
|
|
Step 3: Remove caliper
|
 |
Tools needed: 1/2" breaker bar, 3" extension for 1/2", 18mm socket (rear), 21mm socket (front), 1/2" ratchet, 18mm wrench* (rear), 21mm wrench* (front), sledge hammer or mallot, jack stand
*This is the most time-consuming process of this project. My caliper bolts were very hard to remove and it took repeated pounding until the bolts broke loose. Do not be afraid to use a lot of force as I really was nailing the 1/2" breaker bar with my hand-held sledge hammer. Only one bolt gave me problems and naturally it was the last one which added on an hour to the project. I ended up using the closed end of the 18mm wrench to loosen up the seized bolt whose head had become very stripped after many unsuccessful attempts to loosen. My best advice is to take frequent breaks if you have a seized bolt so that you do not become overly frustrated.
1.) Loosen upper and lower bolts by hitting the 1/2" breaker bar (w/ 18mm socket) with a sledge hammer or mallot. Plenty of force is necessary.
2.) Use 1/2" ratchet (with extension where necessary to avoid bloody knuckles) to loosen and remove the lower bolt.
3.) Use 1/2" ratchet (with extension where necessary to avoid bloody knuckles) to loosen and remove the lower bolt -- make sure to hold the caliper with your free hand and have your jackstand nearby. The caliper will be loose and may fall off on its own, but more than likely you will have to pull it off of the rotor as the brake pads will fit very snug against the rotor.
4.) Remove caliper and place on 3rd jackstand. Careful, it is heavy! Do not let it fall to avoid disconnected the brake line that runs to the caliper.
|
|
|
Step 4: Remove rotor
|
 |
Tools needed: n/a
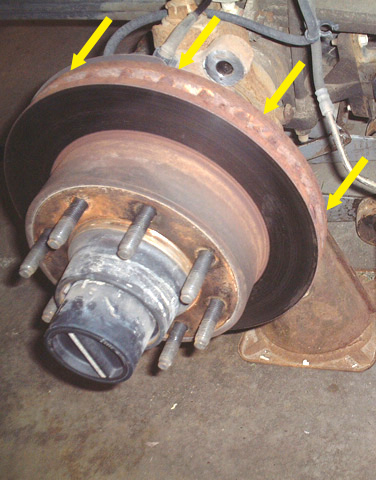
1.) Rotors remove fairly easily. Facing the rotor, pull from the back edges (like the yellow arrows show in the picture to the left) towards you. You may need to pound it once or twice with your fist from behind, but outside of that, it'll pull right off of the lugs.
|
|
|
Step 5: Remove brake pads from caliper
|
 |
Tools needed: Screwdriver
1.) The brake pads are another easy item to remove. Start with either one and push from the outside in (as shown by the yellow arrows in the picture to your left) with a screwdriver to remove the brake pads. Be sure to take note as to how the brake fasteners/retainers are held in place as they are likely to fall out with the pads. They are easy to reseat, just be sure to note which one goes where!
|
|
|
Step 6: Install ART rotor
|

 |
Tools needed: n/a
NOTE: Front and rear rotors are different!
1.) Install the ART rotor. Take note of which rotor you are installing as front and rear rotors are different sizes as noted in the picture to your left.
|
|
|
Step 7: Compress caliper
|

 |
Tools needed: C-clamp
1.) The calipers must be compressed in order for the new brake pads to fit over the rotor. Use the c-clamp to individually compress the calipers down all the way. By all the way I mean until the calipers aren't extended out anymore. This step must be done otherwise your new brake pads will not fit. The caliper was left in the last position for the old brake pads which have more wear and thus are worn and require the calipers to be in an extended state.
|
|
|
Step 8: Install new brake pads
|
 |
Tools needed: n/a
1.) Reinstall the new brake pads. Front pads are a different size from rear, but you cannot get them mixed up because front pads only fit on the front calipers and rear pads only fit on the rear calipers. Front calipers also have a set of retainer springs that must be installed prior to inserting the brake pads into the caliper. With the retainer springs installed, with a firm grip compress the brake pads together and slowly drop them into place in the caliper. It will take a couple of tries as these retainer clips have a tendency to pop out of position quite easily. Patience is important during this step!
|
|
|
Step 9: Re-install caliper
|
 |
Tools needed: 1/2" breaker bar, 3" extension for 1/2", 18mm socket (rear) 21mm socket (front), 1/2" ratchet
1.) This part is only difficult because of the weight of the calipers and how touchy it is when being reinstalled. Carefully slide it onto the rotor without bumping it so the brake pads fall out.
2.) Reinstall bolts and tighten.
|
|
|
Step 10: Re-install wheel
|
|
Tools needed: tire-iron
torque wrench
1.) Reinstall the lug nuts on the wheel by tightening in a star-shaped pattern. You will have to have the wheel on the ground before you can fully tighten the lug nuts (otherwise the wheel will spin when jacked up in the air).
2.) Make final tightening with a troque wrench. The key to maintaining happy rotors on the Excursion is equal torque on the lug nuts. Ford recommends 150-165 ft-lbs. Regardless of what you choose, just make sure that they are the same on all 8 lugs per wheel. Variances will cause excess heat build-up and will lead to warping. Even cryogenically frozen rotors can warp if the lug nuts are not torqued correctly. I tightened mine to 155 ft-lbs.
|
|
Conclusion
|
|
If your rotors were previously warped and you were experiencing pulsating brakes when coming to a stop, newly installed rotors will act like this only for the first mile or two. Your antilock brake system quickly adjusts and you will feel controlled braking shortly!
|
|
10% Discount Available on ART Rotors
|
|
One of the many perks of a SuperMotors subscription is access to sponsor discounts. For details on the 10% discount offered to SuperMotors members by ART, please click here.
|
|
Additional Questions or Comments?
|
|
Do you have additional questions or comments about this install article? Please discuss them in this forum thread.
|