Diagram comparing Ford Bronco frames 1980-81, 1982-91 and 1992-9…
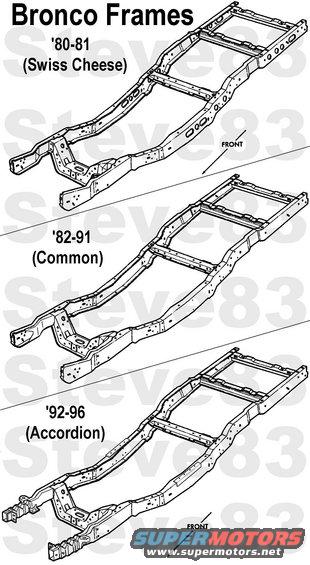
'80-96 Bronco Frames
IF THE IMAGE IS TOO SMALL, click it.
Shock towers, engine perches, radius arm brackets, riveted body perches, rear shock & spring mounts NOT SHOWN.
The '80-81 frame is dimensionally identical to the '82-86 frame; the only difference is the lightening holes.
The '87-91 frame has some extra slots in the front horns for that style of front bumper bracket, and possibly a minor change to the front body mount (core support mount).
The '92-96 accordion frame is 2 inches longer in front than the others, though its bumper mounting tabs are about 1 inch closer to the core support. Most also have a reinforcement along the top edge at the lowest point (under the front doors). Bronco frames have the sway bar tabs welded AND pointed inboard; F-series tabs are welded inboard, but point outboard so they underhang each frame rail. .
.  .
.  .
.  .
.  .
.  .
.  .
.  .
.  .
. 
Frame Strength Identification
'80-96 F-Series, F-Super Duty Chassis Cab and Bronco all use a 36,000 psi steel frame.
'80-96 Bronco/F150 frame 0.146 thick
UNCONFIRMED RUMOR: '93-95 Lightning frame 0.17 thick
'93 & '97 F250 >8500GVWR frame 0.250 thick
Frame Service - Drilling Precautions
CAUTION: Do not drill holes in the frame flanges (top & bottom surfaces). This will reduce the strength of the frame (5005).
If a hole must be drilled in the frame, make sure that it meets all of the following requirements:
1. The hole is located in the upper half of the frame.
2. The edge of the drilled hole and the edge of the nearest hole are at least 25mm (1 inch) apart.
3. The edge of the drilled hole is at least 25mm (1 inch) from the edge of the flange.
4. The drilled hole is not adjacent to any other existing brackets or components of frame.
Welding Precautions
CAUTION: Disconnect the battery ground cable (14301) before using any electric welding equipment.
All welding on frame must be done with electric welding equipment, and the heat should be kept in a small area to prevent change in hardness of the metal. Do not use gas welding equipment. A double reinforcement must be added to frames where heat or weld is applied to the area to be repaired. The welds are to run lengthwise along the reinforcement when a reinforcement is to be welded to the frame side rail.
Weld Attachment
To ensure a quality repair, adhere to the following procedure if it is necessary to weld reinforcements to the frame.
1. Wire brush the area around the crack to remove the paint, grease, mud, etc., and to expose the crack completely and ensure good weld adhesion.
2. To stop the crack from spreading, drill a 6.35mm (1/4-inch) hole at a point 12mm (0.50 inch) beyond the root of the crack.
3. Grind out the full length of the crack to the hole to form a V-shaped slot with the base of the V-slot contacting the reinforcement.
4. The base of the V-slot should have at least a 1.52mm (0.06-inch) opening to ensure weld penetration to the reinforcement when welding the crack.
5. Drill clearance holes in the reinforcements to clear rivet heads and bolt heads or nuts where necessary.
6. In the event that repair is required on more than one frame surface (i.e., a flange crack that extends into the web), two pieces of flat stock (one for each surface) should be utilized and welded together where they join. The web reinforcement should be a minimum of 76.20mm (3.0 inches) high and have a 63.50mm (2.5-inch) radius at each of the two corners.
7. Completely clean the surface of frame under and around the reinforcements.
8. Clamp the reinforcements securely to the frame prior to welding.
9. Weld the reinforcement all around after welding the crack V-slot.
10. The flange edge weld should be ground smooth after all pit holes have been filled by the weld.
11. If a damaged bolted-on frame bracket is to be replaced, the new bolts, washers, and nuts should be of the same specifications and bolt torques as the original parts.
12. In cases where it is necessary to remove rivets, replace them with Property Class 9.8 metric (Grade 8 ) nuts, bolts and washers of the next larger size (i.e., for 3/8-inch diameter rivets use 7/16-inch bolts, for 7/16-inch diameter rivets use 1/2-inch bolts). This requires line drilling of the holes to the same diameter as the new bolt (i.e., either 0.437 diameter or 0.500 diameter).
Frame Straightening
Misalignment of frame can be corrected by straightening the out-of-line parts or by replacing the crossmembers, braces, or brackets if they are badly damaged.
WARNING: DO NOT STRAIGHTEN FRONT FRAME RAIL CONVOLUTES.
Straightening should be attempted on frames that fail to meet specifications of the diagonal checking method or where damage is visually apparent.
However, to prevent internal stresses in the metal, frame straightening should be limited to parts that are not severely bent. If heat is needed to straighten a frame member, keep the temperature below 649 degC (1200 degF) (a dull red glow). Excessive heat may weaken the metal in the frame members and cause permanent damage.
Frame Reinforcing
After a bent frame member has been straightened, inspect the member closely for cracks. If any cracks show, the frame member should be reinforced or replaced.
Reinforcements should be made from angle or flat stock of the same material and thickness as the frame member being reinforced, and should extend a minimum of 152.40mm (6 inches) to either side of the crack. Ideally, the reinforcement should be cut from the corresponding area of a similar frame.
Frame Member Replacement
If a damaged frame member is to be replaced, new bolts, Property Class 9.8 metric (Grade 8 ) fasteners and rivets required for replacement of parts should be of the same specifications as the original bolts or rivets. In cases where it is necessary to substitute a bolt for a rivet, use the next larger size bolt.
High-strength & heat-treated frame welding bulletin
https://fordbbas.com/publications
https://www.fleet.ford.com/maintenance/vin_tools/default.asp
http://forum.garysgaragemahal.com/Frame-repair-kit-E5TZ-5K130-A-NOS-tp26054p26540.html
Is this accurate? Sign in to help verify it.
Comments
More from this build


No comments yet.