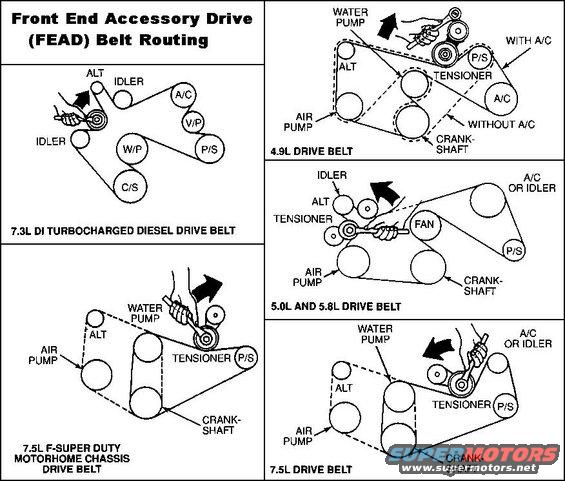
Serpentine belt routing diagrams for several Ford engine sizes i…
Serpentine Belt Routing & Tensioner
Use a wrench on the tensioner pulley bolt (NOT the tensioner mounting bolt) or a square drive in the hole on the tensioner arm (if provided).
Measure belt tension using the special tool after retracting & then slowly releasing the tensioner, and again after forcing the tensioner 1/2" farther, then releasing. The average of the 2 measurements is the belt tension.
TORQUE SPECIFICATIONS
Description . . . . . . . . . . . . . . . . . . . . . . . . . . . . . . . . . . . . . . . . . . . . . . . Nm . . . . . . Lb-Ft
Pivot Bolt, Alternator, 7.5L, All . . . . . . . . . . . . . . . . . . . . . . . . . . . . . . . 54-71 . . . . . 40-52
Adjuster Bolt, Alternator, 7.5L . . . . . . . . . . . . . . . . . . . . . . . . . . . . . . . 20-30 . . . . . 15-22
Bolt, Automatic Tensioner-to-Bracket, 4.9L, 7.5L . . . . . . . . . . . . . . 68-92 . . . . . 50-68
Bolt, Automatic Tensioner-to-Bracket, 5.0L, 5.8L, 7.3L Diesel . . . 47-63 . . . . . . 35-46
Screw, Fan-to-Clutch, 4.9L, 5.0L, 5.8L, 7.5L . . . . . . . . . . . . . . . . . . 16-24 . . . . . 12-18
Clutch-to-Water Pump, 4.9L . . . . . . . . . . . . . . . . . . . . . . . . . . . . . . . . 53-72 . . . . . 39-53
Screw, Clutch-to-Water Pump, 5.0L, 5.8L, 7.5L . . . . . . . . . . . . . . . 16-24 . . . . . 12-18
Screw, Clutch-to-Water Pump, 7.3L . . . . . . . . . . . . . . . . . . . . . . . . . 113-153 . . . 84-113
Ford vehicles are equipped with poly-V drive belts (8620). To ensure maximum belt life, replacement drive belts should be of the same type and specification as originally installed. The drive belts (except for 7.5L generator belt) are tensioned by an automatic belt tensioner which maintains proper belt tension at all times. The 7.5L generator belt is not automatically tensioned and requires periodic tensioning. Loose drive belts will result in slippage that may cause a noise complaint or improper accessory operation (generator (GEN) (10300) will not charge, etc.). Overly tight drive belts will place severe loads on accessory bearings and result in premature drive belt or accessory failure.
Drive Belt Cracking/Chunking/Wear
Under severe operating conditions (high temperatures, low humidity), drive belt rib cracking can occur at less than 96,000 km (60,000 miles). Drive belt rib cracking perpendicular to the belt ribs is not a reason for concern and has no detrimental effect on belt performance. Cracks parallel to ribs are not acceptable. Drive belt chunking means that the rubber material actually chunks out between the cracks. The drive belt (8620) should be replaced if chunking occurs.
Drive Belt Noise/Flutter
Drive belt chirp is a regularly occurring chirping noise that occurs due to pulley misalignment or excessive pulley runout. It can be a result of a damaged pulley or an improperly replaced pulley that was not properly aligned. To correct, determine the area where the noise comes from. Then check each of the pulleys in that area with a straightedge to the crankshaft pulley (6312) and look for the accessory pulleys to be out of position in the fore/aft direction or at an angle to the straightedge.
Belt squeal is an intermittent noise that occurs when the drive belt slips on a pulley during certain conditions such as: engine start-up, rapid engine acceleration, or A/C clutch engagement. Drive belt squeal can occur under the following conditions:
1. If the A/C discharge pressure goes above 2895 kPa (420 psi). This can occur if:
a) The A/C system is overcharged.
b) The A/C condenser core airflow is blocked.
c) The fan blade (8600) is not engaging fully at idle.
d) If A/C OFF equalized pressure (the common discharge and suction pressure that occurs after several minutes) exceeds 965 kPa (140 psi), which is a rare occurrence at high ambient temperatures with a hot engine, turn A/C off for a few seconds and then back on after fan blade begins to cool A/C condenser core.
2. If any of the accessories are damaged, or have a worn or damaged bearing or internal torsional resistance above normal for any reason. All of the accessories should be rotatable by hand in the unloaded condition. If any are not, the accessories should be inspected.
3. If fluid gets on the drive belt. Fluids include power steering fluid, engine coolant, engine oil or air conditioning system lubricant.
4. If fluid does get on the drive belt during service, the best policy is to clean the drive belt with soap and water and thoroughly rinse with clean water. The drive belt does not have to be replaced if no apparent damage has occurred.
5. If drive belt is too long. A drive belt that is too long will allow the drive belt tensioner arm to go all the way to drive belt tensioner arm travel stop under certain load conditions, which will untension the drive belt. If the drive belt tensioner (6B209) is resting on the stop, replace the drive belt.
6. If the drive belt tensioner is worn or damaged. The drive belt tensioner arm should rotate freely without binding.
Drive Belt Replacement
Conditions requiring drive belt (8620) replacement are rib chunk out, excessive wear, severe glazing, frayed cords. Replace any drive belt exhibiting any of these conditions. Minor cracks in the ribbed side of V-grooved portion of the drive belt are considered acceptable.
NOTE: Refer to the proper serpentine drive belt routing diagram in this section, or as indicated on the underhood label, for the specific engine (6007) being serviced.
1. Route drive belt on the pulleys properly as indicated on the correct diagram. The belt span that extends past the flat belt idler pulley (8678 ) should be loose.
2. Check to see that the drive belt is positioned correctly on all pulleys. Make sure all drive belt ribs are correctly seated in the pulley grooves.
3. Install a closed-end wrench on the drive belt tensioner pulley and rotate in the proper direction to lift the tensioner arm away from the drive belt and install the drive belt properly under the flat idler pulley to install. Do not allow the drive belt tensioner (6B209) to snap back because this may damage the drive belt.
CAUTION: Make sure the drive belt is properly seated on all pulleys. One revolution on the engine with an incorrectly seated drive belt may snap the tensile members in the drive belt.
4. Visually inspect drive belt alignment.
5. Slowly release the drive belt tensioner toward the drive belt to tighten the drive belt and complete installation.
Drive Belt Tensioner, Automatic
The drive belt tensioner will maintain correct belt tension if the correct length drive belt (8620) is on the engine (6007). To verify that the drive belt tensioner is working properly on the 4.9L, 7.3L and 7.5L engines, check to see that the belt length indicator mark on the drive belt tensioner is between the maximum and minimum marks. The 5.0L and 5.8L drive belt tensioners do not have belt length indicator marks. This belt system has a drive belt tensioner that can be improperly installed if the pivot bolt is cross-threaded in the generator mounting bracket (10153) or bent. This can result in an out-of-sheave line condition of the belt idler pulley (8678 ).
1. Check that the end of the tensioner spring is looped around the spring stop in the generator mounting bracket and can provide the 60 pound nominal output (±15 percent).
2. Check that the routing idler bolt is not cross-threaded and is tightened to 47-63 Nm (34-46 lb-ft).
3. Check that both the drive belt tensioner and belt idler pulley are parallel to each other and the sheave line.
Removal and Installation
1. Install a closed-end wrench on the tensioner pulley bolt and lift the tensioner arm away from the drive belt (8620).
2. Remove old drive belt. Release drive belt tensioner (6B209) slowly. Do not allow drive belt tensioner to snap back after the drive belt is removed because this may damage the drive belt tensioner.
3. Remove drive belt tensioner by loosening the tensioner pivot bolt.
4. Install drive belt tensioner. Tighten pivot bolt to 47-63 Nm (34-46 lb-ft).
5. CAUTION: Make sure the drive belt is properly seated on all pulleys. One revolution of the engine (6007) with an incorrectly seated drive belt may snap tensile members in the drive belt.
Install new drive belt over pulleys making sure that all belt ribs are correctly seated in the pulley grooves.
Belt Tensioner Pulley Replacement
Engine . . . Tensioner . . . . . . . Replacement Pulley
4.9L/7.5L F5TE-6B209-CA E9TA-19A216-BA
Conditions requiring pulley replacement are excessive pulley wear or pulley bearing noise usually resulting from extended operation in abrasive off-road conditions.
Using a 16mm closed-end wrench, remove the drive belt (8620) according to the Drive Belt Tensioner, Automatic removal procedure in this section.
Removal
NOTE: 7.5L (not F-Super Duty Motorhome Chassis) bolts have a left-hand thread, requiring clockwise motion to loosen the bolts. 4.9L and 7.5L F-Super Duty Motorhome Chassis idler pulley bolts, which loosen counterclockwise, have a conventional right-hand thread,
1. NOTE: Excessive rearward force on the bolt during removal may overstress and crack the tensioner arm.
NOTE: Pulleys being replaced for suspected bearing wear should be evaluated for rough bearings. Bearing noise that continues or rapidly returns after a replacement pulley is installed is usually belt chirp rather than worn bearings. Bearings should rotate smoothly with a slight resistance due to the permanent lubrication.
Using the 16mm wrench, loosen the belt idler pulley retention bolt or nut.
2. Remove bolt or nut and dust shield and remove the drive belt tensioner (6B209) from the tensioner arm locating boss.
Installation
1. Replace the pulley and reverse the removal instructions observing the correct rotation of the retention bolt.
2. Tighten bolt or nut to specifications.
Drive Belt Misalignment
CAUTION: Incorrect drive belt installation will cause excessive drive belt wear and may cause the drive belt to come off the drive pulleys.
NOTE: Original equipment drive belts are made of a special cord construction and are subjected to special testing before they are approved for use.
Replacement drive belts, other than O.E.M., may track improperly. If a replacement drive belt tracks improperly, the drive belt should be replaced with an O.E.M. drive belt to avoid performance failure or loss of drive belt during cold operation.
With the engine running, check drive belt tracking (the position of the drive belt on the drive belt tensioner). If the edge of the drive belt rides beyond the edge of the drive belt tensioner, this can cause noise and premature wear. If a drive belt tracking condition exists, visually check the drive belt tensioner for damage, especially the mounting pad surface. If the drive belt tensioner is not installed correctly with the locating pins in the locating holes, the mounting surface pad will be out of position. This will result in drive belt tension and chirp and squeal noises. If these procedures do not correct the drive belt noise, try replacing the drive belt with a known good original equipment drive belt. However, the drive belt noise may return again (with mileage) if one of the above conditions still exists uncorrected.
With engine running, visually observe the grooves in the pulleys (not the pulley flanges) for excessive wobble. Replace components as required.
Check all accessories, mounting brackets and drive belt tensioner for any interference that would prevent the component from mounting properly. Correct any interference condition and recheck belt tracking. Tighten all accessories mounting brackets and drive belt tensioner retaining hardware to specification. Recheck drive belt tracking. .
. 
Is this accurate? Sign in to help verify it.
Comments
More from this build


No comments yet.