Ford Excursion Install Articles
Welcome to the install articles where we take the opportunity to document, step-by-step, installs and howto's for the Ford Excursion. We accept articles from all registered users of the site and encourage people to document each of their modifications so that we can convert it into an install article for all to read and learn from. Please contact Eric via the SuperMotors profile page (you must be a registered user on SuperMotors) to submit article ideas, articles, and/or photos.
All Excursions
Ford SuperDuty V-Code Leaf Spring Installation

After 175,000 miles, I had about 5/8" of front spring travel. This article shows how to install V-Code leaf springs on a 2000 Ford Excursion to gain 1.5" of additional frontend lift over stock.
Optima D34 Yellow-Top Battery Installation
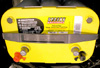
This article shows you how to replace the OEM batteries with Optima D34 series Yellow-Top batteries.
Braided 4WD Electronic Shift on-the-fly Replacement Lines
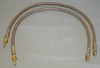
The goal of this install is to show how to replace the OEM rubber ESOF lines which often times become brittle and cracked, causing vacuum leaks in the ESOF system. Braided lines will not deteriorate like rubber lines.
Brake Rotor & Brake Pad Installation
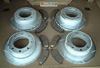
Applied Rotor Technology provides a 10% discount to SuperMotors subscribers. Having had my factory rotors machined 3 times through the course of 30,000 miles, I was out of options for "free repairs" beyond my 36,000 mile warranty. Brakes are considered "wear items" by manufacturers and as a result, are only warrantied for 12,000 miles. I had gone past 12,000 miles since my last "machining" and was given a quote from the dealer for $650 to install new brake pads and machine the factory rotors. I passed. Save money with the ART discount and install your own aftermarket, slotted, cryogenically frozen rotors in just a couple hours of time.
Dieselsite External Transmission Filter Kit Installation
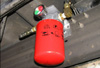
The goal of this install is to prolong the life of the transmission by adding an external, replaceable transmission filter kit. I also opted for the filter gauge so I know for sure when the filter needs replacing. Automatic transmissions have internal filters designed to capture only large particles. These filters are designed as a pickup to keep large particles from flowing through the transmission. These filters are on the suction side of the pump. Fine filtration in the pan is not an option for the transmission manufacturers due to the fact that transmission pumps should not be restricted. The only way to get fine filtration for a transmission is with an external transmission filter kit on the push side of the pump.
Factory Tech 4R100 Valve Body Installation
The goal of this install is to improve factory shifting to firm, crisp shifts in all gears. The Factory Tech Valve Body is a complete accumulator re-calibrated for shorter shift duration, which decreases heat generated and reduces slippage and wear on the friction plates. This valve body is tuned for an aftermarket chip to leave all transmission settings at stock. Factory Tech provides discounts to SuperMotors subscribers on its valve bodies, torque converters, and transmissions.
LANDYOT Radius Rod Installation
The handling of the Ford Excursion has been suspect since day one of the 2000 Excursion all the way to present day (2005 models as of this writing). Ride quality and handling is notibly improved with aftermarket shocks, a rear anti-sway bar, and now radius rods. This article discusses in detail the problem with the factory "traction bar" on Excursions, the benefits of a radius rod, and the installation of LANDYOT radius rods.
Replacing Rear Differential Fluid
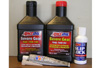
This "how to" article was performed on a 2000 Ford Excursion but will apply to all other Sterling 10.5" rear axles. The concepts will also apply to virtually any other differential fluid replacement as well. Differential Fluid on a Ford Excursion should be changed at 150,000 miles. I opted for Amsoil synthetic fluid as a replacement.
Diesel Excursions
AFE Stage II Intake & Pro-Guard Filter Installation
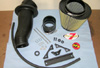
Increase airflow, performance, and fuel economy by replacing the OEM intake & filter with an AFE Stage II intake and Pro-Guard filter. AFE claims an increase of 50 horsepower @ 1900 RPM and 112 ft-lbs torque at 1900 RPM. The Pro-Guard filter is a washable/reusable filter.
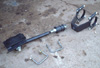
Alternator Replacement on a Ford 7.3L Powerstroke
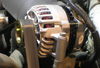
The goal of this install is to show how to remove an existing alternator and replace it with a new or refurbished alternator. This "how to" article was performed on a 2000 Ford Excursion with the 7.3L Powerstroke Diesel. The concept outlined in this article may also be applied to alternator replacements on other vehicles, too.
Crank Case Vent (CCV) Modification
This article outlines how to modify the Crank Case Vent on your Powerstroke Excursion. Discuss this install in the forums.
Powerstroke CAC Hose Replacement
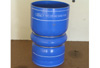
This "how to" article was performed on a 2000 Ford Excursion with the 7.3L Powerstroke Diesel. My CAC hose had been leaking for a few months and while nothing severe, it was leaving drops on the garage floor and making a mess of my engine compartment. I was amazed at how much oil was in my engine compartment as I dove into this project!
From the Forums
How to remove the dashboard
How to remove the dashboard
This message forum thread outlines how to remove the top portion of the dash on the Ford Excursion (also applies to the SuperDuty).
Installing subs in rear doors
This message forum thread discusses various ways to install subs in the rear of an Excursion, mainly in the rear cargo/barn doors or in place of the spare tire. Also includes information on where to mount amps (under the middle row of seats or on the back of the middle row seats).