Clutch Release Bearing & Release Cylinder Removal - Haynes Manual Page 8-5

odd pics 3View all 101

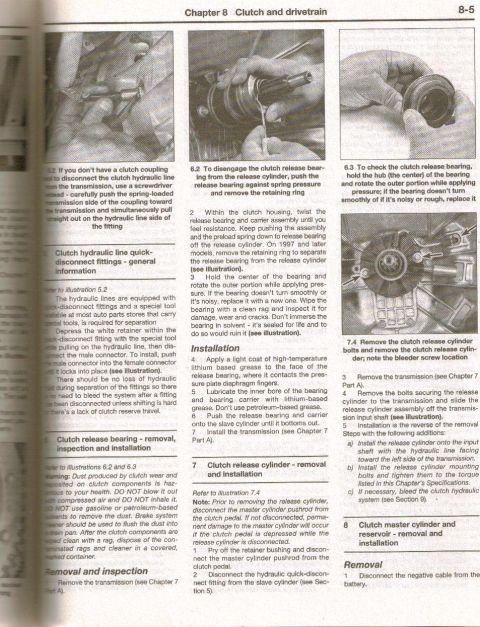





Repair-manual page (Chapter 8, page 8-5) covering clutch hydraulic quick-disconnect fittings and clutch release bearing/cylinder removal, inspection and installation.
This is page 8-5 from Chapter 8 (Clutch and drivetrain) of a Haynes-style automotive repair manual, covering hydraulic clutch service procedures. Section 5 explains clutch hydraulic line quick-disconnect fittings: a special tool is used to depress the white retainer while pulling the line apart, and no bleeding is normally needed after disconnection unless shifting is hard or clutch reserve travel is lacking. Section 6 covers clutch release bearing removal, inspection and installation, including a health warning about clutch dust, instructions to twist the bearing and carrier off the release cylinder (with a retaining ring on 1997 and later models), a spin test for smooth rotation, and use of high-temperature lithium-based grease (never petroleum-based) on installation. Section 7 details clutch release cylinder removal and installation, warning that the master cylinder pushrod must be disconnected from the clutch pedal first or the master cylinder will be permanently damaged. Installation notes include orienting the hydraulic line toward the left side of the transmission, torquing mounting bolts to specification, and bleeding the system if needed. Section 8 (clutch master cylinder and reservoir removal) begins with disconnecting the negative battery cable. Four photo illustrations (5.2, 6.2, 6.3, 7.4) show the quick-disconnect technique, release bearing removal, bearing check, and release cylinder bolt/bleeder screw locations.
Is this accurate? Sign in to help verify it.
Frequently asked questions
- Do I need to bleed the clutch hydraulic system after disconnecting a quick-disconnect fitting?
- No. The manual states there should be no loss of hydraulic fluid during separation of the fittings, so bleeding isn't needed after disconnection unless shifting is hard or there's a lack of clutch reserve travel.
- How do I check if the clutch release bearing is bad?
- Hold the hub (center) of the bearing and rotate the outer portion while applying pressure. If it doesn't turn smoothly or is noisy or rough, replace it. Don't immerse it in solvent, it's sealed for life and solvent would ruin it.
- What grease should be used on the clutch release bearing during installation?
- Apply a light coat of high-temperature lithium-based grease to the face of the release bearing where it contacts the pressure plate diaphragm fingers, and lubricate the inner bore of the bearing and carrier with lithium-based grease. Do not use petroleum-based grease.
- Why must the master cylinder pushrod be disconnected before removing the clutch release cylinder?
- The manual warns that permanent damage to the master cylinder will occur if the clutch pedal is depressed while the release cylinder is disconnected, so disconnect the pushrod from the clutch pedal first.
- How is the clutch release cylinder oriented during installation?
- Install the release cylinder onto the input shaft with the hydraulic line facing toward the left side of the transmission, tighten mounting bolts to the torque in the Chapter's Specifications, and bleed the clutch hydraulic system if necessary.
No comments yet.