How-to
1989 Ford Bronco Rear Axle Seal and Bearing Rebuild
A leaking passenger-side rear axle oil seal on a 1989 Ford Bronco turned into a full rear end rebuild, covering the pinion shaft lock bolt, axle removal, seals, bearings and drum brakes. Brahma502 reports spending a little over $220 on seals, bearings and all brake parts.
-
Step 1
Trace gear oil on the frame rail back to the leaking oil seal at the passenger rear wheel. Brahma502 notes the $10 seal requires pulling the axle out of the rear, and after seeing the condition of the rear brakes decided to rebuild the entire rear end.

-
Step 2
Remove the tires, set the vehicle on a pair of stands and secure it, then drain the rear of oil. Remove the 10 cover bolts without losing the bolts or the tag that identifies the size of the rear, then take off the cover and clean it thoroughly, removing the old gasket.

-
Step 3
Identify the pinion shaft hanging down out of the carrier, the C clip in the end of the axle that holds the axle in, and the pinion shaft lock bolt. Brahma502 found the lock bolt already snapped in half, and it must come out before the pinion shaft will slide free.

-
Step 4
Rotate the driveshaft to bring the bolt hole just outside the pumpkin, thread the kit's guide bolt in until it hits the broken bolt, and drill the bolt through the guide. Brahma502 used the Differential Pinion Shaft Lock Bolt Extractor Kit from Fabbri Associates, bought with a new lock bolt for 35-40 bucks, and recommends it for the guide bolts that keep the bit from jumping and burring the threads.

-
Step 5
Tap the square extractor into the drilled hole with a hammer to set it, then turn the extractor with a T-handle or pliers to back the broken end out. The head of the bolt comes out easily; the broken end comes out with the extractor still lodged in it.

-
Step 6
Slide the pinion shaft out and down, pushing in on the axle from the wheel side if the C clip is not visible, then turn the open end of the clip away and pull it with needle nose pliers. Pull the axle out slowly, then inspect the gears for wear and the inside of the pumpkin for metal shavings; Brahma502 found very few shavings and left the spider gears alone.

-
Step 7
With the axle out, look at the oil seal ring in the middle of the housing and the bearing behind it. Brahma502 found the drum brakes completely oil covered and replaced everything.

-
Step 8
Pull the seal and bearing with a slide hammer, using the hook end for the seal alone or the rocker-shaped end to pull seal and bearing together. Brahma502 rented the slide hammer from a local parts store for the full price of the tool and got it all back. Pull off the brakes and clean the backing plate well with brake cleaner.

-
Step 9
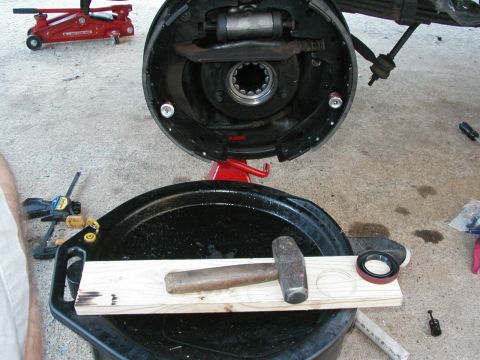
Drive the new bearing in against the old bearing with a block behind it, gently but firmly, until it stops at the raised line inside the axle housing, then drive the new seal in against wood with more care than the bearing takes. Brahma502 fitted new brakes at the same time and reused only the two parking brake bars. The photos stop here: the borrowed camera went back before the axle was reinstalled, so reassembly is not pictured.
Some product links go to the supplier the owner bought from. SuperMotors does not earn a commission today; if that changes, this line will say so and creators will be paid from it.