SuperMotors SuperMotors SUPERMOTORS Search: try “orange Bronco on 35s”
Home/ Registry/ Ford/ “Fairlane GT”/ How-to

How-to

1966 Ford Fairlane Baer Front and Rear Disc Brake Conversion

1966 Ford Fairlane · Upgrade · Expert

Documented by SuperMotors from ezgoing’s photos

The front and rear drum brakes on a 1966 Ford Fairlane were replaced with Baer disc brake kits, along with a new master cylinder and proportioning valve. The album follows the teardown of both ends, the hub, bracket, rotor and caliper fitment, and the wheel change needed to clear the larger rotors.

  1. Step 1

    Check wheel fitment before starting, since Baer recommends at least a 17 inch wheel for the 13 inch rotors and the original 14 inch wheels will not clear the rotor and caliper. ezgoing fitted 17x7 Cragar S/S wheels with 4 inch backspace and 225/40 Nitto tires at the front and reports no clearance problems with the fender or the subframe, running 13 inch rotors on the front and 12 inch rotors on the rear.
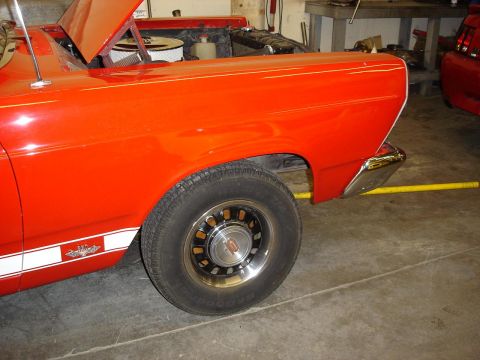
    The old 14 inch wheels before the install. Nice, but they won't work with the big 13 inch Baer rotor and caliper. Bear recommends at least… (1966 Ford Fairlane)
  2. Step 2

    Replace the original single reservoir master cylinder with the new unit and plumb in new brake lines. ezgoing notes that the new master cylinder's ports sit on the right side, which puts the brake lines a bit close to the valve covers, and reports that pedal feel is neither stiff nor soggy.

    The old, single reservoir, master cylinder. Thank you Lord that it never failed on me during all those years of daily driving. (1966 Ford Fairlane) The new master cylinder. It puts the brake lines a bit close to the valve covers, because the ports are on right side, but it works just fi… (1966 Ford Fairlane)
  3. Step 3

    Mount the proportioning valve on the right side of the engine bay as viewed from the driver's seat. The valve is part number 2000035.

    Proportion valve, located on the right side of the engine bay (from the driver's seat point of view). Part# is 2000035. (1966 Ford Fairlane)
  4. Step 4

    Remove the front drum brake assembly and strip the front end down to the spindle, taking off the old hub.

    Old front drum. Good bye sluggish brakes. (1966 Ford Fairlane) Down to the spindle. You can see the old hub in the blue tub. (1966 Ford Fairlane)
  5. Step 5

    Install the Baer caliper bracket on the front spindle, then fit the Baer hub.

    The Baer hub and caliper bracket which will go on the front spindle. (1966 Ford Fairlane) Baer caliper bracket is installed on the front spindle. (1966 Ford Fairlane) Baer hub installed on the front spindle. (1966 Ford Fairlane)
  6. Step 6

    Fit the 13 inch front rotor and caliper. The front kit is part number 4261029, and the master cylinder comes with that kit.

    Front 13 inch rotor and caliper. Front kit part# is 4261029. Master cylinder comes with the kit. (1966 Ford Fairlane) 13 inch rotors on the front and 12 inch rotors on the rear. Awesome! (1966 Ford Fairlane)
  7. Step 7

    Lay out the rear kit parts before starting the rear end. The rear kit is part number 4262036.

    Parts and pieces. All for the rear end, except for the master cylinder and proportion valve, of course. Rear kit part# is 4262036. (1966 Ford Fairlane)
  8. Step 8

    Remove the rear wheel and tire, pull the rear drum, and strip the rear end down to the axle housing. ezgoing reports the old rear drums were noisy despite maintenance.

    Old rear wheel and tire. Duffee Motorsports works on alot of Fords. :) (1966 Ford Fairlane) Old rear drum. They were noisey. Despite my maintenence. Bye Bye. (1966 Ford Fairlane) Down to the rear axle housing. (1966 Ford Fairlane)
  9. Step 9

    Install the Baer clamp that holds the new rear brake line, then fit the line itself.

    Baer clamp installed to hold the new brake line. (1966 Ford Fairlane) New brake line on. (1966 Ford Fairlane)
  10. Step 10

    Before the rear rotor goes on, machine the axle flange so the rotor fits over it. The photos show the axle shaft in a metal lathe and the bare machined surface afterward.

    The axle flange had to be machined in order for the rear rotor to fit over it. (1966 Ford Fairlane) You can see the shiny new surface where the axle flange was machined. (1966 Ford Fairlane)
  11. Step 11

    Install the Baer rear caliper bracket, refit the axle, and mount the 12 inch rear rotor and caliper. ezgoing had new mounting tabs welded onto each rear subframe rail to accommodate the park cable.

    Assembly continues. Baer bracket for the caliper is on and the axle is in. (1966 Ford Fairlane) Rear 12 inch rotor and caliper installed. (1966 Ford Fairlane) A look at the back side of the rear rotor. Note: new mounting tabs had to be welded on to each rear subframe rail to accomodate the park ca… (1966 Ford Fairlane)
  12. Step 12

    Fit the wheels and tires. The owner used 17x7 Cragar S/S wheels with 4 inch backspace and 225/40 Nitto tires at the front, and 17x9 Cragar S/S wheels with 5 inch backspace and 255/40 Nitto tires at the rear. The album's photos end here.

    17x7 Cragar S/S on the front with 4 inch backspace and 225/40 Nitto tires. No clearance problems with the fender or the subframe. I like th… (1966 Ford Fairlane) 17x9 Cragar S/S wheels on the rear with 5 inch backspace and 255/40 Nitto tires. (1966 Ford Fairlane)

Some product links go to the supplier the owner bought from. SuperMotors does not earn a commission today; if that changes, this line will say so and creators will be paid from it.