|
|
'80-96 Bronco Camper Shell & Sliding Side Windows IF THE IMAGE IS TOO SMALL, click it. 290C34 - Weatherstrip, division bar rear (EOTZ98290C34A) 29126 - ? Right side 29127 - ? Left side 29622 - Trim Insert Corner (stainless, optional) 29706 - Window, right sliding (EOTZ9829706A), with rear reinforcement 29707 - Window, left sliding (EOTZ9829707A), with rear reinforcement 29710 - Window, right fixed (E4TZ-9829710-F full 1-way; EOTZ-9829710-B full clear; EOTZ9829710D rear half) 29711 - Window, left fixed (E4TZ-9829711-F full 1-way; EOTZ-9829711-B full clear; EOTZ9829711D rear half) 29838 - Stop 29904 - Gasket (F4TZ-9829905-A fixed window with chrome insert, EOTZ-98299045-B sliding window with insert, EOTZ-98299045-F sliding window w/o insert) 29904 - Weatherstrip, division bar front (EOTZ9829904G right, EOTZ9829904H left) 30104 - Run Channel (EOTZ9830104A) 302A34 - Division Bar, right (EOTZ98302A34A) 302A35 - Division Bar, left (EOTZ98302A35A) 302A38 - Nut, nylon cap 303A24 - Latch Assembly 30518 - Frame, right bottom front (EOTZ9830518A) 30519 - Frame, right bottom front (EOTZ9830519A) 30534 - Frame, right top rear (EOTZ9830534A) 30535 - Frame, left top rear (EOTZ9830535A) 30536 - Corner Reinforcement, bottom rear (EOTZ9830536A) 30652 - Corner Reinforcement, top front (EOTZ9830652A) 385977-S - Nutsert M6x1.00 ('78-91 only) 387956-S - Alignment Pin, Allen 4mm (5/32") M6x1.00x15mm ('78-91 only) 422A00 - Window Track Liner (F2TZ-98422A00-A) interchange FO1390131 or APDTY 140398 42430 - Trim Insert Strip (chromed nylon, optional) 50202 - Camper Shell ('80-91 F2TZ9850202A; '92-96 F4TB9850200A??) 502D26 - Reinforcement Plate (EOTZ98502D26A) 51322 - Camper-to-body Seal, front (D8TZ9851322A) 513C22 - Camper-to-body Seal, right side (F4TZ98513C22A) 513C23 - Camper-to-body Seal, left side (F4TZ98513C23A) 52055-S - Screw, Phillips #2 flat head #4x3/16" 54732 - Body Edge Guard (E8TZ9854732A) similar to TrimLok 62B3X1/16-25N623342-S101 - U-Nut ('78-91 only), M6x1.00 (9 req'd.) N644265-S - Screw, Phillips #2 cap head #6x1/4" (11 req'd. per side) N800538-S100 - U-Nut ('92-96 only), M8x1.25 (11 req'd.) N800947-S2 - Bolt ('78-91 only), 8mm hex head captive fender washer M6x1.00x40mm (8 req'd.) N802867-S2 - Bolt ('78-91 only), 8mm hex head captive fender washer M6x1.00x70mm (5 req'd.) N804271-S - Screw, Phillips #2 round head integral washer #6x3/4" N806697-S58 - Bolt ('92-96 only), TT-40 captive fender washer M8x1.25x30mm (10 req'd.) N806697-S58 - Bolt('92-96 only), TT-40 captive fender washer M8x1.25x60mm (5 req'd.) CRLaurence repro (different from original) sliding side windows on Amazon were ~$450 in 2014.
|
|
|
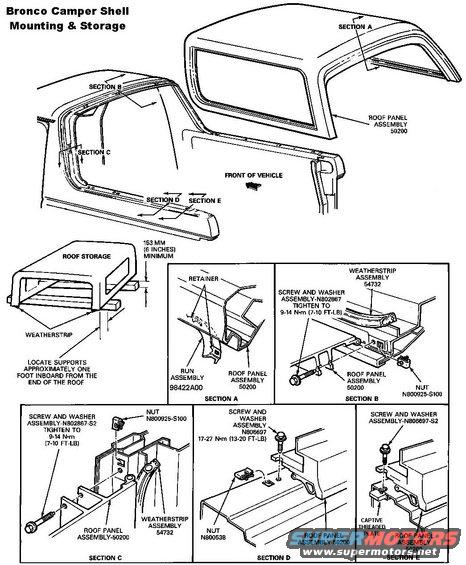 CamperShellDetails.jpg | Hits: 10052 | Size: 72.04 KB | Posted on: 1/17/06 | Link to this image CamperShellDetails.jpg | Hits: 10052 | Size: 72.04 KB | Posted on: 1/17/06 | Link to this image
Camper Shell Details There's a common misconception that fiberglass will sag, bend, or warp if it's not stored just so. It won't. If it did, Corvette bodies & Bronco camper shells would all have melted into heaps by now, but they obviously don't. So as long as the rubber seals aren't being cut or torn, any position is fine.  The camper glass run (Section A) is F2TZ98422A00A and cost $37 in 1998. More recently, I got a Precision brand GRB213080 (made in Thailand?) for $52 on eBay, which seemed well-made. The camper top-front edge seal is shown in views B, C, & D, but not called out. The camper side seals (L F4TZ98513C23A, R F4TZ98513C22A) are shown in views D & E, but not called out. The body top-rear lip weatherstrip E8TZ9854732A is shown in views B & C. The body rear lip guard is shown in view B, but not called out. The headliner (F4TZ9851942AAK) is not shown in this early diagram. '78-91 Broncos use 4 short bolts (8mm head, 6x1.00x40mm) on each bedrail & 5 long bolts (8mm head, 6x1.00x70mm) in the upper sections. All bolts thread into U-nuts, except the 2 upper corners & the 2 rear corners which use captive nut plates. The bedrail bolts each use a clip stamped "L" or "R", but the rearmost bolts use the opposite clip. The clips for the B-pillar bolts are not always marked, but the smaller tab goes down. '92-96 Broncos use 5 short bolts (tamper T-40 head, 8x1.25x30mm) on each bedrail & 5 long bolts (tamper T-40 head, 8x1.25x60mm) in the upper sections. All bolts thread into U-nuts, except the 2 upper corners & the 4 rear corners which use captive nut plates. The bedrail bolts each use a clip stamped "L" or "R", except the rearmost bolts. The clips for the B-pillar bolts are not always marked, but the smaller tab goes down. According to the service manual, the roof weighs 264 kg (120 lb.).  See also:  .  F2TZ98422A00A glass run F4TZ98513C23A LHS F4TZ98513C22A RHS ??? camper top-front edge seal E8TZ9854732A body top-rear lip ??? body rear edge guard
|
|
|
This shows the difference in colors between the 2 years. The '96 is "mocha". This shows an '80-91 top on a '78-79 body: 
|
|
|
 Camper Difference.JPG | Hits: 6046 | Size: 77.39 KB | Posted on: 7/13/03 | Link to this image Camper Difference.JPG | Hits: 6046 | Size: 77.39 KB | Posted on: 7/13/03 | Link to this image
Besides the third brake light, shoulder belts, and color, this is another difference in Bronco camper shells. The early alignment pin unscrews so it doesn't stab people when the top is off. Additionally, later bodies include a front vertical alignment pin peened onto the sheet metal above the driver's head.  This shows an '80-91 top on a '78-79 body: 
|
|
|
These spikes screw into '78-91 Bronco bedrails & are removeable to prevent injury when the top is off & passengers are in the back. Later Broncos have the pins permanently attached to the camper shell, with slots in the bedrails.
|
|
|
This pin aligns the front of the '92-96 camper shell. It is only used on the L side. Both sides have a captive threaded steel plate for the bolt. The camper shell has 2 more pins that fit into slots in the '92-96 bedrails (shown in the NEXT pic).
|
|
|
These bolt holes are for the integral roll bar in the camper shell, and the captive nut plates are visible in them. The slot between them is for the rear alignment pin. The connector is for the cargo dome light & CHMSL (both '92-96 only). The slot between the bolt holes is for the alignment pin on the camper shell (on each side).
|
|
|
After removing all the trim, bolts, & clips (including the '78-91 alignment pins), the shell can be lifted (so the '92-96 alignment pins clear the bedrails) & shifted rearward. From there, simply remove the shell & set it out of the way so that its rubber gaskets won't be damaged.
Before reinstalling the shell, the entire sealing surface should be washed & coated with either silicone spray lube or a THIN film of silicone grease.
|
|
|
My method to remove the shell is to stand (knees bent) in the bed facing the t/g bent at the waist with my shoulders a few inches from the rear edge of the shell. I then lift the shell off the bedrails with my legs, spin 180 degrees in place, step to the driver's side to clear the spare tire, then step backward off the t/g onto a sturdy box so the shell straddles the driver's bedrail. Once on the ground, as I stand up straight, I allow the shell to slide down until its rear edge rests on my shoulders. Holding the bottom rear corners allows full control while walking to where I can lean it against a wall or fence. 
|
|
|
This is how I prefer to carry a Bronco camper shell: alone with its rear lip resting on my shoulders. I'm holding onto the lower rear corners (top front as I'm holding it) to stabilize it as I walk, and to keep its front edge (bottom rear) from hooking my heels.  . 
|
|
|
The steel roll bar inside the factory '80-91 Bronco camper shell is glued into the fiberglass, but not bolted to the bedwalls. This is an '83 shell. I'm not sure if '78-79s had any steel. This shows an '80-91 top on a '78-79 body:  Here's a cross-section thru the window opening: 
|
|
|
The steel roll bar inside the factory '80-91 Bronco camper shell is glued into the fiberglass, but not bolted to the bedwalls. This is an '83 shell. I'm not sure if '78-79s had any steel. This shows an '80-91 top on a '78-79 body: 
|
|
|
The steel roll bar inside the factory '80-91 Bronco camper shell is glued into the fiberglass, but not bolted to the bedwalls. This is an '86 shell. I'm not sure if '78-79s had any steel. This shows an '80-91 top on a '78-79 body: 
|
|
|
The steel roll bar inside the factory '80-91 Bronco camper shell is glued into the fiberglass, but not bolted to the bedwalls. This is an '86 shell. I'm not sure if '78-79s had any steel. This shows an '80-91 top on a '78-79 body: 
|
|
|
All '80-96 Broncos have a steel roll bar integrated into the rear edge of the fiberglass camper shell ('92-96 F4TB9850200A??). In '92, the bar was improved & extended forward so it could be retained by 2 of the bolts, and the alignment pins were moved onto the bar, pointing down into the bedrails.
The bolt & clip shown are INCORRECT for this shell: 1) '92-96 Broncos don't use a clip on this bolt because of their C-pillar trim; 2) '92-96 clips are punched with a wide slot for a plastic trim-colored pushpin instead of the earlier self-drilling self-tapping oval-head screw with captive washer; 3) '92-96 bolts have a tamper T-40 head to discourage removal of the shell due to the rear shoulder belts & CHMSL. But since this shell is installed on an '82 body tub at the moment, it requires this bolt.
|
|
|
'92-96 Bronco Camper ('92-96 F4TB9850200A??) Steel Reinforcement This plate is the forward end of the same cage that's visible at the bases of the C-pillars where the camper bolts to the bedwalls. It also contains the shoulder belt mounting points. The riveted plate on the B-pillar is TSB 96-20-11.  The "DW" suffix on the PN is the color code for this flat medium mocha used from '94-96.
|
|
|
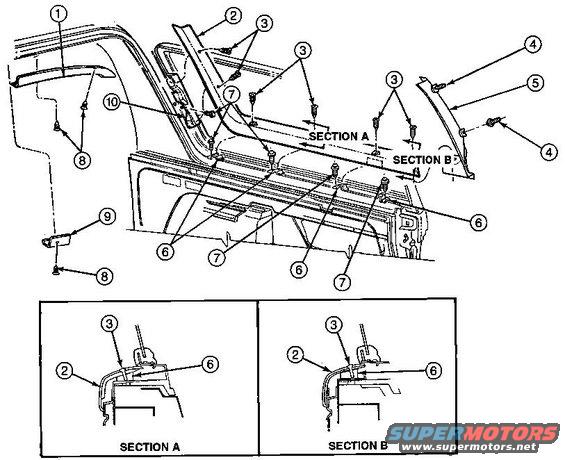 CamperShellTrim.jpg | Hits: 9964 | Size: 59.01 KB | Posted on: 1/17/06 | Link to this image CamperShellTrim.jpg | Hits: 9964 | Size: 59.01 KB | Posted on: 1/17/06 | Link to this image
Camper Shell Trim IF THE IMAGE IS TOO SMALL, click it. 1 Roof Trim Rear Moulding 517C04 2 Quarter Window Garnish Lower Front Moulding 29004 3 ('92-96) Pushpin N807154-SW, ('78-91 See #8 ) 4 Pushpin, Nylon (2 Req'd Each Side) N807372-S5 Quarter Rear Window Garnish Rear Moulding 29010 ('92-96 only) 6 Body Side Window Garnish Moulding Bracket 29126 7 Bolt and Washer N800486-S9 8 Screw and Washer (2 Req'd Each Side, 1 Req'd Center) N801157-S58 9 Roof Trim Rear Moulding Joint Cover 518B34 10 Body Side Window Garnish Moulding Front Bracket 29070 (Left F2TZ9829071B; Right F2TZ9829070B)  .  .  '78-91 use 17 self-drilling oval-head 1-1/4" phillips screws with captive countersunk washers (#8 ) to retain all the trim pieces. 6 on each long trim, 2 on each short trim (#1), & 1 on the small center joint cover (#9).  . '92-96 use 5 screws as above for the short trim & cover, 2 hidden plastic pushpins (#4) on each rear corner trim (#5), & 6 color-matched pushpins (#3) on each long trim. The colored pushpins are interchangeable with the '94-96 carpet pushpins, though the camper pins have more & thinner fins.  .  AuVeCo #.........Color.....................Head Dia..........Stem Dia................Stem Lgth 19371 ...............Blue.......................19/32" ...............9/32".......................27/32" 19372 ...............Dark Gray ............19/32" ...............9/32".......................27/32" 19373 ...............Light Gray ............19/32" ...............9/32".......................27/32" 19374 ...............Tan.........................19/32" ...............9/32".......................27/32" BroncoGraveyard 38262 $6 per 14 pcs (Opal gray) plus $8sh; or Amazon ClipsAndFasteners ~$11 per 25pcs no sh. See also:  . 
|
|
|
There's a common misconception that fiberglass will sag, bend, or warp if it's not stored just so. It won't. If it did, Corvette bodies & Bronco camper shells ('92-96 F4TB9850200A??) would all have melted into heaps by now, but they obviously don't. So as long as the rubber seals aren't being cut or torn, any position is fine.
Just avoid touching the headliner (F4TZ9851942AAK).
|
|
|
There's something on the headliner (F4TZ9851942AAK) that looks like the beginning of mildew, so I'm giving it some sun for a few hours. I'm afraid to vacuum it because the fabric is already getting loose at the edges & I don't feel like reupholstering it yet.
|
|
|
This is where I prefer to start removing the side windows. Some silicone spray lube between the rubber & paint makes it easier, but don't use any petrochemical or penetrating oil. Break all the rubber free from the paint (inside & out) before beginning so it's easier for it to slip out as you work. Note the integral steel roll bar in the rear lip of the fiberglass camper shell is bolted to the body on '92-96 Broncos. Push as close as possible to the EDGE of the glass; pushing in the middle will shatter it. If you're not sure, WEAR GLOVES. But it's tempered safety glass, and stronger than you'd think. It can tolerate some bending, but work up & down the length of the window so you're not bending it much. READ THE NEXT SEVERAL CAPTIONS... See also: 
|
|
|
Work up & down the length of the glass so it doesn't shatter. Tucking the corner out will help maintain progress.
Push as close as possible to the EDGE of the glass; pushing in the middle will shatter it. If you're not sure, WEAR GLOVES.
|
|
|
With 2 sides of the gasket out, the assembly comes up & rearward. If the gaskets are clean, and a little silicone grease is applied to their inner lips & grooves, and to the outboard face of the fiberglass lip they go onto, it's very easy to reinstall them, and to remove them again. They can be hauled in the cargo area or strapped to the back of the rear seat for quick re-installation if the weather changes, or if the truck must be parked publicly. See also: 
|
|
|
 Side Install 1.JPG | Hits: 4872 | Size: 73.33 KB | Posted on: 7/13/03 | Link to this image Side Install 1.JPG | Hits: 4872 | Size: 73.33 KB | Posted on: 7/13/03 | Link to this image
This helps, but it's not really necessary on these windows. It's military 440 or 550 cord.
|
|
|
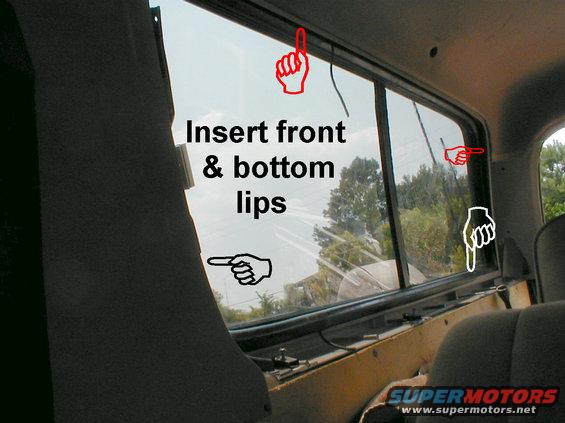 Side Install 2.JPG | Hits: 4979 | Size: 65.76 KB | Posted on: 7/13/03 | Link to this image Side Install 2.JPG | Hits: 4979 | Size: 65.76 KB | Posted on: 7/13/03 | Link to this image
Reverse of removal: start by setting the window assembly into the camper with as much of the gasket on the front & bottom lips as possible.
|
|
|
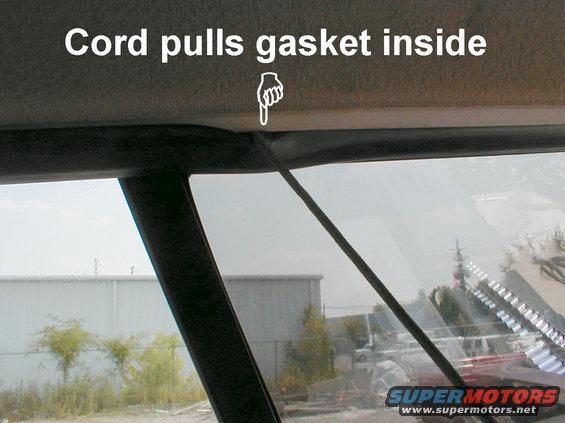 Side Install 3.JPG | Hits: 4892 | Size: 66.71 KB | Posted on: 7/13/03 | Link to this image Side Install 3.JPG | Hits: 4892 | Size: 66.71 KB | Posted on: 7/13/03 | Link to this image
It's almost as easy to do this by hand, especially if the surfaces have a light coat of silicone lube. The silicone also helps the rubber relax into position so it doesn't leak, prevents squeaking, and preserves the rubber.
|
|
|
Pounding on the glass along the edges will let the gaskets settle into place. The edges of the headliner go behind the gaskets.
|
|
|
It almost looks like it belongs there! But Bronco sliding side windows were only offered from '78~83. Fortunately, the window openings are the same from '80-96, so these fit perfectly in this '96 shell. '78-79 windows only fit those trucks.
|
|
|
OE '80-83 sliding side windows fit '80-96 Broncos & Centurion 4-door Broncos.
|
|
|
Unusual, sought-after, & valuable, but not very practical. As hard as it is to work the latch & then slide the glass without breaking, it's really better to just keep the solid windows & pop them out of the shell when you want them open. And that gives you the FULL opening, instead of less than half, like this. 
|
|
|
'83 sliders in a '96 camper shell on an '82 body with a '99 Taurus dome lamp.

|
|
|
The roof rack came from a '96 4-door Explorer, but was cut down one mounting screw. The runners are uncut. T-nuts are much more expensive than blind nuts, so I broke the tabs off. The screws are stainless. I hate shiny things, but none of them are visible when the rack is installed.
|
|
|
Some of the nuts have to be spaced down or shortened because the roof is so thin. Although silicone helps hold the nuts while screws are being installed, the first camper I did this to had none and never leaked. Using the shortest screws available (~1/2") allows a stock '92-96 headliner to fit.
|
|
|
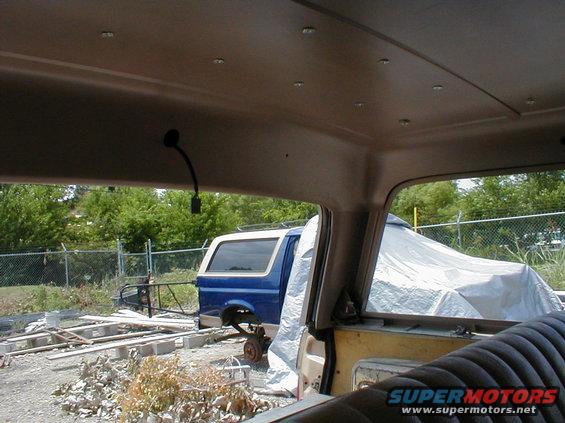 Rack Installation.JPG | Hits: 5030 | Size: 77.7 KB | Posted on: 7/13/03 | Link to this image Rack Installation.JPG | Hits: 5030 | Size: 77.7 KB | Posted on: 7/13/03 | Link to this image
Some of the nuts have to be spaced down or shortened because the roof is so thin. Although silicone helps hold the nuts while screws are being installed, the first camper I did this to had none and never leaked. Using the shortest screws available (~1/2") allows a stock '92-96 headliner to fit.
|
|
|
I cut the front of the tracks down by 1 screw hole and installed 2 rear crossbars because they can both be (re)moved without tools. The original front bar is screwed in place, so I deleted it. I also added more tie-downs. Outside dimensions (after cutting it down) are 43"Lx42"Wx3.5"H The support runners are 42"L. 
|
|
|
SOLD Roof Rack from 4-door Explorer cut down to fit a Bronco, including used screws & blind nuts. Ships as 48x8x6" 12 lbs
|
|
|
Although I'm not using these gaskets, I replaced the trim in them. It's more difficult than installing the windows in the shell.
D7TZ-1042430-A Reveal moulding insert, 143" roll
EOTZ-9829622-B Reveal moulding upper front joint
EOTZ-9829622-C Reveal moulding lower rear joint
|
|
|
It took a while to learn that the INSIDE corner is the hardest, so start there and then work the outside in. It's still not easy.
D7TZ-1042430-A Reveal moulding insert, 143" roll
EOTZ-9829622-B Reveal moulding upper front joint
EOTZ-9829622-C Reveal moulding lower rear joint
|
|
|
A hard plastic tool with blunt edges would have been MUCH better.
D7TZ-1042430-A Reveal moulding insert, 143" roll
EOTZ-9829622-B Reveal moulding upper front joint
EOTZ-9829622-C Reveal moulding lower rear joint
|
|
|
Insert only the ends of the strips to start, but do both ends of each strip.
D7TZ-1042430-A Reveal moulding insert, 143" roll
EOTZ-9829622-B Reveal moulding upper front joint
EOTZ-9829622-C Reveal moulding lower rear joint
|
|
|
With both ends in, work toward the middle. Extra silicone helps. Silicone grease would be better.
D7TZ-1042430-A Reveal moulding insert, 143" roll
EOTZ-9829622-B Reveal moulding upper front joint
EOTZ-9829622-C Reveal moulding lower rear joint
|
|
|
Glass Run F2TZ98422A00A
Some aftermarket versions are simply a continuous strip - they lack the formed corner pieces at each end.
Early ('80~90) Broncos use 4 philips screws; later trucks may have pushpins in the upper holes.
|
|
|
I need a driver's front (sliding) panel of glass & the metal bar for its back edge.
The white crap is apparently paint - IDK how it got spattered on BOTH sides of the truck. But I've cleaned it all off, washed the mud out of the rubber gaskets, replaced the glass runs (as shown in the NEXT 2 pics), and sandblasted & powdercoated the Aluminum frames. But I haven't found replacements for the missing glass & edge yet.
|
|
|
Original flocked glass run channel (EOTZ-9830104-A) for factory sliding side windows. It's not available, but JCW sometimes stocks a shallower version that works. Aerostar runs can also be made to work, with a razor blade & some effort.
|
|
|
I've found a replacement glass run for the factory slider windows, and it's a Ford part!  It comes from the sliding side windows of an Aerostar. After cutting the one outer lip off, it's 3/8"W x 5/8"H, so it's recessed in the channel ~1/8".
The top L pic is the unmodified run in the channel, but it doesn't touch the bottom because of the extra lip. Top R is after cutting the lip off & pushing the run all the way down. Lower L is with the glass in place. Lower R is the uncut section compared to the cut section.
|
|
|
This is the latch used on '78-83 Bronco sliding side windows.
|
|
|
Along with some other junk, I sandblasted all the sliding window frames in preparation for powdercoat.

|
|
|
Looking good...

|
|
|
SOLD Camper Hardware for '92-96 Bronco These bolts are threaded 8mmx1.25mm, and the OEM u-nuts are AuVeCo 11630. Short bolts are 30mm; long are 60mm. The correct quantity of clips is 4 each. The rearmost bolt on each side is under the C-pillar trim, and doesn't require a clip because it sits on the thick steel roll bar integrated into the fiberglass camper. 
|
|
|
SOLD Sliding camper shell windows in crate 63x21x7" @ 91 lbs. Crating material ~$40.
|
|
|
 CamperTrimGy92.JPG | Hits: 3327 | Size: 23.75 KB | Posted on: 3/27/06 | Link to this image CamperTrimGy92.JPG | Hits: 3327 | Size: 23.75 KB | Posted on: 3/27/06 | Link to this image
SOLD Dark Gray Camper Trim from '92-93 Bronco
Fits '92-96. Screws (5) & some pushpins (~10) included. The damaged screw hole indicated has been glued back into place.
Ships as 64x25x6" @ 7lbs.
|
|
|
SOLD Bronco Black Camper Trim fits '80-91
Ships as 64x25x6" @ 6lbs.
|
|
|
Just a freaky idea I've been contemplating.
|
|
|
 Camper Windows.jpg | Hits: 4762 | Size: 66.17 KB | Posted on: 7/10/03 | Link to this image Camper Windows.jpg | Hits: 4762 | Size: 66.17 KB | Posted on: 7/10/03 | Link to this image
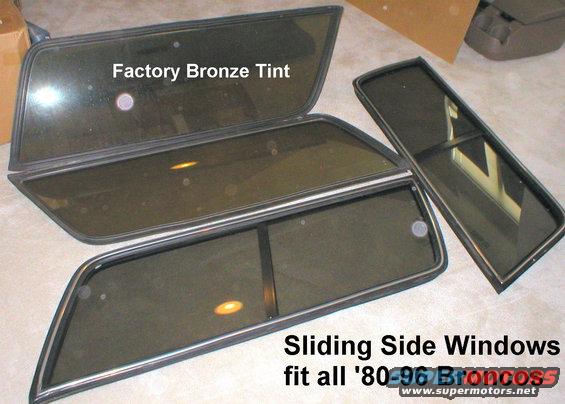
Bronco camper windows. Sliders are (Sold) fully restored, & were professionally tinted and powdercoated. A pair of windows is approx. 60x18x6" @ 40lbs, but a crate will be slightly larger & substantially heavier.
For more info, see this album:

|
|
|
'92-96 Bronco Headliners
IF THE IMAGE IS TOO SMALL, click it.
1 - Roof Trim Panel - 51944
2 - Drive Pin (1 Req'd Each Side) - 383927-S
3 - Moulding - 517C04 & 518B34
4 - Quarter Trim Panel - 31012
5 - Body Side Garnish Moulding - 29010
6 - Front Body Pillar Inside Moulding - 3598
7 - Windshield Garnish Moulding - 03606
8 - Roof Trim Panel, Rear - 519C14
9 - Rear Cargo Lamp - 13K706
10 - Rear Courtesy Lamp Lens - 13K707
11 - Cowl Side Trim Panel Retainer (2 Req'd) - 02354
12 - Coat Hook - 29024
13 - Screw - N610021-S424
|
|
|