This document provides instructions for basic start-up and ignition tuning for maximum performance.
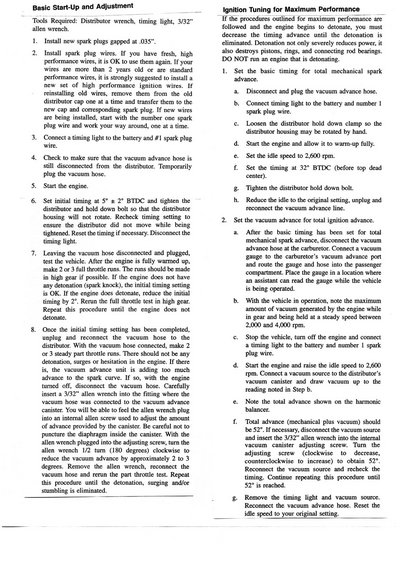
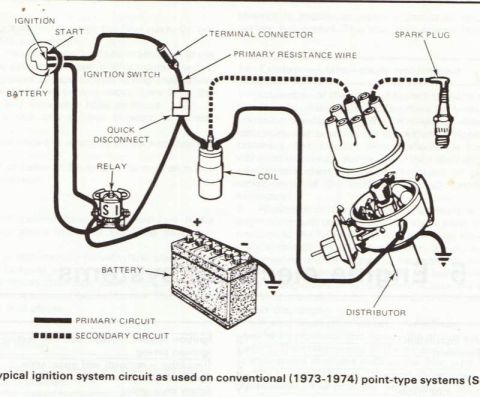
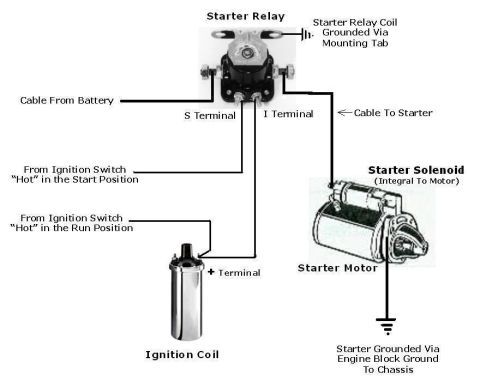
Basic Start-Up and Adlustment Tools Required: Distributor wrench, timing light. 3/32" allen Wrench. 1. 2. install new spark plugs gapped at .035". Inslal] spark plug wires. If you have fresh, high performance wires. it is OK to use them again. If your wires are more than 2 years old or are standard performance wires. it is strongly suggested to install a new set of high performance ignition wires. tr reinstalling old wires. mmove them from the old distributor cap one at a time and transfer them to the new cap and corresponding spark plug. If new wires are being installed, start with the number one spark plug wire and work your way around. one at a time. Connect a timing light to the battery and #1 spark plug wire. Check to make sure that the vacuum advance hose is still disconnected from the distributor. Temporarily plug the vacuum hose. Stan the engine. Set initial timing at 5 2 2 BTDC and tighten the distributor and hold down boll so that the distributor housing will not rotate. Recheck timing setting to ensure the distribulor did not move while being tightened. Reset the timing if necessary. Disconnect the timing light Leaving the vacuum hose disconnected and plugged, test the vehicle. After the engine is fully warmed up. make 2 or 3 full throltle runs. The runs should be made in high gear if possible. If the engine does not have any detonation (spark knock), the initial tinting setting is OK. if the engine does detonate. reduce the initial timing by 2". Rerun the full throttle test in high gear. Repeat this procedure until the engine does not detonate. Once the initial timing setting has been completed. unplug and reconnect the vacuum hose to the distributor. With the vacuum hose connected, make 2 or 3 steady part throttle runs. There should not be any detonation, surges or hesitation in the engine. If there is. the vacuum advance unit is adding too much advance to the spark curve. If so. with the engine [timed off. disconnect the vacuum hose. Carefully insert a 3/32" allen wrench into the tting where the vacuum hose was connecled to the vacuum advance canister. You will be able to feel the allen wrench plug into an internal alien screw used to adjust the amount of advance provided by the canister. Be careful not Io puncture the diaphragm inside the canister. wnh the allen wrench plugged into the adjusting screw, turn the allen wrench 1fl turn (180 degrees) clockwise to reduce die vacuum advance by approximately 2 to 3 degrees. Remove the allen wrench. reconnect the vacuum hose and rerun the part throttle test. Repeat this procedure until the detonation. surging and/or stumbling is eliminated. Ignition Tuning for Maxlmum Peormance If the procedures outlined for maximum perioarice at: followed and the engine begins to detonate. you must decrease the timing advance until the detonation is eliminated. Detonation not only severely reduces power. it also destroys pistons. rings. and connecting rod bearings. DO NOT run an engine that is detonatingt 1. Set the basic tinting for total mechanical spark advance. 3. Disconnect and plug the vacuum advance hose. b. Connect tinting light to the battery and number 1 spark plug wire. c. Loosen the distributor hold down clamp so the disu-ibutor housing may be rotated by hand. d. Start the engine and allow it to warmup fully. e. Set the idle speed to 2,600 rpm. f. Set the tinting at 32 BTDC (before top dead center). Tighten the distributor hold down bolt. Reduce the idle to Ihe original setting. unplug and reconnect the vacuum advance line. 2. Set the vacuum advance for total ignition advance. a. After the basic tinting has been set for total mechanical spark advance. disconnect the vacuum advance hose at the carburetor. Connect a vacuum gauge to the carburetors vacuum advance port and route the gauge and hose into the passenger compartment. Place the gauge in a location where an assistant can read the gauge while the vehicle is being operated. in. With the vehicle in operation. note the maximum amount of vacuum generaled by the engine while in gear and being held at a steady speed between 2,000 and 4,000 rpm. c. Stop the vehicle. turn off the engine and connect a timing light to the battery and number 1 spark plug wire. d. Start the engine and raise the idle speed to 2.600 rpm. Connect a vacuum source to the distributors vacuum canister and draw vacuum up to the reading noted in Step b. e. Note the total advance shown on the harmonic balancer. f. Total advance (mechanical plus vacuum) should be 52. if necessary, disconnect the vacuum source and insert the 3/32" alien wrenCh into the intemai vacuum canister adjusting screw. Turn the adjusting screw (clockwise to decrease. counterclockwise to increase) to obtain 52". Reconnect the Vacuum source and recheck the tinting. Continue repeating this procedure until 52" is reached. g. Remove the timing light and vacuum source. Reconnect the vacuum advance hose. Reset the idle speed to your original setting.
Comments
More from this build


No comments yet.