Home/
Registry/
Chevrolet/
C/K Pickup/
1988-1998/
1998 Chevrolet C/K Pickup/
Photo
supermotors.net/registry/media/1112481
1998 Chevy C/K Pickup Instrument Panel Removal - IP Storage Compartment & Bolts
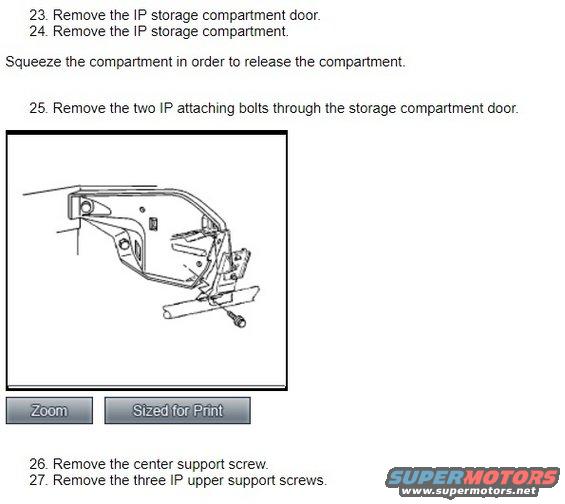
Service procedure page with steps 23-27 removing the IP storage compartment and attaching bolts, plus illustration.
This document is a single page from a multi-step service procedure covering instrument panel (IP) removal, apparently printed from an electronic service manual (it includes 'Zoom' and 'Sized for Print' buttons). The visible portion contains steps 23 through 27 of the procedure. Step 23 instructs removing the IP storage compartment door, and step 24 the IP storage compartment itself, with a note to squeeze the compartment in order to release it. Step 25 directs removal of two IP attaching bolts accessible through the storage compartment door opening, accompanied by a line-art illustration showing the instrument panel carrier structure and the location of the bolt being removed. Steps 26 and 27 instruct removal of the center support screw and the three IP upper support screws. No torque specifications, part numbers, fuse data, or wire colors appear on this page. The page was uploaded to a 1998 Chevrolet C/K Pickup gallery as part of an eight-page album; nothing on this specific page states a year, model, or engine, so applicability cannot be confirmed or contradicted from this page alone. A reader can learn the mid-procedure fastener locations required to free the instrument panel: two bolts behind the storage compartment, one center support screw, and three upper support screws.
Is this accurate? Sign in to help verify it.
Frequently asked questions
- How do you remove the IP storage compartment?
- Remove the IP storage compartment door first, then squeeze the compartment in order to release it and remove it (steps 23-24).
- How many IP attaching bolts are behind the storage compartment door?
- Two — step 25 says to remove the two IP attaching bolts through the storage compartment door.
- How many upper support screws hold the instrument panel?
- Three IP upper support screws are removed in step 27, after removing the center support screw in step 26.
- What is removed after the two IP attaching bolts?
- The center support screw (step 26), followed by the three IP upper support screws (step 27).
Comments
More from this build


No comments yet.