This document details the removal, inspection, and installation procedures for an oil pan and oil pump assembly.
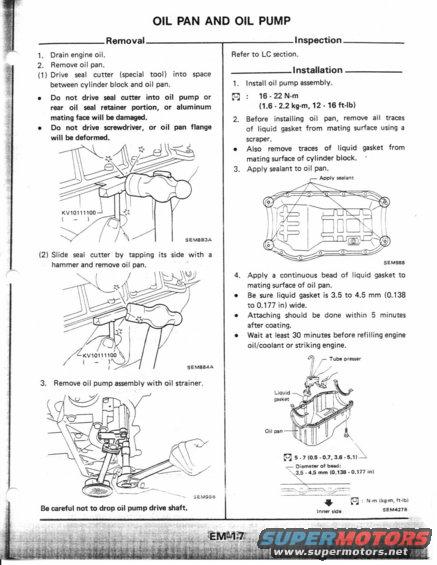
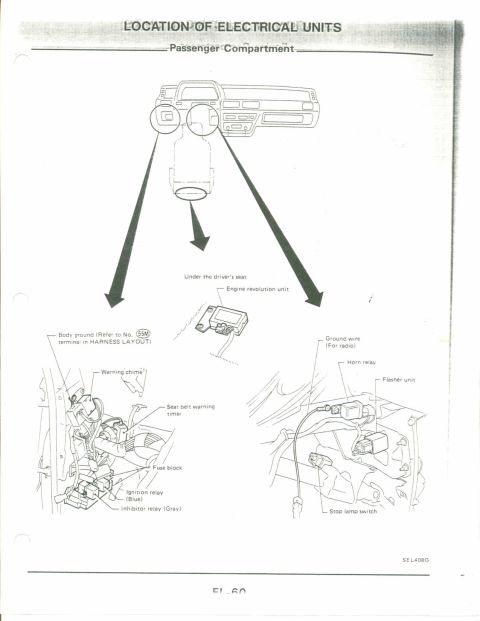
g ,:, Eti'mg.n~q a... y OIL PAN AND OIL PUMP Removal 1. Drain engine oil. 2. Remove oil pan. (1) Drive seal cutter (special tool) into space between cylinder block and oil pen. a Do not drive seal cutter into oil pump or rear oil seal retainer portion, or aluminum mating face will be damaged. 0 Do not drive screwdriver, or oil pan flange will be deformed. 1 Shaun (2) Slide seal cutter by tapping its side with a hammer and remove oil pan. r Gym in) SEMean Inspection Refer to LC section. Installation 1. Install oil pump assembly. [3] : 16.22 N-m (1.6 2.2 Ram, 12 - 16 ft-lb) 2. Before installing oil pan, remove all traces of liquid gasket from mating surface using a scraper. I Also remove traces of liquid gasket from mating surface of cylinder block. 3. Apply sealant to oil pan. Awlv sealant 5 Hana 4. Apply a continuous bead of liquid gasket to mating surface of oil pan. 0 Be sure liquid gasket is 3.5 to 4.5 mm (0.138 to 0.177 in) wide. a Attaching should be done within 5 minutes after coating. 0 Wait at least 30 minutes before refilling engine oil/coolant or striking engine. 6'] r Tube press-r / \ P} 5 - 7 (as .n.7,:i.e -5.1) F Dilmltnr of bid: :15 - 4.5 mm (0J3 - 0.177 in) . {C} : NAm lkngt-lbi sauna inner sid-
Comments
More from this build

No comments yet.