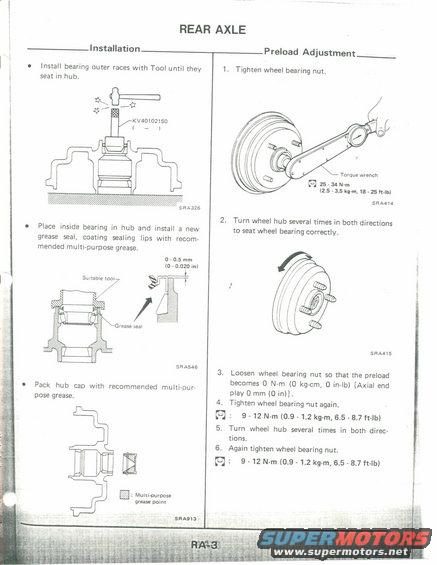
This document provides step-by-step instructions for rear axle installation and preload adjustment, including torque specifications.
~lnstallation 0 Install bearing outer races with Tool until they seat in hub. Kvaoxcmso I ~ 3 / / 5HAJ26 0 Place inside bearing in hub and install a new grease seal, coating sealing lips with "zoom mended mum-purpose greaset l7 - 0.5 mm 1 - 0.020 in) sultabley Grease seal ,/ sRAsne 0 Pack hub cap with recommended multi~pur~ pose grease. 9, E I: Mum-ourpase grnll numt SRABIS. REAR AXLE Preload Adjustment 1. Tighten wheel bearing nut. Turque wrench M 25 .34 N-m (2.5 . 15 lug-m, Ia - :5 (HM SHAAIA 2. Turn wheel hub several times in both directions to seat wheel bearing correctly. 5501415 3. Loosen wheel bearing nut so that the preload becomes 0 N-m (O kgcm, D in-lb) [Axial and play 0 mm (0 in)]. 4. Tighten wheel bearing rtut again. P] 1 9 - 12 N-m (0.9 - 1.2 ku-m, 6.5 -a.7 ft-lb) 5. Turn wheel hub several times in both direc- tions. 6 Again tighten wheel bearing nut. {U} : 9 - 12 Min (0.9 - 1.2 kg-ml 6.5 8.7 ft-lb)
Comments
More from this build


No comments yet.