How-to
1975 Ford Bronco Dana 20 Transfer Case Teardown
A Dana 20 transfer case was pulled from a 1975 Ford Bronco and opened up because the shifter would not move into 4H. The photos cover the access and removal problems, the internal gear and shift rail layout, and each of the five shift positions demonstrated with the gears and rails in hand.
-
Step 1
Start from the exploded view of the Dana 20 transfer case to identify the gears, shift rails and forks before any disassembly. Steve83 collected a shifter pill modification photo from the internet for reference and reported being unsure whether to do that modification.

-
Step 2
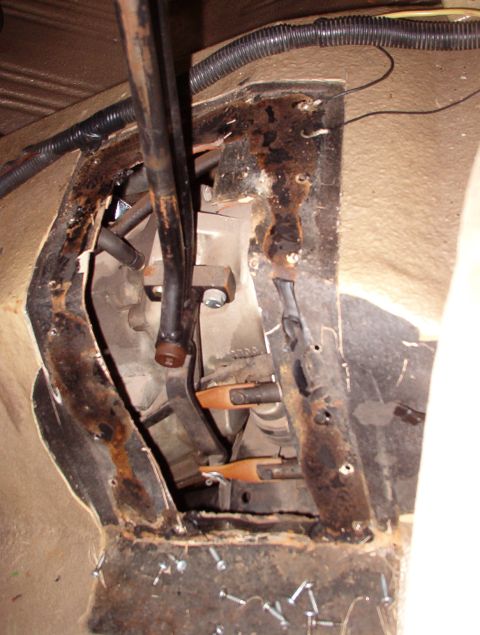
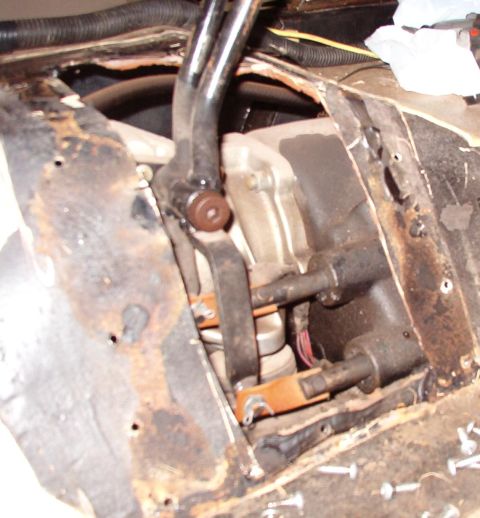
Confirm the complaint before teardown: the shifter will not move into 4H, and the problem is internal to the transfer case. Steve83 reports the tunnel was closed up when the body was blasted, repaired, painted and Rhino-Lined so the shifter hole could be cut precisely, and that a later shop in Baton Rouge cut it out worse than it had been.
-
Step 3
Check access to the mounting nuts before dropping the case. With the factory rubber bumper installed at the back of the crossmember the lower L nut cannot be reached, and the middle L nut takes a 4-way wrench.

-
Step 4
Lift the transmission tailhousing off its mounts to reach the lower L nut. Steve83 reports the Advance Adapters adapter required clearancing the crossmember in several spots and 1/2 inch of washers on each transmission mount, and is leaving the crossmember bumper off and replacing the stacked washers with a single shim on each side so the case will be easier to drop next time.

-
Step 5
With the case open, read the gear positions against the schematic: the front output gear centered puts the front in neutral, and the rear output gear forward puts the rear in high range. Steve83 warns that removing the aluminum sleeve and stub shaft of the Advance Adapters AOD kit lets about a dozen roller bearings fall loose into and out of the case, and that finding and reinstalling them is a challenge.

-
Step 6
Trace the power path through the case: power comes in to the lower left gear from the transmission, the upper left gear is an idler spinning at input speed, and each fork slides its output gear forward for 1:1 high range or rearward onto the smaller central gear for low range, with the gear centered leaving that output in neutral. Note that the pills between the shift rails prevent the front and rear from being in different ranges.

-
Step 7
Slide the output gear rearward on the output shaft to engage the smaller center gear for low range, or forward to engage the splines of the input gear for high range. With both output gears slid rearward, the case is in 4L.


-
Step 8
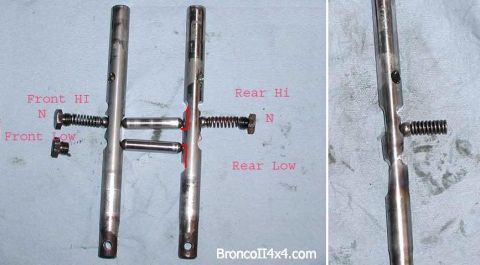
Study the shift rail close-ups before reassembling anything: the machined notches the detent ball rides in are visible on the rail as it passes through the case, and they show where each shift position lands.


-
Step 9
Check the markings on the shift parts so each one can be matched to its place: the output gears carry a stamped Dana mark and the shift forks have cast part marks, and a hand holds each fork on its rail to show how it sits.


-
Step 10
Work through the five positions with the gears and rails in hand: 4WD High with both sliding gears and rails full forward on the 1:1 gears, 2WD High with the front gear centered and the rear engaged to the input, Neutral with both gears centered, 2WD Low with the rear gear full rearward, and 4WD Low with both full rearward on the small end of the center idler gear. In each position the pills hold one shift rail and allow only the other to move, which is what limits the shifter to the legal range combinations.


-
Step 11
The album ends here. The photos do not cover reassembly of the transfer case or reinstallation in the truck.
Some product links go to the supplier the owner bought from. SuperMotors does not earn a commission today; if that changes, this line will say so and creators will be paid from it.