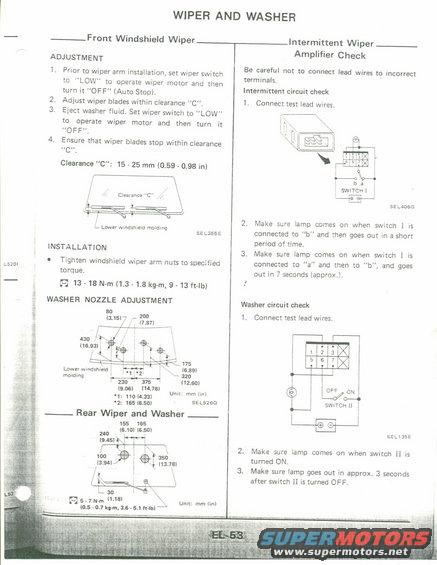
This document details the adjustment and installation procedures for front and rear wiper and washer systems, along with intermittent wiper amplifier checks.
WIPER AND WASHER - Front Windshield Wiper ADJUSTMENT 1. Prior to wiper arm installation, set wiper switch to "LOW" to operate wiper motor and then turn it "OFF" (Auto Stop). 2. Adjust wiper blades within clearance "C 3. Eject washer fluid. Set wiper switch to LOW to operate wiper motor and then turn it "OFF". 4. Ensure that wiper blades stop within clearance C Clearance "C": 15 - 25 mm (0.59 0.98 in) Clearance "C" / L Lower Windshield miamg SEL355E INSTALLATION L520! 0 Tighten windshield wiper arm nuts to specified torque. H 13 - 18 NM (1.3 A 1.8 kg-m, 9 - 13 ft-Ib) i; WASHER NOZZLE ADJUSTMENT P so ' a , zoo E (1151/ I, (7) :5 l H m i / . i "5.9:: l 9i ; . g L I anerwmdshield , i l \ (6.39) ' maiamg W e 320 no . 375 (12.60) (9.06! (14.76! _ 1 ) 1. , 11014.33) um. mm m . '2. 155(850l 5&5sz Rear Wiper and Washer __ V55 135 2 (mo! (sec) (9.45) | .1 f 1 : ~ 1m % 350 (3.94) - @I (13.78) l. H5-7anilm u (0.5 - 0.7 kI-m. :Ls - 5.1 Mb) Unit: mm (in) Intermittent Wiper Amplifier Check Be careful not to connect lead wires to incorrect terminals. Intermittent circuit check 1, Connect test lead wires. in ; Qi He g2: se L405: 2. Make sure lamp comes on when switch | is connected to b" and then goes out in a short period of time. 3. Make sure lamp comes on when switch I is connected to "a" and then to "b", and goes out in 7 seconds (approx). Washer circuit check 1, Connect test lead wires. ui SWITCH ll b senses 2. Make sure lamp comes on when swrtch II is turned ON. 3. Make sure lamp goes out in approx. 3 seconds after switch [I is turned OFF.
Comments
More from this build

No comments yet.