Home/
Registry/
Ford/
Bronco/
1978-1979/
“buyers guide”/
Photo
supermotors.net/registry/media/962387
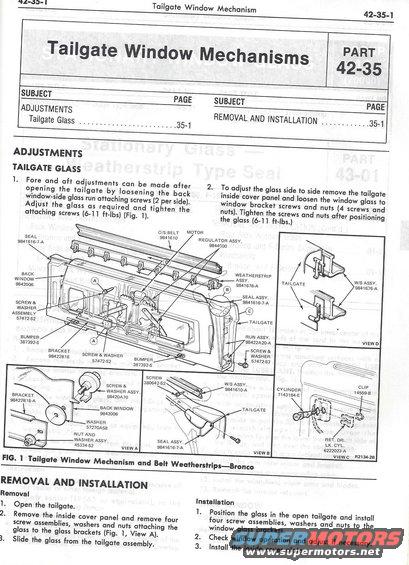
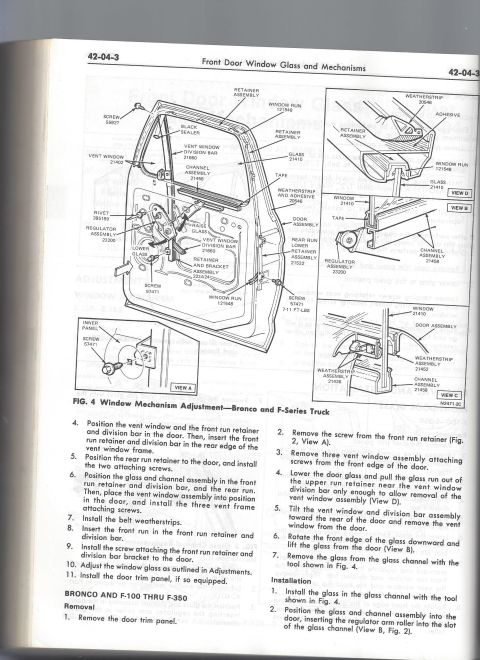
This diagram details the tailgate window mechanism and belt weatherstrips for a Bronco, illustrating its removal and installation process.
41-634 Tailgate Window Mechanism 42-35-l Tailgate Window Mechanisms 4'2'35 SUBJECT PAGE SUBJECT PAGE ADJUSTMENTS REMOVAL AND INSTALLATION ............ 35-1 Tailgate Glass ........................ 35-1 ADJUSTMENTS TAILGATE GLASS 1. Fore and aft adiustments can be made after 2. To adjust the glass side to side remove the tailgate opening the tailgate by loosening the back inside cover panel and loosen the window glass to window-side glass run attaching screws (2 per side). window bracket screws and nuts (4 screws and Adiust the glass as required and tighten the nuts). Tighten the screws and nuts after positioning attaching screws (6~ll ft-lbsl (Fig. l). the glass (6-H ft-lbs.) o/s BELT MOTOR 9841610 REGULATOR ASSV 9844000 SEAL 9341616~7rA WEATHERSTRIP W/s Assv. BACK ASSY. TAlLGATE 9841675'A WNDOW 9841676-A 9842005 SEAL ASSY. 984161604X SCREW 8( WASHER ASSEME Lv TAILGATE 57472752 HUN ASSV. VIEW 9 BUMPER 98422A20-A 3873926 SCREW & WASHER BRACKET 98422515 SCREEZWSAZSHER BUMPER 5747252 \ ' 387392-5 \ A scREw .: W/s Assv \ CLIP 9; sanw & 380642752 - . swam-A chINnER \ 1455975 WASHER ASSY. 1 714313 F\ BRACKET 98420A70 % . t 7"? L , 984225184X TAILGATE / It"? : 9 BACK WINDOW ' {:a.L-{} 9842006 cc; I J WASHER . 57270A58 RET DR NUT AND ' WASHER ASSY. SEAL A55 6:25:35; 4533432 VIEW A 93415161 VIEW 8 VIEW c tutu-28 FIG. 'I Tailgate Window Mechanism and Belt WeatherstripsBronca REMOVAL AND INSTALLATION Removal Installation 1. Open the tailgate. 1. Position the glass in the open tailgate and install 2. Remove the inside cover panel and remove tour by? screw assembliesl washers and HUtS to the screw assemblies, washers and nuts attaching the WIHdOW glass brackets. glass to the glass brackets (Fig. 1, View A). Check window operation and adjust if necessary. 3. Slide the glass from the tailgate assembly. lnstall the inside cover plate. 0.
Comments
More from this build


No comments yet.