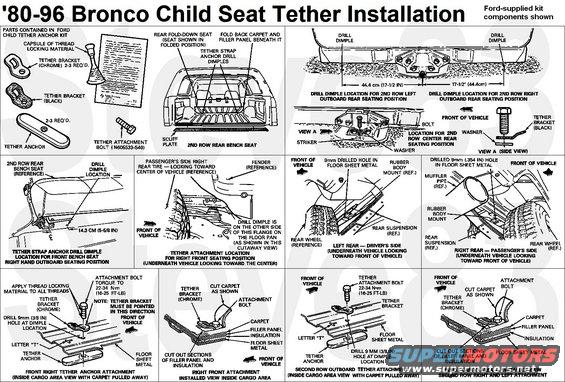
Diagram for 1980-96 Bronco child seat tether installation with l…
Child Restraint Seat Tether Installation Instructions for '92-96 Bronco ('80-91 similar)
IF THE IMAGE IS TOO SMALL, click it.
See also: .
.  .
.  .
.  .
. 
General Instructions
Read these instructions carefully prior to installation of the child tether strap anchor kit. (Refer to kit content.) Some manufacturers make safety seats with a tether strap that goes over the back of the vehicle seat and attaches to an anchoring point behind the vehicle seat. Ford recommends placement of tethered safety seats in a rear seating position with the tether strap attached to the tether anchoring point as shown. If a tethered seat is installed in the front seat, Ford recommends the center front seating position, with the tether strap secured to the center rear lap belt tongue or to the webbing of the buckled center rear lap belt behind the child safety seat. The front, right hand seating position may be used if it is the only seating position available.
WARNING: FAILURE TO FOLLOW THESE PRECAUTIONS COULD INCREASE THE CHANCE AND/OR SEVERITY OF INJURY IN AN ACCIDENT.
This vehicle has provisions to attach a tether anchorage in the front right hand, and all second row, seating positions. It is easiest to install a tether anchor at the second row (rear) center seating position.
Instructions for Locating Tether Strap Anchor Drill Dimples for the Front Right Hand Seating Position
1. You must remove the second row bench seat to gain access to the affected area beneath the carpet.
2. To remove this rear fold-down seat:
(a. Unlock the latch and fold the seat forward.
(b. Remove the rear seat cushion torsion bar. Release it from the right hand floor bracket by pushing forward and up.
(c. Remove the spring retainers and the hinge pivot pins from both the floor brackets.
(d. Remove the seat assembly.
(e. Remove the front bolts that fasten the bracket to the floor.
(f. Remove the plug buttons from the spring. Remove the bolts from the spring. Remove the spring, the washer and the retainer from the bracket.
NOTE: When the carpeting is pulled back, you should see a colored 2 inch x 2 inch (51mm x 51mm) square box with a large block letter T inside of it. This marks the approximate area of the floor where the drill dimple is located.
3. Lift front flap of the floor carpeting and pull it back to expose the drill dimple provided for attachment of the tether strap bracket.
4. Locate the drill dimple. It is approximately 5-5/8 inches (14.3cm) toward the center of the vehicle from the front RH bracket bolt. A letter T is stamped next to the drill dimple to help find its location.
Instructions for Locating Tether Strap Anchor Drill Dimples for the Second Row Right Hand and Left Hand Seating Position
1. Open the liftgate. Remove the attaching screws retaining the rear floor scuff plate to the body.
2. Fold the rear bench seat forward.
3. Fold back the rear floor carpet and lift the carpet assembly to expose the floor sheet metal. (Refer to illustration.)
4. From inside the cargo area, locate the two (2) drill dimples (one for each side of the vehicle) in the floor near the embossed letter T. The drill dimples are located approximately 17-1/2 inches (44.4cm) from the rear striker bolt. (Refer to illustrations.)
Instructions for Installing Tether Strap Anchor Attachments for the Front Right Hand and Rear Out-Board Seating Positions ONLY
1. From inside the cargo area, drill a .354 inch (9mm) hole through the desired dimple(s). Verify, before drilling the hole through the floor pan, that the drill will not damage any underbody components. Refer to the following illustrations.
NOTE: Do not install the black-colored tether strap bracket at these locations.
2. An assistant will be needed underneath the vehicle to attach the tether anchor. Before installing the tether hardware, read the instructions on the package containing thread locking material, then open the capsule and apply thread locking material to all threads on the tether attachment bolt. Install the child tether hardware as shown in the following illustrations.
WARNING: THE TETHER BRACKET MUST BE BOLTED DIRECTLY TO THE FLOOR SHEET METAL. INTERIOR TRIM MUST NOT BE TRAPPED BETWEEN THE ANCHOR AND THE SHEET METAL. FAILURE TO PROPERLY INSTALL THE ANCHOR COULD RESULT IN IMPROPER PERFORMANCE IN THE EVENT OF AN ACCIDENT.
3. It is important that the tether attachment bolt be torqued to 22-34 N-m (16-25 ft-lb).
WARNING: THE THREADED HOLE IN THE TETHER ANCHOR HAS AN 8MM METRIC THREAD. A WRENCH WILL BE NEEDED TO TIGHTEN THE 8MM BOLT TO THE REQUIRED TORQUE. SOME CHILD RESTRAINTS COME WITH A NON-METRIC BOLT WITH A DIFFERENT THREAD. DO NOT USE A NON-METRIC BOLT AS IT MAY BE IMPOSSIBLE TO SCREW IT ALL THE WAY INTO THE HOLE, RESULTING IN INADEQUATE RETENTION OF THE CHILD RESTRAINT. USE ONLY THE METRIC ANCHOR BOLT SUPPLIED IN THIS KIT. IF YOU NEED A REPLACEMENT METRIC BOLT OR ASSISTANCE, ANY FORD DEALER WILL BE HAPPY TO ASSIST YOU.
WARNING: IF THE ANCHOR BOLT(S) ARE EVER REMOVED, THE HOLE(S) IN THE FLOOR MUST BE SEALED TO PREVENT THE POSSIBILITY OF EXHAUST FUMES ENTERING THE PASSENGER COMPARTMENT.
4. Refer to Cutting the Carpet in this section.
Instructions for Installing Tether Strap Anchor Attachments for the Second Row Center Seating Position
1. Locate the latch assembly and the latch striker. The rear bolt holding the latch striker to the floor pan is the bolt used for mounting the tether strap bracket (refer to illustration).
2. With the rear seat folded forward, remove the rear bolt retaining the striker bar to the floor pan sheet metal.
3. Before installing the tether hardware, read the instructions on the package containing the thread locking material, then open the capsule and apply thread locking material to all threads on the tether attachment bolt.
NOTE: Use the black-colored tether strap bracket at THIS LOCATION ONLY.
4. Assemble the bolt, black tether bracket and washer. The black tether bracket must be pointing rearward and assembled as shown.
5. Install the bolt assembly and torque the bolt to 61.3-81.7 N-m (45-60 ft-lb).
Cutting the Carpet -- Front Right Hand and Rear Out-Board Seating Positions (After Tether Bracket Has Been Installed)
Pull back the carpet and find the 2 inch x 2 inch (51mm x 51mm) colored square on the back side of the carpet. The colored square is the approximate location of the required cut-out in the carpet. Using the colored square as a guide, establish the location where a 2 inch x 2 inch (51mm x 51mm) cut-out in the carpet will expose the chrome tether bracket. Cut the carpet as shown in the following illustrations.
Installing the Seat and Trim
1. If the rear fold-down seat was removed, install the seat as follows.
(a. Align the holes in the rear seat cushion bracket with the holes in the floor pan. Put a washer and a retainer in the bottom of each spring. Place the assembly so the retainers are on the brackets. Install the bolts through the springs and tighten to 62-81 N-m (45-60 ft-lb).
(b. Install the remaining bolts and washers that fasten the brackets to the floor. Tighten to 62-81 N-m (45-60 ft-lb).
(c. Put the seat assembly in position and install the hinge pivot pins and spring retainers.
(d. Install the rear seat cushion torsion bar.
(e. Check the seat for correct operation.
2. Return the folding rear seat to the upright position and make sure it is latched in place.
3. Position the rear floor carpeting and the trim.
WARNING: FOLLOW THE CHILD SEAT MANUFACTURER'S INSTRUCTIONS TO ATTACH THE TETHER STRAP TO THE TETHER BRACKET.
4. Install the tail gate scuff plate if it was removed.
ALL SAFETY BELT ASSEMBLIES INCLUDING RETRACTORS AND ATTACHING HARDWARE SHOULD BE INSPECTED AFTER ANY COLLISION. FORD RECOMMENDS THAT ALL SAFETY BELT ASSEMBLIES IN USE DURING A COLLISION BE REPLACED UNLESS THE COLLISION WAS MINOR AND A QUALIFIED TECHNICIAN FINDS THAT THE BELTS SHOW NO DAMAGE AND CONTINUE TO OPERATE PROPERLY. SAFETY BELT ASSEMBLIES NOT IN USE DURING A COLLISION SHOULD ALSO BE INSPECTED AND REPLACED IF EITHER DAMAGE OR IMPROPER OPERATION IS NOTED.
Is this accurate? Sign in to help verify it.
Comments
More from this build


No comments yet.