This document page provides instructions for vehicle maintenance procedures.
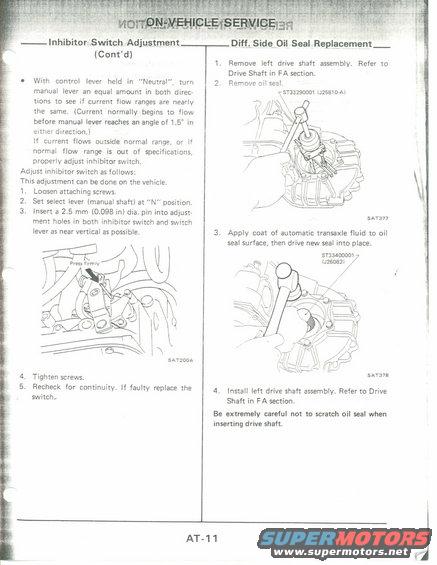
InhibitorxSwitch Adjustment Diff; (Cont' d) , e_0il Seal . Replacement 1. Remove left drive shaft assembly. Refer to Drive Shaft in FA section. With control lever held in Neutral", turn 2. Remove all seal. manual lever an equal amount in both direc- 73379000! (4253mm tions to see if current flow ranges are nearly the same. (Current normally begins to flow before manual lever reaches an angle of 1.5 in either direction.) if current flows outside normal range, or if normal flow range is out of specifications, properly adjust inhibitor switch. Adjust inhibitor switch as follows: This adjustment can be done on the vehicle, 1. Loosen attaching screws. 2, Set select lever (manual shaft) at "N" position. 3. lnsert a 2.5 mm (0.098 in) dia. pin into adjust- ment holes in both inhibitor switch and switch lever as near vertical as possible. 3. Apply coat of automatic transaxle fluid to oil seal surface, then drive new seal into place. srazmoom [JYGDBV SAT377 sATzonA . :1: 4. Tighten screws. 5 5. Recheck for continuity. lf faulty replace the 4 Install left drive shaft assembly. Refer to Drive Mitch Shaft in FA section. Be extremely careful not to scratch oil seal when inserting drive shaft. AT-11
Comments
More from this build

No comments yet.