Nissan Micra Automatic Transaxle Removal & Installation - Service Manual AT-12
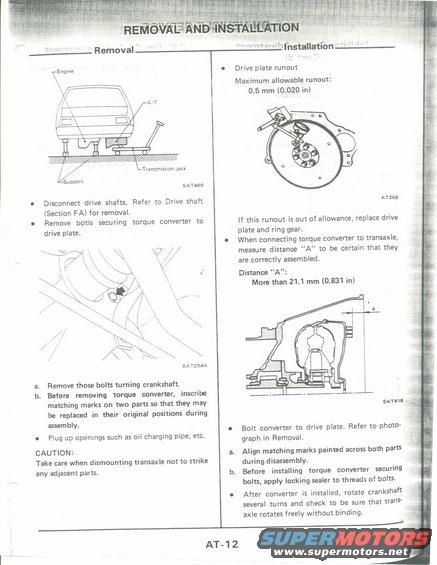
AT-12 transaxle removal/installation; drive plate max allowable runout 0.5 mm, torque converter to transaxle distance A more than 21.1 mm.
This is page AT-12 of a factory service manual section covering removal and installation of an automatic transaxle (A/T). The Removal side instructs disconnecting the drive shafts (referencing Section FA), removing the bolts securing the torque converter to the drive plate by turning the crankshaft, inscribing matching marks on the two parts before removing the torque converter so they can be reassembled in their original positions, and plugging openings such as the oil charging pipe. A caution warns not to strike adjacent parts when dismounting the transaxle. An illustration (SAT469) shows the vehicle supported with a transmission jack under the A/T; another (SAT204A) shows the converter bolt access point. The Installation side specifies checking drive plate runout with a dial indicator (AT268), with a maximum allowable runout of 0.5 mm (0.020 in); if exceeded, the drive plate and ring gear must be replaced. When connecting the torque converter to the transaxle, distance "A" must be more than 21.1 mm (0.831 in), shown in cross-section diagram SAT416. Final steps include aligning the matching marks, applying locking sealer to the converter bolt threads, and rotating the crankshaft several turns after installation to verify the transaxle rotates freely without binding.
Is this accurate? Sign in to help verify it.
Frequently asked questions
- What is the maximum allowable drive plate runout?
- 0.5 mm (0.020 in). If runout exceeds this, replace the drive plate and ring gear.
- What should distance "A" be when installing the torque converter into the transaxle?
- Distance "A" must be more than 21.1 mm (0.831 in) to be certain the converter is correctly assembled.
- What should be done before removing the torque converter?
- Inscribe matching marks on the torque converter and drive plate so they may be replaced in their original positions during assembly.
- What must be applied to the torque converter securing bolts before installation?
- Apply locking sealer to the threads of the bolts before installing them.
- How do you verify the transaxle after installing the torque converter?
- Rotate the crankshaft several turns and check that the transaxle rotates freely without binding.
Comments
More from this build

No comments yet.