Ford F-150 and Bronco transfer case exploded parts diagram
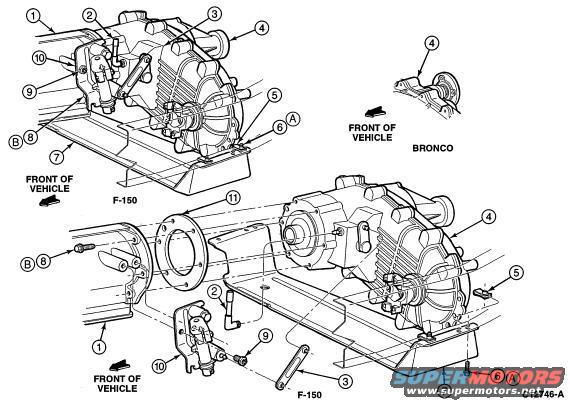
TSB 91-14-15 TRANSFER CASE - BORG WARNER 1345 - REVISED SHIFT CONTROL LEVER INSTALLATION PROCEDURE - 4X4 VEHICLES
Publication Date: 07/11/91
LIGHT TRUCK: 1990-91 F-150-350 SERIES
ISSUE: The 1990 and 1991 Shop Manuals incorrectly state that the shift control lever is pointed downward. The shift control lever should be pointed UPWARD.
In prior model years, the lever was pointed downward. However, in 1990 the position of the shift lever was changed, it was pointed upward. The 1990 and 1991 Shop Manuals were not previously updated to reflect this change. A Quarterly TSB Update will be issued in September correcting the Shop Manual pages.
ACTION: If assembly of the transfer case is required, make sure that the shift control lever is pointing UPWARD in the neutral position.
For other TSBs, check here.
__________________________________________
TSB 97-12-13 TRANSMISSION - C6, E4OD, AOD, 4R70W - LOW TRANSMISSION FLUID LEVEL AND/OR SHIFT AND/OR ENGAGEMENT CONCERNS - 4X4 AND AWD VEHICLES ONLY
Publication Date: 06/09/97
LIGHT TRUCK:
1987-96 BRONCO
1987-97 F-150, F-250, F-350
1996-97 EXPLORER
1997 EXPEDITION, MOUNTAINEER
This TSB article is being republished in its entirety to include 1997 model year vehicles.
ISSUE: The transmission may have low fluid level and/or may have either a shift concern and/or an engagement concern. This may be caused by transmission fluid leaking from the transmission into the transfer case through the transfer case input seal.
ACTION: Replace the transfer case input seal. The new seal should reduce the possibility of fluid leaking from the transmission into the transfer case. Refer to the following Service Procedure for details.
SERVICE PROCEDURE
1. Check the transmission fluid level. It the transmission fluid level is low and there are no visible signs of a leak, check the transfer case fluid level. The level of fluid in the transfer case should be just below the fill plug hole.
2. If the transfer case fluid level is overfull and the transmission fluid is not burnt, remove the transfer case from the vehicle following the procedure outlined in the appropriate model/year Service Manual.
3. Remove the transfer case input seal. Clean the seal bore in the transfer case.
4. Install a new Transfer Case Input Seal (F77Z-7B215-AA)
5. If the transmission fluid is burnt, repair the transmission as required and then replace the transfer case seal as outlined in Step 3.
PART NUMBER PART NAME
F77Z-7B215-AA Transfer case Input Seal
OTHER APPLICABLE ARTICLES: NONE
SUPERSEDES: 96-20-18
WARRANTY STATUS: Eligible Under The Provisions Of Bumper To Bumper Warranty Coverage
OPERATION DESCRIPTION TIME
971213A Replace Transfer Case 1.6 Hrs.
Input Seal - 1987-96
F-150-350, Bronco And
1997 F-250-350
971213B Replace Transfer Case 2.7 Hrs.
Input Seal - 1996-97
Explorer AWD And 1997
Mountaineer
971213C Replace Transfer Case 2.1 Hrs.
Input Seal - 1997 F-150,
Expedition
DEALER CODING
CONDITION
BASIC PART NO. CODE
7B215 D8
OASIS CODES: 501000, 502000, 503000, 504000, 506000, 510000
__________________________________________
TSB89-6-19 TRANSFER CASE-LUBRICATION REQUIREMENTS FOR VEHICLES EQUIPPED "DANA" POWER TAKE-OFF (PTO) UNITS
LIGHT TRUCK: 1987-89 F-350
ISSUE: Warner 356 transfer case assemblies with "Dana" P.T.O. units require 4.8 quarts more oil (Dexron II ATF) than transfer cases without P.T.O's. Transfer cases equipped with P.T.O's that are operated under a continuous load in excess of 11 minutes may exhibit failures due to a low fill.
ACTION: When servicing transfer cases that have P.T.O's, refill the transfer case as described in the following service procedure.
FIGURE 1
NOTE: SOME TRANSFER CASES HAVE A FILL PLUG LABELED "FOR P.T.O. FILL ONLY" ON THE FRONT OF THE CASE, FIGURE 1.
NOTE: CUSTOMERS SHOULD BE GIVEN A COPY OF THIS INFORMATION FOR FUTURE REFERENCE.
1. Locate the fill plug on the front of the transfer case labeled "FOR P.T.O. FILL ONLY", Figure 1. Fill oil to the level of this fill hole. If this fill hole does not exist, proceed to Step 2. NOTE: THE UPPERMOST CAPSCREW ON THE OUTPUT SHAFT BEARING COVER OF THE P.T.O. SHOULD BE USED TO CHECK THE OIL LEVEL.
FIGURE 2
2. Remove the uppermost capscrew ("A") on the output shaft bearing cover of the P.T.O., Figure 2.
FIGURE 3
3. Remove the barbed fitting and breather hose from the P.T.O. shifter cover, Figure 3.
4. Add oil into the P.T.O. through the breather hole in the shifter cover until the oil begins to run out of the hole for the capscrew ("A").
5. Reinstall the capscrew in the output shaft bearing cover of the P.T.O.
6. Reinstall the barbed fitting and breather hose into the P.T.O. shift cover.
7. Make sure all the capscrews are properly tightened. Refer to the P.T.O. owner manual for the correct torque specification.
OTHER APPLICABLE ARTICLES: None
WARRANTY STATUS: INFORMATION ONLY
OASIS CODES: 5700, 5970
__________________________________________
See also:
Is this accurate? Sign in to help verify it.
Comments
More from this build


No comments yet.