Service manual page BF-15 with exterior molding installation dia…
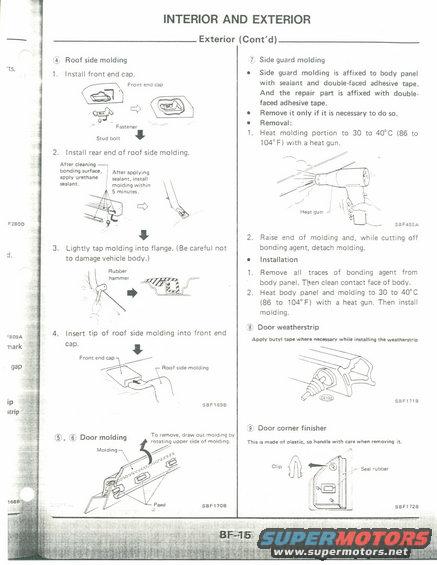
Scanned service manual page BF-15 titled 'Interior and Exterior — Exterior (Cont'd)', with line diagrams showing installation of roof side molding, side guard molding, door molding, door weatherstrip and door corner finisher. Instructions reference using a heat gun, urethane sealant, and a rubber hammer.
INTERIOR AND EXTERIOR .3 Roof side molding 'ts. 1, install front end cap. Front end can @ if? :9 Fasten" Slud boll 2. Install rear end of roof side molding. . AIt-r cllaning bonding mam. EDDIV urlthune sealant. After EDDIVIng sealant, Install molding Wlthln 5 mmulus. li> F2BDD 9 . :1 3. Lightly tap molding into flange. (Be careful not to damage vehicle body.) Runner hammer 4. Insert tip of roof side molding into front end cap. Front end up / M Slde mniamg Ip SEF 1698 strip @ , 763 Door molding T mm: dravj mu molding by 'mailns upper side or molding. Molding /g // 16.! saFnoa Exterior (Cont'd) 7 Side guard molding Side guard molding is affixed to body panel with sealant and double-faced adhesive tape. And the repair part is affixed with double- faced adhesive tape. Remove it only if it is necessary to do so, Removal: Heat molding portion to 30 to 40C (86 to 104F) with a heat gun. i Heat gun i ww senssm 2, Raise end of molding and, while cutting off bonding agent, detach molding. 0 Installation 1. Remove all traces of bonding agent from body panel. Then clean contact face of body, 2. Heat body panel and molding to 30 to 40C (86 to 104F) with a heat gun. Then install molding. "5 Door weatherstrip Apply hutyl unl whorl nunm while installing an wmh-Invip g SBFI7IB 3 Door corner finisher This is mad- of ulmic. an rumi- wilh cue wim- rum-wing it, // @Ti 3 , Seal rubber SEFI72E
Is this accurate? Sign in to help verify it.
Comments
More from this build

No comments yet.