Nissan Micra Exterior Body Seals & Weatherstrips - Service Manual Page BF-16
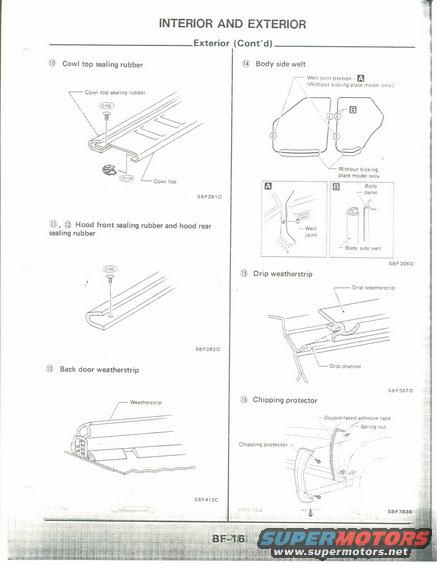
Service manual page covering cowl-top, hood, body-side welt, drip weatherstrip, and chipping-protector installation.
This is page BF-16 from a Nissan service manual body (BF) section, titled "Interior and Exterior — Exterior (Cont'd)." It is a service/reference page consisting of exploded and cross-section illustrations for exterior body sealing and trim components. The numbered items covered are: (10) Cowl top sealing rubber, showing its attachment to the cowl top with a screw (C102) and clip (CE104); (11)/(12) Hood front sealing rubber and hood rear sealing rubber, secured with screw C102; (13) Back door weatherstrip cross-section; (14) Body side welt, including the welt joint portion (details A and B) applicable to models without a kicking plate, with cross-sections showing the welt joint and how the body side welt fits over the body panel; (15) Drip weatherstrip, showing its fit into the drip channel; and (16) Chipping protector, showing installation with double-faced adhesive tape, spring nut, and screws at the wheel arch area. Illustration reference codes visible include SBF281D, SBF282D, SBF412C, SBF306D, SBF307D, and SBF783B. The page contains no torque specs, fuse data, or year/model statements; it is purely a component location and construction reference for exterior seals and trim.
Is this accurate? Sign in to help verify it.
Frequently asked questions
- How is the cowl top sealing rubber attached?
- The diagram shows the cowl top sealing rubber attached to the cowl top with a screw (labeled C102) and a clip (labeled CE104).
- What fasteners hold the hood front and rear sealing rubbers?
- The illustration for the hood front sealing rubber and hood rear sealing rubber shows attachment with a screw labeled C102.
- Which models have the body side welt joint portion shown in detail A?
- The welt joint portion (detail A) is noted as applying to the 'without kicking plate model only.'
- How is the chipping protector installed?
- The chipping protector is shown installed with double-faced adhesive tape, a spring nut, and screws at the lower body/wheel arch area.
- Where does the drip weatherstrip fit?
- The drip weatherstrip is shown fitting into the drip channel along the roof edge.
Comments
More from this build

No comments yet.