Headlight aim adjustment instructions for 1980-86 and 1992-96
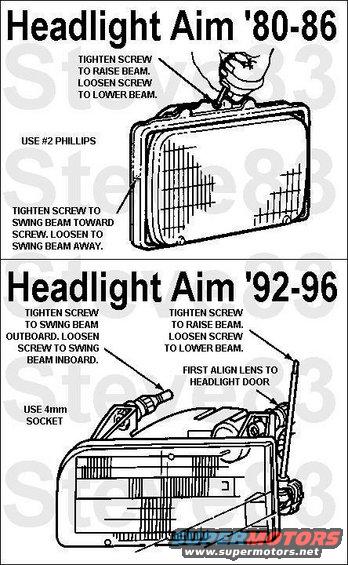
Headlight Aim '80-86 & '92-96
'87-91 is essentially the same as '92-96.
The '92-96 horizontal adjustment is hidden under a rubber seal between the grille opening reinforcement & the core support.
NOTE: Sagging springs, faulty wheel alignment or improper tracking of the rear axle may affect headlamp aim.
Before making any adjustments on headlamp (13008 ), perform the following preparatory steps:
Remove ice or mud from under fenders. Make sure that all tires are inflated to recommended pressures. Make sure there is no load in the vehicle other than the fuel tank half full. Clean lenses and aiming pads. Check for headlamp bulb (13007) burn-out and proper beam switching. Verify that lamp output is well toward normal new lamp value. Bounce the vehicle and allow to settle. For aerodynamically styled headlamps, set the non-adjustable corner (outboard top) so the face of the lens corner is flush with the headlight door.
- Rotunda Headlamp Aiming Kit 196-00001 or equivalent.
To aim the aerodynamically styled headlamps, the adjustable aimer adapters provided in the kit must be used. Adjustment aimer adapter positions are moulded into the bottom edge of the headlamp lens. Set and lock the adjustable adapters, attach each adapter to its mechanical aimer and aim headlamps per latest instructions in the kit. The equipment in Rotunda Headlamp Aiming Kit 196-00001 or equivalent can be calibrated to accommodate a slight slope in the floor, making it usable almost anyplace in the garage. However, the area must be reasonably flat.
- Alternate Aiming Method
On a dark, straight, flat road with no traffic, stop the vehicle without steering, keeping the vehicle aligned with its lane. With the headlamps on, open the hood for adjuster access and block one headlamp so the other's beam is apparent. Adjust the visible beam to strike near the horizon directly ahead of itself, using the lane lines as guides. Repeat for the other headlamp.
NOTE: Access holes are provided for '80-86 to allow headlamp adjustment without removing the headlamp door (13064).
For sealed-beam (glass) lamps, always bring each beam into final position by turning the headlamp adjusting screw (13032) clockwise so that the headlamp will be held against the tension springs when the operation is completed.
See also: .
.  .
. 
Is this accurate? Sign in to help verify it.
Comments
More from this build


No comments yet.