Nissan Micra Auto Transaxle Assembly AT-51: Output Shaft Shim Chart & Housing
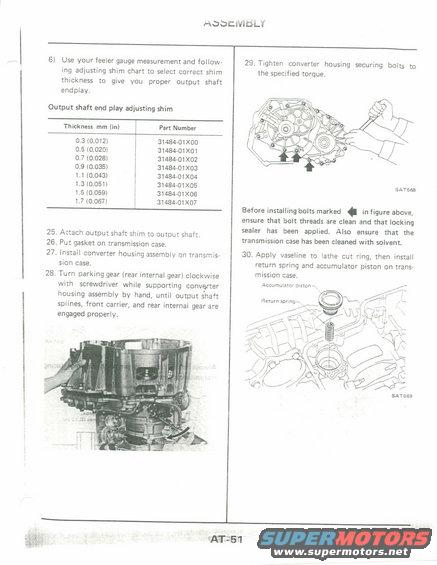
AT-51 output shaft end play shim selection chart (0.3-1.7 mm, P/N 31484-01X00 to X07) and converter housing install with locking sealer.
This is page AT-51 from a Nissan automatic transaxle (AT section) service manual, covering part of the transmission assembly procedure. It includes step 6 instructions for using a feeler gauge measurement with an adjusting shim chart to select the correct output shaft end play shim, followed by a table listing eight shim thicknesses from 0.3 mm (0.012 in) to 1.7 mm (0.067 in) with corresponding part numbers 31484-01X00 through 31484-01X07. Assembly steps 25 through 30 are detailed: attaching the output shaft shim, placing the gasket on the transmission case, installing the converter housing assembly, turning the parking gear (rear internal gear) clockwise with a screwdriver while supporting the converter housing until the output shaft splines, front carrier, and rear internal gear engage properly, tightening converter housing securing bolts to specified torque (with a caution that bolts marked with arrows in figure SAT668 require clean threads, locking sealer, and a solvent-cleaned case), and finally applying vaseline to the lathe cut ring before installing the return spring and accumulator piston (figure SAT669). Two illustrations and one photo accompany the steps. Readers can learn shim part number selection and converter housing installation sequence for this automatic transaxle.
Is this accurate? Sign in to help verify it.
Frequently asked questions
- What shim thicknesses are available for adjusting output shaft end play?
- Eight thicknesses: 0.3 (0.012), 0.5 (0.020), 0.7 (0.028), 0.9 (0.035), 1.1 (0.043), 1.3 (0.051), 1.5 (0.059), and 1.7 mm (0.067 in), with part numbers 31484-01X00 through 31484-01X07.
- How do you select the correct output shaft end play shim?
- Use your feeler gauge measurement and the adjusting shim chart to select the correct shim thickness that gives proper output shaft endplay.
- What precautions apply to the converter housing securing bolts marked with arrows?
- Before installing the bolts marked with arrows in the figure (SAT668), ensure the bolt threads are clean, locking sealer has been applied, and the transmission case has been cleaned with solvent.
- How do you ensure the converter housing engages properly during installation?
- Turn the parking gear (rear internal gear) clockwise with a screwdriver while supporting the converter housing assembly by hand, until the output shaft splines, front carrier, and rear internal gear are engaged properly.
- What is used when installing the accumulator piston and return spring?
- Apply vaseline to the lathe cut ring, then install the return spring and accumulator piston on the transmission case.
Comments
More from this build

No comments yet.