Home/
Registry/
Ford/
Bronco/
1978-1979/
1979 Ford Bronco/
Photo
supermotors.net/registry/media/1032623
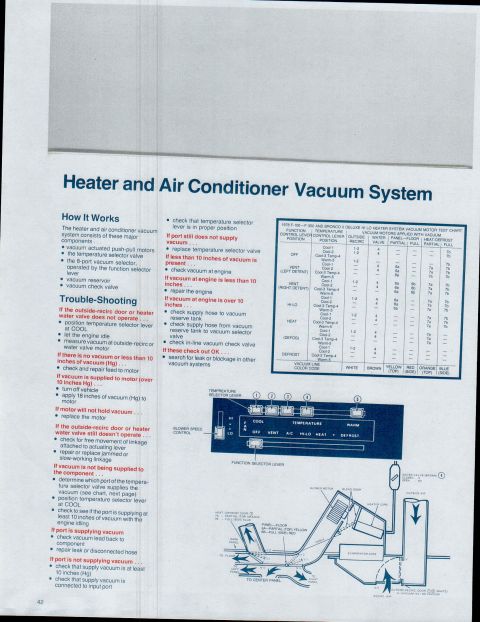
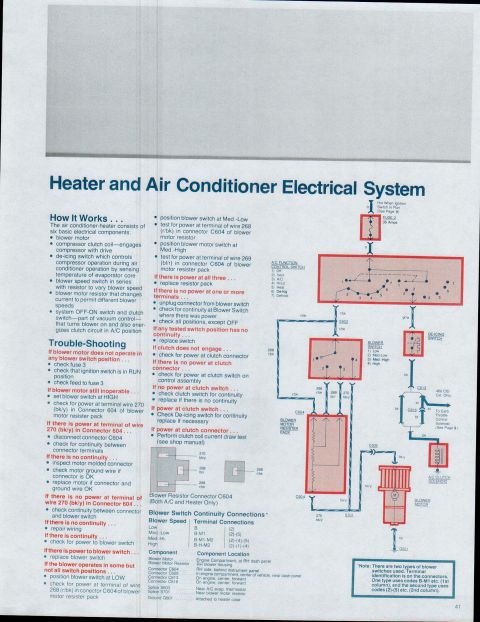
1979 Ford Bronco & F100-F350 Trouble-Shooting Basics: Battery, Alternator, Belts
Ford manual 'Trouble-Shooting...The Basics' page covering probability/speed/elimination method plus battery, alternator and vacuum-system quick checks and visual inspection tips.
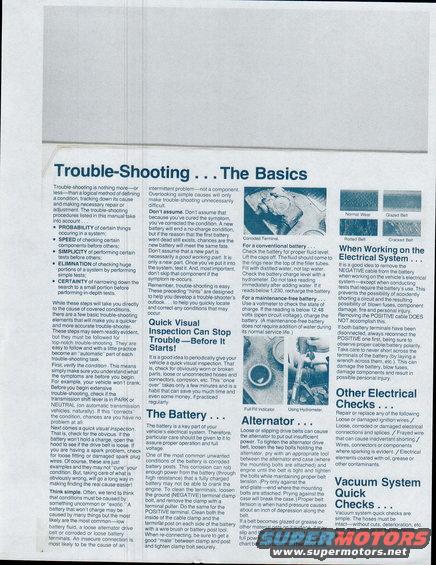
This page, titled "Trouble-Shooting . . . The Basics," is page 4 of a Ford trouble-shooting/service reference booklet covering the 1979 Bronco and F100 through F350 trucks. It introduces the logical fundamentals of trouble-shooting: the manual's procedures account for probability, speed, simplicity, elimination, and certainty. It advises the reader to first verify the condition (e.g., check that an automatic transmission is in PARK or NEUTRAL if the vehicle won't crank), perform a quick visual inspection, think simple, and never assume that curing a symptom fixed the underlying cause. Battery care is covered in detail: cleaning corroded terminals (remove the NEGATIVE clamp first, use a terminal puller and wire brush), checking a conventional battery's fluid level and specific gravity with a hydrometer (recharge if below 1,230), and checking a maintenance-free battery with a voltmeter (charge if below 12.48 volts open circuit). Alternator drive-belt tensioning is explained (about one inch of belt deflection under hand pressure; pry only against the end-plate), with photo examples of normal wear, glazed, rotted, and cracked belts. Safety notes cover disconnecting the negative battery cable before electrical work and reconnecting the positive cable first. Brief sections list other electrical checks (frayed, corroded, or sparking wiring) and vacuum system quick checks (hoses intact and securely connected).
Is this accurate? Sign in to help verify it.
Frequently asked questions
- What hydrometer reading means a conventional battery needs recharging?
- If the hydrometer reads below 1,230, recharge the battery. Do not take the reading immediately after adding water.
- How do you check the charge on a maintenance-free battery?
- Use a voltmeter to check the state of charge. If the reading is below 12.48 volts (open circuit voltage), charge the battery. A maintenance-free battery does not require addition of water during its normal service life.
- What is proper alternator belt tension?
- Proper belt tension is when hand pressure causes about an inch of depression along the belt. When prying to tension the belt, pry only against the end-plate where the mounting bolts are attached—prying against the case will break it.
- Which battery cable should be removed when working on the electrical system?
- Remove the NEGATIVE cable from the battery when working on the electrical system (except during tests that require the battery). Removing the POSITIVE cable does NOT accomplish this. If both cables were removed, reconnect the POSITIVE one first.
- What water should be used to top off a conventional battery?
- Fill with distilled water, not tap water. The fluid should come to the rings near the top of the filler tubes.
Comments
More from this build


No comments yet.