Nissan High-Reverse Clutch (Front) Disassembly & Inspection - AT-29 Exploded View
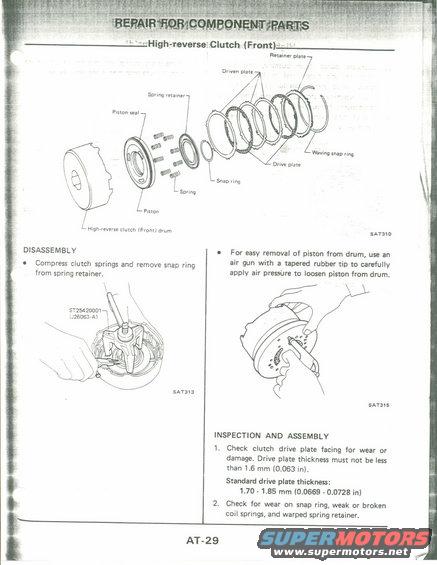
Service manual page AT-29 showing an exploded high-reverse clutch assembly with disassembly and inspection figures.
This is page AT-29 from a factory automatic transmission service manual section titled 'Repair for Component Parts,' covering the High-reverse Clutch (Front). The page begins with an exploded parts diagram (figure SAT310) labeling all components of the clutch assembly: retainer plate, driven plate, spring retainer, piston seal, drive plate, waving snap ring, snap ring, spring, piston, and the high-reverse clutch (front) drum. Under DISASSEMBLY, the instructions direct the technician to compress the clutch springs using special tool ST25420001 (J26063-A) and remove the snap ring from the spring retainer (figure SAT313), and to use an air gun with a tapered rubber tip to apply air pressure and loosen the piston from the drum (figure SAT315). The INSPECTION AND ASSEMBLY section specifies checking the clutch drive plate facing for wear or damage, drive plate thickness must not be less than 1.6 mm (0.063 in), with a standard thickness of 1.70-1.85 mm (0.0669-0.0728 in), and inspecting for snap ring wear, weak or broken coil springs, and a warped spring retainer. Readers can learn the clutch pack component layout, disassembly technique, required special tool number, and wear-limit specifications.
Is this accurate? Sign in to help verify it.
Frequently asked questions
- What is the minimum allowable drive plate thickness for the high-reverse clutch?
- Drive plate thickness must not be less than 1.6 mm (0.063 in).
- What is the standard drive plate thickness specification?
- Standard drive plate thickness is 1.70 - 1.85 mm (0.0669 - 0.0728 in).
- What special tool is used to compress the clutch springs during disassembly?
- Tool ST25420001 (J26063-A) is shown compressing the clutch springs so the snap ring can be removed from the spring retainer.
- How do you remove the piston from the high-reverse clutch drum?
- For easy removal, use an air gun with a tapered rubber tip to carefully apply air pressure and loosen the piston from the drum.
- What parts make up the high-reverse clutch (front) assembly?
- The exploded diagram shows the high-reverse clutch (front) drum, piston, piston seal, springs, spring retainer, snap ring, driven plates, drive plates, retainer plate, and waving snap ring.
Comments
More from this build

No comments yet.