Nissan Micra Automatic Transaxle Disassembly Steps 1-6 - Service Manual AT-16
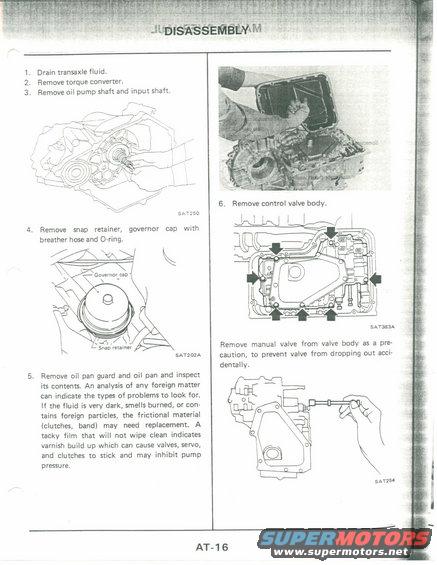
AT-16 transaxle disassembly steps; inspect oil pan contents for foreign matter, dark/burned fluid indicates clutch/band wear and varnish build-up.
This page is from an automatic transaxle service manual section (page AT-16) covering the beginning of the transaxle disassembly procedure. It lists six numbered steps: (1) drain transaxle fluid, (2) remove torque converter, (3) remove oil pump shaft and input shaft, (4) remove snap retainer and governor cap with breather hose and O-ring, (5) remove oil pan guard and oil pan and inspect the contents, and (6) remove the control valve body. Step 5 includes diagnostic guidance: analyzing foreign matter in the oil pan can indicate the type of problem; very dark, burned-smelling fluid or foreign particles suggest frictional material (clutches, band) may need replacement, and a tacky film that will not wipe clean indicates varnish buildup that can cause valves, servos, and clutches to stick and may inhibit pump pressure. A final note instructs removing the manual valve from the valve body as a precaution against it dropping out accidentally. The page includes line-art illustrations (figure references SAT250, SAT202A, SAT383A, SAT254) and a photograph of the oil pan being removed. Bolt locations for the control valve body are shown with arrows in one illustration.
Is this accurate? Sign in to help verify it.
Frequently asked questions
- What are the first steps in disassembling the automatic transaxle?
- Drain the transaxle fluid, remove the torque converter, then remove the oil pump shaft and input shaft.
- What should I inspect when removing the oil pan?
- Inspect the pan contents. Foreign matter analysis can indicate the type of problem; very dark or burned-smelling fluid or foreign particles suggest the frictional material (clutches, band) may need replacement. A tacky film that won't wipe clean indicates varnish buildup, which can cause valves, servo, and clutches to stick and may inhibit pump pressure.
- Why should the manual valve be removed from the valve body?
- As a precaution, to prevent the valve from dropping out accidentally.
- What is removed along with the governor cap?
- The snap retainer and the governor cap with breather hose and O-ring.
Comments
More from this build

No comments yet.