Nissan Micra Front Axle Drive Shaft Disassembly & Inspection - FA-9 Service Manual
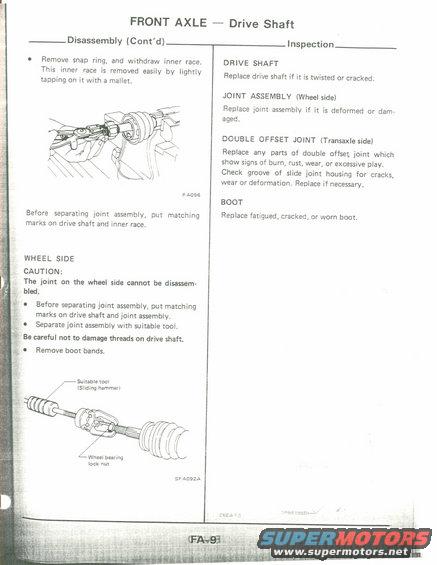
Service manual page with drive shaft disassembly steps and inspection notes for joints, boot and double offset joint.
This page (FA-9) from a Nissan service manual covers Front Axle, Drive Shaft procedures, continuing the disassembly instructions and providing inspection criteria. The disassembly section instructs removing the snap ring and withdrawing the inner race by lightly tapping with a mallet (illustration FA096), and emphasizes placing matching marks on the drive shaft and inner race before separating the joint assembly. For the wheel side, a caution states the wheel-side joint cannot be disassembled; the procedure calls for matching marks on the drive shaft and joint assembly, separating the joint with a suitable tool (a sliding hammer, shown in illustration SFA092A along with the wheel bearing lock nut), avoiding damage to the drive shaft threads, and removing the boot bands. The inspection section lists replacement criteria: replace the drive shaft if twisted or cracked; replace the wheel-side joint assembly if deformed or damaged; replace any parts of the transaxle-side double offset joint showing burn, rust, wear, or excessive play, checking the slide joint housing groove for cracks, wear, or deformation; and replace any fatigued, cracked, or worn boot. Readers learn correct CV drive shaft disassembly technique and pass/fail inspection standards for front-drive axle components.
Is this accurate? Sign in to help verify it.
Frequently asked questions
- Can the wheel-side CV joint on the drive shaft be disassembled?
- No. The manual's caution states the joint on the wheel side cannot be disassembled; it must be separated as an assembly using a suitable tool (sliding hammer), taking care not to damage the drive shaft threads.
- How is the inner race removed from the drive shaft joint?
- Remove the snap ring, then withdraw the inner race. It comes off easily by lightly tapping on it with a mallet.
- What should be done before separating the joint assembly?
- Put matching marks on the drive shaft and inner race (or on the drive shaft and joint assembly for the wheel side) before separating.
- When should the double offset joint (transaxle side) be replaced?
- Replace any parts of the double offset joint showing signs of burn, rust, wear, or excessive play. Also check the groove of the slide joint housing for cracks, wear, or deformation and replace if necessary.
- When should the drive shaft or boot be replaced?
- Replace the drive shaft if it is twisted or cracked, and replace the boot if it is fatigued, cracked, or worn.
Comments
More from this build
No comments yet.