Home/
Registry/
Ford/
Bronco/
1992-1996/
“pukin' dogII”/
Photo
supermotors.net/registry/media/1138756
Ford Vacuum System Troubleshooting Steps & Tests - Supply, Leak, Component (EVTM)

Reference · 1992-1996 BroncoAll 142 service procedures
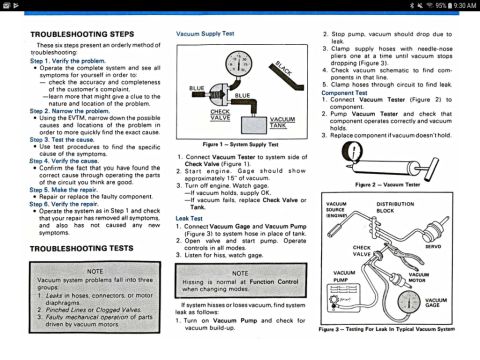
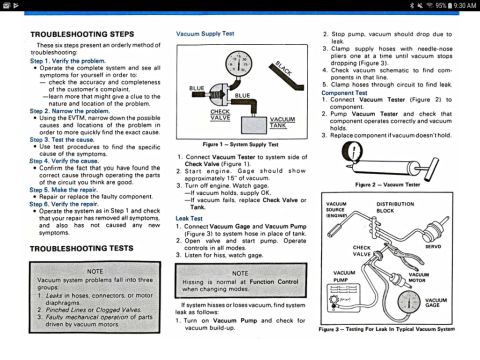
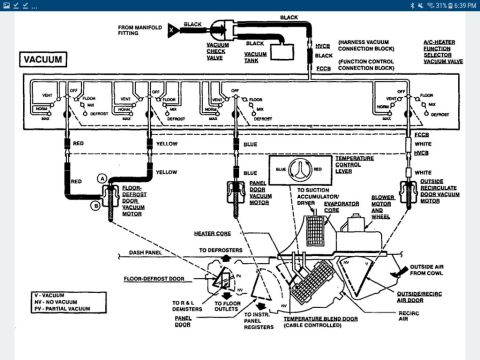
Step-by-step vacuum system troubleshooting procedure with system supply, leak and component test diagrams.
Part of 1992-1996 Ford Bronco Service Procedures
This page is a service procedure covering troubleshooting of an automotive vacuum system, likely from a Ford EVTM (Electrical & Vacuum Troubleshooting Manual). It outlines six orderly troubleshooting steps: verify the problem, narrow the problem (using the EVTM), test the cause, verify the cause, make the repair, and verify the repair. It notes that vacuum system problems fall into three groups: leaks in hoses/connectors/motor diaphragms, pinched lines or clogged valves, and faulty mechanical operation of vacuum-motor-driven parts. Three tests are detailed. The Vacuum Supply Test (Figure 1) connects a vacuum tester to the system side of the check valve; with the engine running the gage should show approximately 15 inches of vacuum, and if vacuum fails after shutoff the check valve or tank should be replaced. The Leak Test (Figure 3) uses a vacuum gage and pump in place of the tank, clamping supply hoses one at a time with needle-nose pliers until vacuum stops dropping, then tracing the circuit. The Component Test (Figure 2) uses a hand vacuum tester to verify each component holds vacuum and operates correctly. Diagrams identify the check valve, vacuum tank, distribution block, servo, vacuum motor, vacuum pump, and vacuum gage, with hose colors blue and black shown in Figure 1.
Is this accurate? Sign in to help verify it.
Frequently asked questions
- How much vacuum should the gage show during the Vacuum Supply Test?
- With the engine started, the gage should show approximately 15 inches of vacuum when the tester is connected to the system side of the check valve.
- What should I do if vacuum fails after shutting off the engine during the supply test?
- If the vacuum fails to hold after turning off the engine, replace the Check Valve or the Tank.
- What are the three groups of vacuum system problems?
- 1) Leaks in hoses, connectors, or motor diaphragms; 2) pinched lines or clogged valves; 3) faulty mechanical operation of parts driven by vacuum motors.
- How do I find a vacuum leak in the system?
- Turn on the vacuum pump and check for vacuum build-up, stop the pump (vacuum should drop due to the leak), then clamp supply hoses with needle-nose pliers one at a time until vacuum stops dropping. Check the vacuum schematic for components in that line and clamp hoses through the circuit to locate the leak.
- Is hissing normal in the vacuum system?
- Yes: hissing is normal at the Function Control when changing modes; otherwise hissing or vacuum loss indicates a system leak.






No comments yet.