Ford E4OD Transmission Solenoid Body Connector Installation - Service Procedure
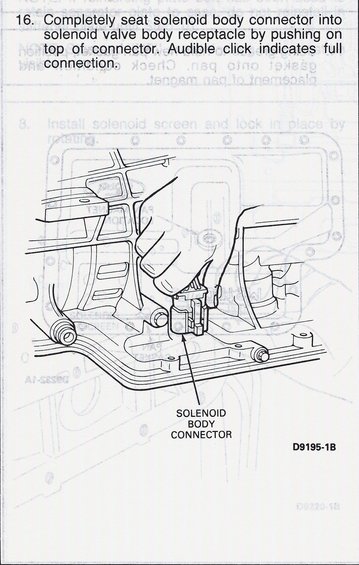
Service procedure step 16 showing how to seat the solenoid body connector into the valve body receptacle until an audible click (D9195-1B).
This document is a single page (or excerpt) from a Ford service procedure covering the E4OD automatic transmission solenoid body. It shows step 16 of a reassembly/installation procedure: the technician is instructed to completely seat the solenoid body connector into the solenoid valve body receptacle by pushing on the top of the connector, with an audible click indicating full connection. The accompanying line-art illustration (figure D9195-1B) shows a hand pressing the solenoid body connector into place inside the transmission with the oil pan removed, and the connector is identified with a labeled arrow callout reading "SOLENOID BODY CONNECTOR." Faint bleed-through text from the reverse side of the page references installing the solenoid screen, the pan gasket, and pan magnet placement, indicating this is part of a longer multi-step transmission pan/solenoid service procedure. A reader learns the correct method to reconnect the E4OD internal solenoid body connector and how to verify it is fully seated (the audible click). No years, vehicle models, torque specs, or part numbers other than the figure ID appear on this page.
Is this accurate? Sign in to help verify it.
Frequently asked questions
- How do you install the E4OD solenoid body connector?
- Completely seat the solenoid body connector into the solenoid valve body receptacle by pushing on the top of the connector.
- How do you know the solenoid body connector is fully connected?
- An audible click indicates full connection.
- What does the illustration in this document show?
- It shows a hand pushing the solenoid body connector into its receptacle inside the transmission with the pan removed; the connector is identified by an arrow labeled 'SOLENOID BODY CONNECTOR' (figure D9195-1B).
- Is this a complete procedure?
- No, this page shows only step 16 of a longer procedure; bleed-through text from the reverse side references other steps such as installing the solenoid screen and pan gasket.
Comments
More from this build










No comments yet.