Home/
Registry/
Ford/
Bronco/
1980-1986/
“Still Pending”/
Photo
supermotors.net/registry/media/825037
Carburetor service routine check and YFA 1V feedback carburetor…
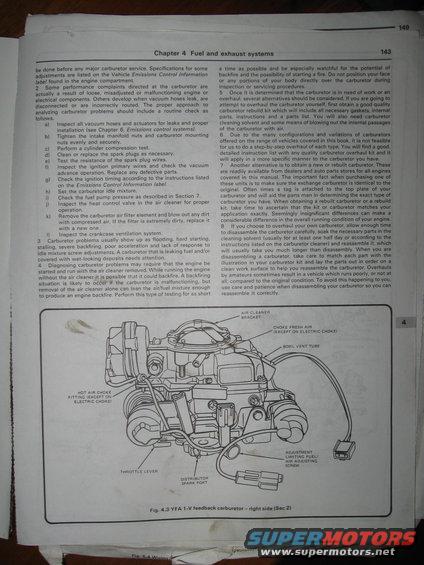
Haynes fuel-systems page outlining a pre-overhaul carburetor diagnostic routine, with a labeled right-side view of the Carter YFA 1V feedback carburetor.
Chapter 4 Fuel and exhaust systems be done before any major carburetor service. Specications for some , adjustments are listed on the Vehicle Emissions Control Information " label found in the engine compartment. 2 Some performance complaints directed at the carburetor are * actually a result of loose, misadiusted or malfunctioning engine or electrical components. Others develop when vacuum hoses leak, are disconnected or are incorrectly routed. The proper approach to analyzing carburetor problems should include a routine check as follows. 3) Inspect all vacuum hoses and actuators for leaks and proper installation (see Chapter 6, Emissions control systems). b) Tighten the intake manifold nuts and carburetor mounting nuts evenly and securely. cl Perform a cylinder compression test. d) Clean or replace the spark plugs as necessary. el Test the resistance of the spark plug wires. fl Inspect the ignition primary wires and check the vacuum advance operation. Replace any defective parts. 9) Check the ignition timing according to the instructions listed on the Emissions Control /nformari0n label, hl Set the carburetor idle mixture, il Check the fuel pump pressure as described in Section 7. j) inspect the heat control valve in the air cleaner for proper operation kl Remove the carburetor air filter element and blow out any dirt with compressed air. if the filter is extremely dirty replace it with a new one ll inspect the crankcase ventilation system. 3 Carburetor problems usually show up as flooding hard starting stalling. severe backfiring poor acceleration and lack of response to idle mixture screw adiustments A carburetor that is leaking fuel and or covered with wet looking deposits needs attention 4 Diagnosing carburetor problems may :equire that the engine be started and run with the air cleaner removed While running the engine without the air cleaner it is possible that it could backfi. e. A backfiring situation is likely to occur if the carburetor Is malfunctioning but removal of the air cleaner alone can lean the air iuel mint urI enough to produce an engine backfire. Perform this tt pe oi testiIIj for c 3 short a time as possible and be especially watchtul for the backfire and the possibility of starting a re. Do not WI or any portions of your body directly over the cum inspection or servicing procedures. 5 Once it is determined that the carburetor is in need of M or overhaul, several alternatives should be considered. If you are m attempt to overhaul the carburetor yourself, rst obtain a good carburetor rebuild kit which will include all necessary gm WI parts, instructions and a parts list. You will also aim cleaning solvent and some means of blowing out the Marimba - of the carburetor with air. 6 Due to the many configurations and variations of carbine! offered on the range of vehicles covered In this book, it is not feeelbki for us to do a step- by- step overhaul of each type. You will nd a good, detailed instruction list with any quality carburetor overhaul kit and it, will apply in a more specific manner to the carburetor you have. i E; 7 Another alternative Is to obtain a new or rebuilt carburetor. These: lv are readily available from dealers and auto pans stores for all enginesi covered in this manual The important fact when purchasing one of: these units is to make sure the exchange carburetor' Is Identical to thei original. Often times a tag is attached to the top plate of your carburetor and will aid the parts man in determining the exact type of' carburetor you have. When obtaining a rebuilt carburetor or a rebuild. kit. take time to ascertain that the kit or carburetor matches your application exactly. Seemingly insignificant differences can make a: considerable difference in the overall running condition of your engine. 8 It you choose to overhaul your own carburetor, allow enough time} to disassemble the carburetor carefully, soak the necessary parts in the cleaning solvent (usually for at least one half day or according to the instructions listed on the carburetor cleaner) and reassemble it, which will usually take you much longer than disassembly. When you are disassembling a carburetor, take care to match each part with the illustration in your carburetor kit and lay the parts out in order an a. clean work surface to help you reassemble the carburetor. Overhauls by amateurs sometimes result In a vehicle which runs poorly, or not at all compared to the original condition. To avoid this happening to you, use care and patience when disassembling your carburetor so you can reassemble it correctly. AIR CLEANER BRACKET CHOKE FRESH AIR (EXCEPT ON ELECTRIC CHOKEl BOWL VENT TUBE HOT AIP CHOKE FITTING (EXCEPT ON ELECTRIC CHOKEl THROTTLE LEVER DISTRIBUTOR SPARK PORT ADJUSTMENT LIMITING FUELI AIR ADJUSTING SCREW Fig. 4.3 YFA 1-V feedback carburetor right side (Sec 2)
Is this accurate? Sign in to help verify it.
Comments
More from this build







No comments yet.